Korman:Plasma Modifiers
| This is a tutorial page.Versions available: PyPRP; 3ds Max; Korman. |
This tutorial will go over all of the existing Plasma Modifiers found in Korman.
Contents
Introduction
Modifiers in Korman are used to make the various game logic in URU work, such as footstep regions, animations, Linking Books, node trees, and more! Each has its own various settings, with some requiring their own tutorial (associated links will be below).
Where To Find Them
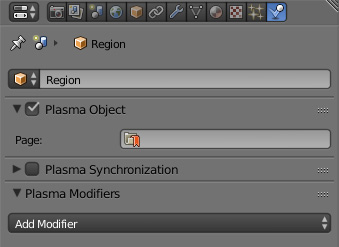
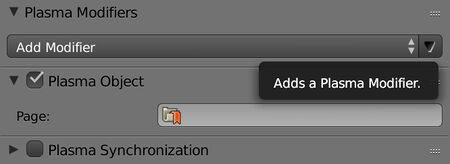
To add a Plasma Modifier, simply select the object to which you'd like to attach one and click on the Physics button in the Properties window.
From here, you can select a variety of modifiers to use many functions in URU. Each modifier has a specific function, and each will be described below.
Animation
Animation Modifier
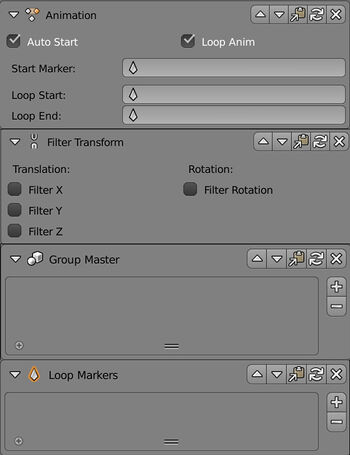
This modifier will enable any animation attached to a specific object. Note that it will not work with an object that does not have an animation f-curve.
- Auto Start: Starts the animation upon Link in.
- Loop Anim: Loops the animation indefinitely.
- Start Marker: Indicates the default starting marker of the animation.
- Loop Start: Indicates a specific marker to start within an animation.
- Loop End: Indicates a specific marker to end within an animation.
Filter Transform
To Be Added (Related to Subworlds.)
Group Master
To Be Added
Loop Markers
To Be Added
Avatar
These modifiers control some avatar behavior.
Ladder
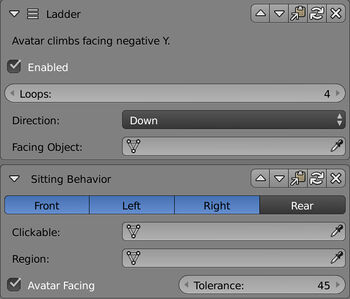
Makes a region part of a ladder. One of these is needed for both the top and bottom of a ladder.
- Enabled: Check this box if you would like the latter to be enabled by default.
- Loops: Number of full animation loops to play after the first before dismounting from the ladder.
- Direction: Determines which direction the avatar will go on the ladder. Up would be at the bottom of the ladder and Down at the top of it.
- Facing Object: Tells URU which object the avatar should be facing before the ladder will work (generally the avatar mesh object itself).
Sitting Behavior
Creates a sitting mod for the avatar.
- Facing Direction: The four buttons...Front, Left, Right, Rear...indicates which side of the clickable the avatar can approach from to sit.
- Clickable: The object that initiates the sitting mod.
- Region: The mesh object in which the avatar must be to enable the clickable.
- Avatar Facing: Enabling this requires the avatar to face the clickable at a certain angle.
- Tolerance: The angle in degrees the avatar must be turned facing the clickable.
GUI
GUI modifiers cause various interfaces (popups) to appear in URU.
Image Library
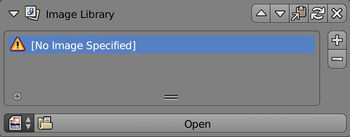
Image libraries are used to store such things as journal covers, images in journals, and Linking panels. Click the + to add a new image, then click Open and navigate to your desired image.
Note that all images in this library will export with the .hsm extension, so be sure to use that for any references to images you add here.
Journal
Adds a mod to create a journal popup. A full rundown of the mod is in the Journals tutorial.
Linking Books
Adds a mod to create a Linking Book popup to Link to other Ages. A full rundown of the mod is in the Linking Books tutorial.
Logic
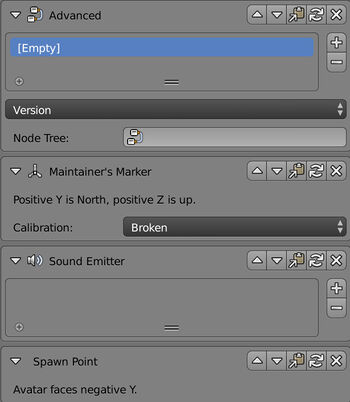
Advanced (Logic Node Trees)
This mod is used to add your various node trees into the Age itself. To do this, simply:
- Click the + symbol.
- Click the Node Tree field and select your node tree by name.
- Version: Here, in the drop down menu, select which version(s) of URU...Ages Beyond Myst, Path of the Shell/Complete Chronicles, and Myst Online...to which you'd like the node tree to export. By default, this has all three versions selected.
This process can be repeated for as many node trees as you'd like, but node trees must be added into an Advanced mod in order to be exported!
Maintainer's Marker
This mod will cause the object's origin point to register its coordinates in the KI (assuming the Great Zero has been fully calibrated).
There are three types of calibration:
- Broken: Coordinates will be scrambled.
- Repaired: Coordinates will be blank.
- Coordinated: Coordinates will be accurate in the KI if the marker missions have been completed.
Sound Emitter
Adds a sound effect into the Age. For a more detailed rundowm, click on the Sounds tutorial.
Spawn Point
Locations where the avatar can Link into the Age. The avatar will face away from the local y-axis of the object's origin. There can be multiple spawn points in an Age. The default is usually named LinkInPointDefault.
Physics
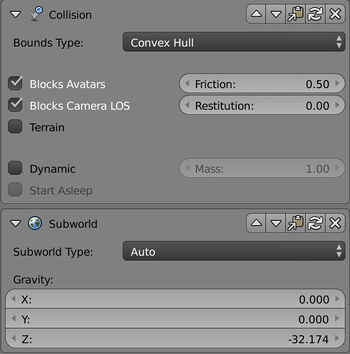
Collision
When attached, it gives the object collision, meaning the avatar, camera, or both cannot pass through it.
- Bounds Type: Choose from Bounding Box, Bounding Sphere, Convex Hull, and Triangle Mesh. In that order, they rank from most general to most accurate as far as bounds. Generally, for simple objects, Convex Hull is best, while more complex objects or single planes use Triangle Mesh.
- Blocks Avatars: Exactly what it says: keeps the avatar from passing through the object.
- Blocks Camera LOS: Keeps any camera with Maintain LOS checked from passing through the object (see the cameras tutorial).
- Terrain: Used if the object in question is where the avatar walks. Keeps the avatar from sliding along the surface.
- Friction: To Be Added.
- Restitution: To Be Added.
- Dynamic: Check this if the object is a kickable and can be moved by other objects or the avatar.
- Start Asleep: The kickable object is stationary until moved by the avatar or another object.
- Mass: The weight of the kickable object in pounds (lbs).
Subworld
This mod is used if the object, when animated, moves the avatar along with it.
To Be Added
Region
These mods turn the object into an invisible region with certain properties.
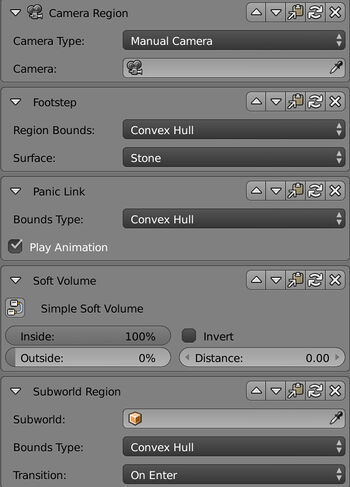
Camera
This mod causes the region to activate a camera. For more on cameras and their region options, click on the Cameras tutorial.
Footstep
When entered, the region sets or changes the footstep sound when the avatar is walking. Footstep regions can be within or overlap one another for more accurate footstep sound transitions.
- Region Bounds: Type of bounds the region will use. Generally, this is best set at Convex Hull for simpler region meshes and Triangle Mesh for the more elaborate.
- Surface: type of surface footstep sound effect for the region. Choose from Dirt, Grass, Metal, Puddle, Rope, Rug, Stone, Water, Wood Bridge, Wood Floor, and Wood Ladder.
Panic Link
The region, when entered, causes the avatar to panic Link back to Relto.
- Bounds Type: Choose the type of bounds the region will use. Generally, the default Convex Hull works the best.
- Play Animation: When checked, it will cause the avatar to reach for the Relto book. Unchecking this will simply Link the avatar out with no animation.
Soft Volume
Sets the region object as a soft volume. For a more detailed description, click on the Soft Volumes tutorial.
Subworld (Region)
Determines the area in which an avatar enters or exits a subworld.
- Subworld: selects the subworld object. See above.
- Bounds Type: selects the type of bounds the region will use. Again, Convex Hull for the simpler meshes and Triangle Mesh for the more complicated works best.
- Transition: Determines whether the avatar transitions to the subworld upon entering or exiting the region.
Render
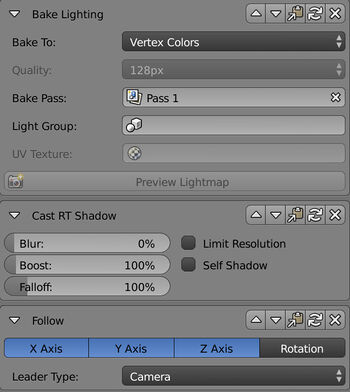
Bake Lighting
This mod will use the selected surrounding lamps and light sources and use them to create the lighting on a particular object.
- Bake To: This will select which type of lighting to use.
- Vertex Colors is less accurate and needs a more complex mesh, but it doesn't add to the texture PRP.
- Lightmap Texture uses a texture for more accurate lighting, but will add to your texture PRP and the overall file size of your Age.
- Quality (Lightmap Only): Determines the size of the image to be used for a lightmap in pixels. The bigger the image size, the more detailed the map. However, this will also add to your overall texture PRP file size.
- Bake Pass: Select which bake pass (created in the Render Layers panel in the Properties window) to use for the lighting.
- Light Group: If your various lamps are grouped, you can select that or any group here.
- UV Texture (Lightmap Only): select which UV Map you would like to use for the lightmap texture.
- Preview Lightmap (Lightmap Only): Clicking this button will cause Korman to generate a preview of the lightmap texture that will be used in the final export.
Cast RT (Real Time) Shadow
To Be Added
Follow
Mod that causes the object to follow another object or the avatar.
- The buttons, X Axis, Y Axis, Z Axis, and Rotation, determine how the object follows the other.
- Leader Type: Tells the object what it will follow. You can choose from another Object, the Player, a Listener, or a Camera.
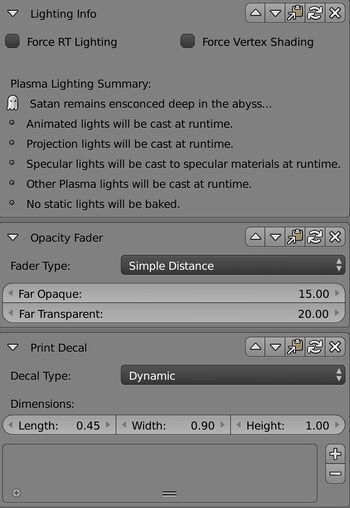
Lighting Info
This will influence how the object will be lit.
- Force RT Lighting: This will force the game engine to dynamically light the object.
- Force Vertex Shading: Ensures vertex lighting will be baked, even if illogical.
Check both of these...and Satan shall be unleashed! Beware!
Opacity Fader
Causes an object to fade in and out given its distance.
- Fader Type: chooses the type of fading behavior.
- Simple Distance: best used for Great Zero markers.
- Line of Sight: fade in and out is based on the line of sight with the avatar.
- Distance: causes object to fade by determining the distance from it.
- Far Opaque: The distance at which the object is fully visible in feet.
- Far Transparent: The distance at which the object is invisible in feet.
Print Decal
To Be Added
For a full rundown of decals, click on the Dynamic Decals tutorial.
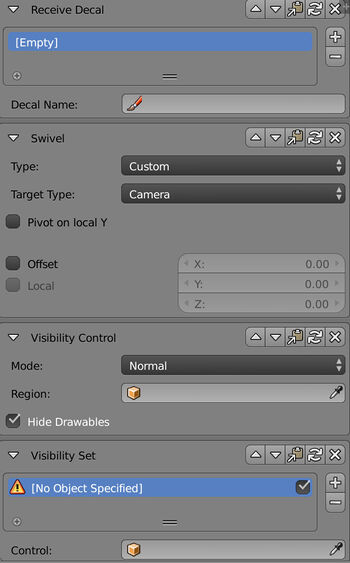
Receive Decal
When the avatar walks on the objects surface (or within it), it will cause dynamic decals to appear on its surface.
For a full rundown of decals, click on the Dynamic Decals tutorial.
Swivel
The swivel mod causes the object to rotate along with the avatar/camera.
- Type: selects the type of swivel used.
- Billboard: rotates the object with the camera along the object's local y-axis. An example would be the imagers in the Guild Pubs.
- Sprite: Probably the most common, this causes the object to rotate along all axes to always face the avatar/camera. Many lamp blooms in the game have this property.
- Custom: gives the user more swivel options.
Custom Swivel Options
To Be Added
Visibility Control
An object with this mod will set a VisRegion using existing soft volumes or the point of origin for a reflection.
- Mode: sets the type of VisRegion.
- Normal: objects attached to this control will only appear within the VisRegion.
- Exclude: objects attached to this control will not appear within this VisRegion.
- Special FX: this is generally used for reflections, especially dynamic camera maps (DCMs).
- Region: selects the Soft Volume to be used as the VisRegion.
- Hide Drawables: having this checked will hide any drawables attached to this VisRegion.
Visibility Set
An object with this mod will be attached to any Visibility Control specified.
Press the + button to add a new Control. You can add as many visibility controls as you'd like.
Below, select your visibility control of choice. Objects need a visibility control to be displayed here.
Water
There are various mods to control the settings for waveset water as seen in Eder Kemo, Gahreesen, etc, as well as a swimming mod for avatars.
Basic
For more information, see the wavesets tutorial.
Geometry Waves
For more information, see the wavesets tutorial.
Texture Waves
For more information, see the wavesets tutorial.
Shore
For more information, see the wavesets tutorial.
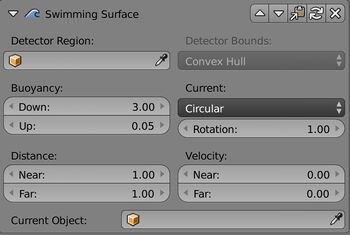
Swimming Surface
This mod will cause the avatar to swim on the surface of the object (usually a flat plane).
IMPORTANT NOTE: Due to a known bug in Plasma, any footstep regions intersecting the swimming region will break the swimming region. The swimming region itself can instead be set as a footstep region and adjusted accordingly.
- Detector Region: region mesh in which the swimming surface will be active.
- Detector Bounds: type of bounds for the detector region. The default Convex Hull is usually best for this, especially if it's a simple rectangle.
- Buoyancy: Controls the avatar's up and down when in the water.
- Down: distance in feet the avatar can sink into the water.
- Up: distance the avatar rises up after sinking.
- Current: determines if the swimming area has a current or not.
- None: No current to move the avatar.
- Straight: The current moves the avatar in one direction.
- Circular: The current moves the avatar in a circular motion.
Straight and Circular have a few options to work with:
- Rotation (Circular Only): the rate of rotation around the swimming surface's origin.
- Distance: determines the near and far velocity rates.
- Velocity: determines the current's near and far velocity relative to the swimming surface's origin.

