Korman:Journals
| This is a tutorial page.Versions available: PyPRP; 3ds Max; Korman. |
Journals are a good way to convey story, characters, and exposition to the explorers who find your Age. These journals can appear either as an aged and yellowed book, or as a newer notebook containing lined paper. The simple journal modifier available in Korman allows you to choose which of these your journal will use, as well as allowing you to automatically export correctly for the different versions of Uru with only a small amount of initial configuration.
Contents
[hide]Simple Journals
To create a simple journal, you will need the book object to which you will attach the modifier. Build and texture your journal's mesh and place it in your Age as you want it to appear to explorers.
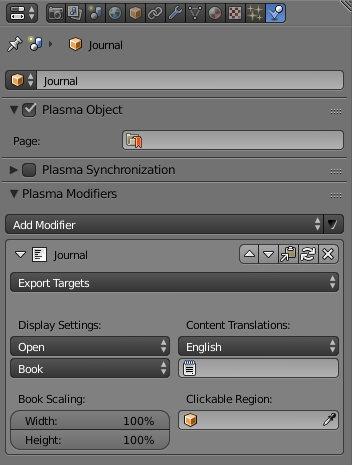
With your journal object selected, go to the Properties window and select the Physics panel.
Click on Add Modifier and select Journal, found in the GUI group. The defaults should have your journal ready for export in most cases. You will only need to select the Uru version(s) to which you intend to export, and fill in the value which specifies the journal contents (see Content Options below).
The available options will change dynamically based on which Uru version(s) you select as targets in the Export Targets dropdown. You can configure as many versions as you like, and Korman will automatically use the appropriate options when you export.
Appearance Options
These options change how the UI pop-up element of the journal is displayed to the explorer.
- Start: The start position specifies whether the book should, when clicked, start closed showing the cover, or opened and showing the first pages. If you are not providing a cover for your journal, you should use the Open option.
Applies to: Uru: Ages Beyond Myst, Myst Online: Uru Live
- Book Type: The Book Type determines the type of page that Uru will use to fill your journal. Book uses the yellowed pages, while Notebook uses the white, lined paper.
Applies to: The Path of the Shell, Myst Online: Uru Live
- Book Scaling: If you have an unusually thin or wide journal object and wish the journal UI to match it, you can scale it down in width and/or height here.
Applies to: The Path of the Shell, Myst Online: Uru Live
Content Options
Each version of Uru has a slightly different way to access journal contents. As of Korman 0.08, Korman will manage journal contents for you. To do so, you will provide a Blender text file with the journal contents. You can provide multiple translations for the journal by using the drop down.
- Language: Select the name of the language you would like to specify the journal contents for.
- Text File: Provide the text file whose contents should be used for the journal contents in the specified language.
Journal Contents
The journal's contents and some elements of its appearance are specified through a text file. To format the text of your journal (e.g. choose a new font), see the Plasma esHTML reference page. To customize the cover see the Plasma esHTML section on Journal Covers. A journal must have a cover provided through this method for it to appear closed, otherwise it will always start open regardless of the setting in Appearance Options.
NOTE: Journal modifiers created with Korman 0.07 or lower will only be partially updated. You will have to manually provide the journal contents.
[J'Kla Bit starts apollogies for any first person text excursions]
Lets assume you have created a journal you can edit the content in a the text window of Blender or edit an external file and cut and paste the content from some external word processor like Microsoft Word note however you need to set your word preferences to use the simple apostrophy and speech marks the curly one Word uses by default is not recognised in the blender text editor dispite appearing in a pasted document.
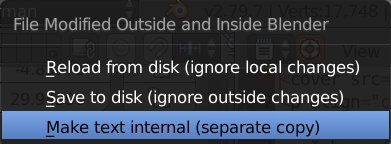
I have found the simpilest method if you are using Word is to paste your finnished text into a plain text document using something like word pad then in your Blender file open this .txt file with the text editor within blender when there are differences between the text within blender and your external .txt file you will see a life saver ring next to the toolbar selection icon.
As you can see you have 3 choices
1) Reload the external file and overwrite the onboard text.
2) Save to disk overwrite the existing external with the current internal.
3) Break the link to the external file.
I personaly keep all of my .txt files in a sub directory of my age building folder called Book Texts
What follows is a sample of one of my Enobmort text files.
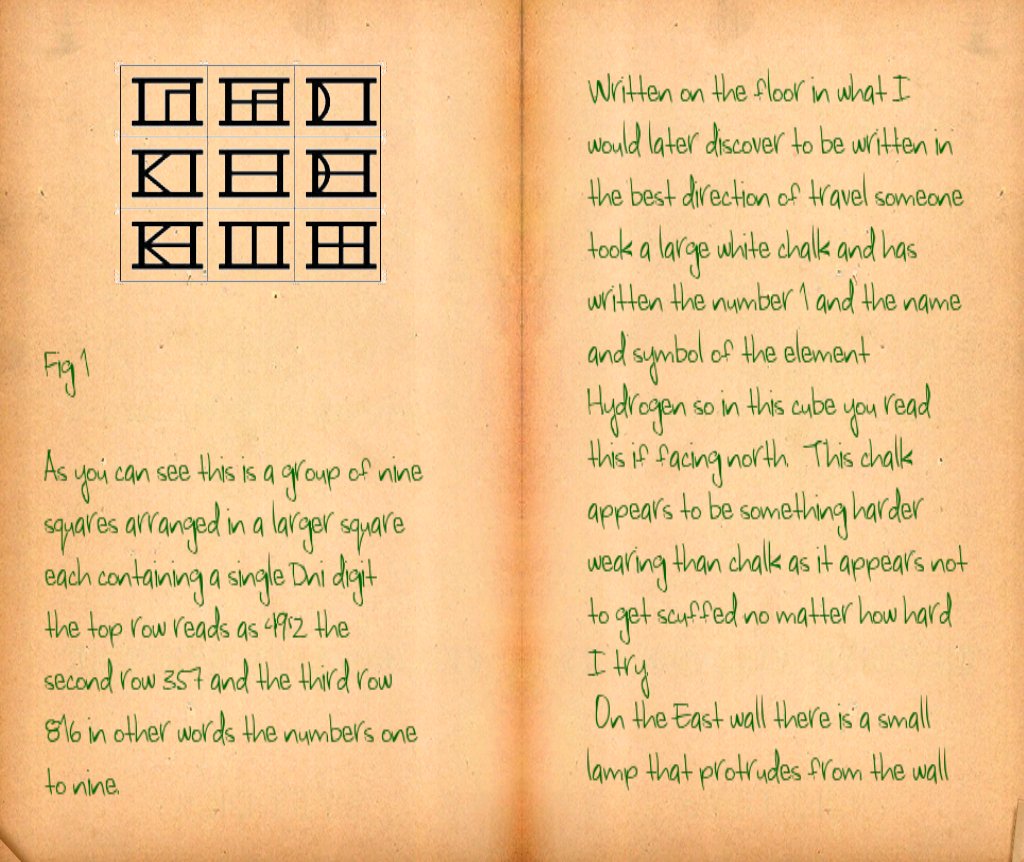
<cover src="EnobmortCover.hsm"> <p align="center"><font size=42> Enobmort a Description <font size=24 face=Sharper color=006400><margin left=62 right=62 top=48><p align="left"> I have found in Chiso Preniv a linking book to the age Silas described as Enobmort It to all appearances is a series of discrete cubes here I have done my best to describe the space as I found it. I have numbered each space sequentially I have started the numbering at 1001 as I progressed through the age. There is a space I can see but cannot get to from the link in point I have numbered this space 1000 the description of this space is in the entry for cell 1001. Cell 1001 The cell is cubic with walls of red granite on the floor is an embossed compass rose with one pointer marked with what I now know is a D’ni zero. I have discovered that this embossing always has this zero in the same direction so I have assumed this direction is zero degrees and is north. I did try bringing a compass to this age but it never appeared to coincide with the embossed markings I just have to take these markings on their assumed direction. Also on the floor are five squares of paper marked with the Chinese numbers one through five. Given that north direction to the south there is a grey granite block door I assume it is a door because it slid partially towards the west and through the gap, I can see a space that appears to be another cube. This is the space I have numbered 1000 there is enough visible light to see the walls are the same red granite and there is a compass rose embossed onto the floor. On the block door there is a large hemispherical button that may have been to open the door but at this time has no discernible function. Stuck on the east wall there is a square paper diagram here is a copy I made in figure 1 <img src="AlphaTurtle.hsm"<resize=yes align=center blend=alpha> <p align="left">Fig 1
We start with an entry that specifies the book cover that will appear when we click on the journal.
The next line uses an html p tag to align the text center (note US spelling of centre) with a font size 42 points as we have not specified a font it will use the default blender font.
the next line sets up the content for the rest of our text font size 24 point font face is Sharper the color (Note again US spelling of colour) is specified as 00 64 00 so thats green we now set up our page margins left right and top in pixels and then we have another p tag with a left alignment this can be left, right, center, Note: at this time there is no justified option.
The text continues with a description of the first cell note the text wrap is automatic. We continue until we decide to insert an image in our text this has to be pre loaded to convert it to a .hsm format now we use the p tag again to center I know the image will not display if it is over wide so you may need to pllay with the image dimensions to get it to display.
If your image to insert has an alpha chanel transparency set so for example is a .png file (Note this is the file you use as a source for your image library where it becomes a .hsm file) and you set the option blend=alpha then the image will show the background of the page where the alpha has been set as if the image had been created on the page.
NOTE the following is an expansion on the images section that follows.
Let us consider you want an image somewhere in the flow of your text. With the image editor of your choice create a 1024 x 1024 white .png in the centre this paste a 512 x 512 image resize this with a 2:1 aspect ratio so 512 wide by 256 high (yes your image appears squashed stick with this) set you transparency (alpha channel) to your white background color save the resultant .png file avoid spaces in the name it makes it easier for now.
Open your blender file and select your journal isure it has an image library modifier.
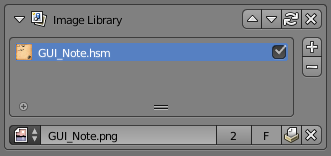
Use the plus button to add a new slot this should have the following text
[No Image Specified]
Click this and then the Open button below the box
Navigate to your new image the one you just created.
open the image
The library slot should now display xxxxx.hsm where the xxxxxx is the name before .png but now with the extension .hsm
Now go to your journal text file and on a new line in the body of your text enter the following contained in angle brackets <>
img scr="xxxxxxx.hsm" resize=yes align=center blend=alpha
Note US spellings and inside <> brackets (cant use them in this example it will screw with the wiki page) note the space in img scr
Before you continue your text on a new line again in angle brackets put the following
p align="left"
If you do not do this your text will continue centered if you miss the blend=alpha your white box will show miss resize=yes is probably ok miss align=center image will probably not show if you see a strange conjoined CE you have an error in your img scr line or you boxed the image library.
Note your image is stretched which compensates for the squashed aspect ratio of your original image Go Figure.
This should give you a start point also note the straight quote marks this had me screwed for months.
This should at least give you an image in your journal to play with.
MORE TO FOLLOW as experimentation continues.
[J'Kla bit ends]
Region Options
By default, the simple journal modifier will automatically create a six-foot cubic clickable region centered around your journal's mesh.
If a special region is required for your journal, you can override this by providing your own. Simply create a region object and select it in the provided Region field.
Images
If your journal is going to contain images, either as the cover or as interior illustrations (i.e., the Minkata journal), you can use the Image Library Modifier to attach them. This modifier ensures any images it contains are exported despite having no physical presence in your Age.
With your journal object selected, go to the Properties window and select the Physics panel. Click on Add Modifier and select Image Library, found in the GUI group. Click the + button to add a slot for the new image you wish to add to the library. Select the new slot, and from the image picker below the list, you can select either images you have already imported into Blender, or open a new file directly. Repeat adding a slot and selecting or loading an image for each new image you wish to add to the journal.
Note: The name for each image will be changed upon export; this modified name is displayed in the list's entry for each image.
When adding each image to your journal, keep in mind that on export your images will be converted to a Plasma-specific image format with the '.hsm' suffix, and that's how they will be seen in the Image Library list. For example, if you add an image named GUI_Note.png to the library, it will be exported as GUI_Note.hsm. Therefore, the source attribute of the image tag in your journal must use this finalized suffix (e.g., <img src="GUI_Note.hsm"> ) and not the original suffix, GUI_Note.png.


