Difference between revisions of "Korman:Updating From PyPRP"
m (→Text Files) |
|||
| (42 intermediate revisions by 4 users not shown) | |||
| Line 5: | Line 5: | ||
==Setting Up== | ==Setting Up== | ||
| − | Open your blend file in Blender 2. | + | Open your blend file in Blender 2.79. Everything should open fine, but to get the Age working properly, there are a few things to adjust. |
| − | === | + | ===Basic Age Settings=== |
The first order of business is to carry over the contents of your '''Book''' text file and put it into the '''World''' panel in your '''Properties''' window. | The first order of business is to carry over the contents of your '''Book''' text file and put it into the '''World''' panel in your '''Properties''' window. | ||
| Line 20: | Line 20: | ||
Alternately, you can keep your AlcScript file in for later reference, but note that Korman will never use any of it upon export. | Alternately, you can keep your AlcScript file in for later reference, but note that Korman will never use any of it upon export. | ||
| + | |||
| + | ===Age Pages (PRPs)=== | ||
| + | |||
| + | To re-add your old pages/PRPs, simply scroll to the '''Plasma Age''' panel and press the '''+''' to the right. | ||
| + | |||
| + | * '''Page Flags''': options for the loading of a particular page. | ||
| + | ** '''Auto Load''': loads the page/PRP upon Linking in. Checked by default. | ||
| + | ** '''Local Only''': the page should not synchronize with the server. | ||
| + | * '''Page Info''': Details for the page itself. | ||
| + | ** The field just below this is where you can change the name of the page/PRP. | ||
| + | ** '''ID''': the ID number of the page. By default, the pages will go in sequence as you add them. | ||
| + | ** '''Export Versions''': choose which versions of URU for which the PRP will export. All three options are checked by default. | ||
| + | |||
| + | You can add as many pages/PRPs as you like. '''If you change some ID numbers, be sure no two numbers are the same across all pages!''' | ||
| + | |||
| + | ====Assigning Objects to a Page==== | ||
| + | [[file:KorExp01.jpg|200px]] | ||
| + | |||
| + | To assign objects to a particular page/PRP, simply hold '''Shift''' and '''right-click''' on each object you would like to add. | ||
| + | |||
| + | Once you have everything selected, go to the '''Plasma Tools''' panel in the '''3D View''' window (press '''T''' in that window if you don't see it) and click '''Move to Page'''. | ||
| + | |||
| + | When the list of available pages appears, select the page to which you would like to assign the objects. | ||
| + | |||
| + | ====Reselecting Objects by Page==== | ||
| + | |||
| + | To highlight each object that's been assigned to a page, first press '''A''' a few times until nothing is selected, then click '''Select Objects''' in the '''Plasma Tools''' panel. | ||
| + | |||
| + | From there, select the page. This will then highlight all the page's objects. | ||
===Plasma Objects=== | ===Plasma Objects=== | ||
| Line 25: | Line 54: | ||
For things to export in Korman, they must have '''Plasma Object''' checked in the '''Physics''' panel. However, if you have a lot of objects, this could take awhile. | For things to export in Korman, they must have '''Plasma Object''' checked in the '''Physics''' panel. However, if you have a lot of objects, this could take awhile. | ||
| − | To simplify this, Korman has the '''Plasma Objects''' button that checks ALL objects. In the 3D window, press '''T''' to bring up the Tools panel. Make sure the '''Tools''' tab is selected, and under '''Plasma''', you can click ''' | + | To simplify this, Korman has the '''Plasma Objects''' button that checks ALL objects. In the 3D window, press '''T''' to bring up the Tools panel. Make sure the '''Tools''' tab is selected, and in the '''Plasma''' panel, under '''Plasma Objects''', you can click on '''Enable All'''. |
| − | [[file:KorExp01.jpg]] | + | If you want to enable only some items, you can select them in the 3D window and click '''Enable Selection'''. Alternately, to turn off the selected items, click '''Disable Selection'''. |
| + | |||
| + | There is also the '''Disable All''' option if you want to turn everything off. | ||
| + | |||
| + | [[file:KorExp01.jpg|200px]] | ||
| − | If you'd prefer not to have | + | If you'd prefer not to have a single item export, select it in 3D view, go to the '''Physics''' window and uncheck '''Plasma Object'''. |
[[file:KorStart03.jpg]] | [[file:KorStart03.jpg]] | ||
| Line 37: | Line 70: | ||
Due to the old way of lightmapping, a lot of your textures may be unchecked. In Korman, this will keep them from exporting. | Due to the old way of lightmapping, a lot of your textures may be unchecked. In Korman, this will keep them from exporting. | ||
| − | To fix this, in the same '''Tools''' panel as the '''Plasma Objects''' button, click the '''Textures''' button under '''Enable All'''. | + | To fix this, in the same '''Tools''' panel as the '''Plasma Objects''' button, click the '''Textures''' button under '''Enable All Textures'''. |
| − | + | <blockquote>'''NOTE:''' active textures do NOT interfere with the new method of lightmapping.</blockquote> | |
Your existing '''image stencils''' (blends don't export in Korman) and old '''lightmaps''' and their settings will carry over fine. | Your existing '''image stencils''' (blends don't export in Korman) and old '''lightmaps''' and their settings will carry over fine. | ||
| Line 50: | Line 83: | ||
[[file:KorStart05.jpg]] | [[file:KorStart05.jpg]] | ||
| + | |||
| + | ===Sounds=== | ||
| + | |||
| + | To rewire your sound emitters, see the [[Korman:Sounds|sounds tutorial]]. | ||
| + | |||
| + | ===Cameras=== | ||
| + | |||
| + | Cameras were added as of Korman 0.07. A tutorial can be found [[Korman:Cameras|here]]. | ||
| + | |||
| + | ===Subworlds=== | ||
| + | |||
| + | Subworlds have been enabled in Korman. A tutorial for this will be added soon. | ||
===Collision=== | ===Collision=== | ||
| Line 61: | Line 106: | ||
For simple objects, '''Convex Hull''' is usually the best option. For more complex objects, choose '''Triangle Mesh'''. | For simple objects, '''Convex Hull''' is usually the best option. For more complex objects, choose '''Triangle Mesh'''. | ||
| − | + | <blockquote>NOTE: Triangle Mesh should be used as sparingly as possible to help Age performance. Use Convex Hull where possible instead.</blockquote> | |
| + | |||
| + | <blockquote>NOTE 2: Flat planes cannot have Convex Hull collision or URU will crash.</blockquote> | ||
===Footstep Regions=== | ===Footstep Regions=== | ||
| − | To set up your footstep regions, you can use the footstep modifier by clicking '''Add Modifier''' and selecting '''Footstep'''. | + | To set up your footstep regions, you can use the footstep modifier by going to the '''Physics''' window, clicking '''Add Modifier''' and selecting '''Footstep'''. |
[[file:KorStep01.jpg]] | [[file:KorStep01.jpg]] | ||
| Line 80: | Line 127: | ||
You can carry over your settings from this panel for all affected textures by pressing the '''Layer Opacities''' button in the '''Tools''' panel in the '''3D View''' window. | You can carry over your settings from this panel for all affected textures by pressing the '''Layer Opacities''' button in the '''Tools''' panel in the '''3D View''' window. | ||
| + | |||
| + | [[file:KorExp01.jpg]] | ||
For easier access, Korman makes layer opacity its own separate function instead of utilizing an unused, unrelated Blender slider. | For easier access, Korman makes layer opacity its own separate function instead of utilizing an unused, unrelated Blender slider. | ||
| Line 89: | Line 138: | ||
===Animations=== | ===Animations=== | ||
| − | For detailed instructions on setting | + | For detailed instructions on setting your old animation curves in Korman, see the [[Korman:Animations#From_PyPRP_to_Korman|animations]] tutorial. |
===Clickables=== | ===Clickables=== | ||
| Line 95: | Line 144: | ||
For detailed instructions on setting various clickables in Korman, see the [[Korman:Clickables|clickables]] tutorial. | For detailed instructions on setting various clickables in Korman, see the [[Korman:Clickables|clickables]] tutorial. | ||
| − | === | + | ===Ladders=== |
| + | |||
| + | For detailed instructions on creating Ladders in Korman, see the [[Korman:Ladders|ladders]] tutorial. | ||
| + | |||
| + | ===SDL File=== | ||
| + | |||
| + | You can now export SDL state files directly from Korman. Simply switch to the '''Text Editor''' window (where your old AlcScript, Book, etc should be) and add a new file. Rename it from '''Text''' to [YourAge}.SDL, then copy and paste the contents of your old SDL file in. Korman will now automatically export the SDL along with the other Age files. You can also update the file from here as needed too. | ||
| + | |||
| + | ===Python Scripts=== | ||
| + | |||
| + | Korman can also directly export any custom Python scripts you may have. Using the same method as the SDL file, create a new '''Text''' entry in the '''Text Editor''' and rename it [MyPythonFileName].py, then copy and paste the contents of your Python file into it. | ||
| + | |||
| + | In the header (where you renamed the '''Text'''), if you middle click and hold, you can scroll it side to side. Scrolling all the way to the right will give you an '''Export''' checkbox. Check this if you'd like Korman to export the file along with the rest of the Age files. | ||
| − | + | <blockquote>Try to include only custom scripts and not any modified Cyan Python scripts in any publicly released export. This could lead to problems for shard owners and/or users of your Age</blockquote> | |
==Changes Between PyPRP and Korman== | ==Changes Between PyPRP and Korman== | ||
| − | * Objects left with no material will not lock up the export (they export as invisible). | + | * Objects left with no material and not set as regions will not lock up the export (they export as invisible). |
* '''NO MORE ALCSCRIPT!''' | * '''NO MORE ALCSCRIPT!''' | ||
* You can export for ''three'' different versions of URU, not just Path of the Shell/Complete Chronicles. This ''includes'' Myst Online: Uru Live. | * You can export for ''three'' different versions of URU, not just Path of the Shell/Complete Chronicles. This ''includes'' Myst Online: Uru Live. | ||
* You can now animate the scale of an object (ie shrink, grow, squish or stretch it). | * You can now animate the scale of an object (ie shrink, grow, squish or stretch it). | ||
* A new, more visual node-based system of wiring for responders. | * A new, more visual node-based system of wiring for responders. | ||
| − | * Shiny, K'veer-like floors ( | + | * Shiny, K'veer-like floors with more accurate reflections (MOUL only - see [[Korman:Environment_Maps|Dynamic Camera Maps]]). |
| + | * No more need to copy sounds in with the blend file or convert to WAV format. You can link to the OGG sounds in URU's SFX folder directly. | ||
[[Category:Korman]] [[Category:Korman Tutorials]] | [[Category:Korman]] [[Category:Korman Tutorials]] | ||
Latest revision as of 18:19, 13 November 2024
| This is a tutorial page. |
This tutorial will explain how to prepare your PyPRP-built Age for Korman.
Contents
- 1 Setting Up
- 2 Changes Between PyPRP and Korman
Setting Up
Open your blend file in Blender 2.79. Everything should open fine, but to get the Age working properly, there are a few things to adjust.
Basic Age Settings
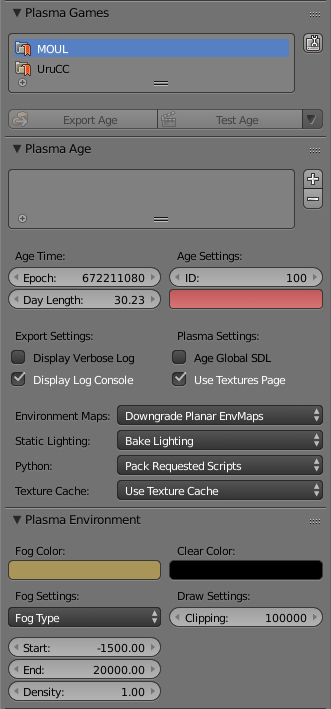
The first order of business is to carry over the contents of your Book text file and put it into the World panel in your Properties window.
Also take the fog/clear color and fog settings from your Init text file and plug them into the fog settings in the same panel.
Once that is done, you can delete the Book and Init text files.
You will want to copy and paste the text from your AlcScript file into a separate text program and save it separately. This way, you can keep it for reference later. Once that's done, you can delete the AlcScript text file from your blend file.
Alternately, you can keep your AlcScript file in for later reference, but note that Korman will never use any of it upon export.
Age Pages (PRPs)
To re-add your old pages/PRPs, simply scroll to the Plasma Age panel and press the + to the right.
- Page Flags: options for the loading of a particular page.
- Auto Load: loads the page/PRP upon Linking in. Checked by default.
- Local Only: the page should not synchronize with the server.
- Page Info: Details for the page itself.
- The field just below this is where you can change the name of the page/PRP.
- ID: the ID number of the page. By default, the pages will go in sequence as you add them.
- Export Versions: choose which versions of URU for which the PRP will export. All three options are checked by default.
You can add as many pages/PRPs as you like. If you change some ID numbers, be sure no two numbers are the same across all pages!
Assigning Objects to a Page
To assign objects to a particular page/PRP, simply hold Shift and right-click on each object you would like to add.
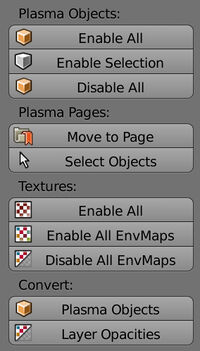
Once you have everything selected, go to the Plasma Tools panel in the 3D View window (press T in that window if you don't see it) and click Move to Page.
When the list of available pages appears, select the page to which you would like to assign the objects.
Reselecting Objects by Page
To highlight each object that's been assigned to a page, first press A a few times until nothing is selected, then click Select Objects in the Plasma Tools panel.
From there, select the page. This will then highlight all the page's objects.
Plasma Objects
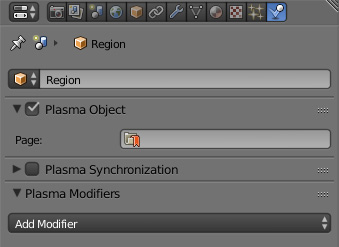
For things to export in Korman, they must have Plasma Object checked in the Physics panel. However, if you have a lot of objects, this could take awhile.
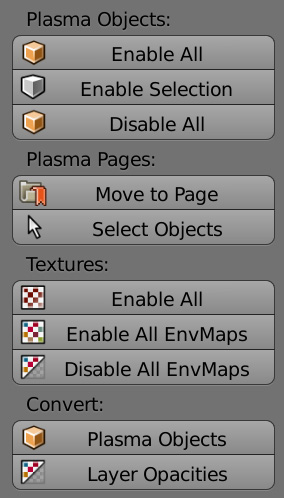
To simplify this, Korman has the Plasma Objects button that checks ALL objects. In the 3D window, press T to bring up the Tools panel. Make sure the Tools tab is selected, and in the Plasma panel, under Plasma Objects, you can click on Enable All.
If you want to enable only some items, you can select them in the 3D window and click Enable Selection. Alternately, to turn off the selected items, click Disable Selection.
There is also the Disable All option if you want to turn everything off.
If you'd prefer not to have a single item export, select it in 3D view, go to the Physics window and uncheck Plasma Object.
Textures
Due to the old way of lightmapping, a lot of your textures may be unchecked. In Korman, this will keep them from exporting.
To fix this, in the same Tools panel as the Plasma Objects button, click the Textures button under Enable All Textures.
NOTE: active textures do NOT interfere with the new method of lightmapping.
Your existing image stencils (blends don't export in Korman) and old lightmaps and their settings will carry over fine.
Spawn Points
Now that the AlcScript is gone, we need to set the Link in point(s) again. For this, select the Link in empty in the 3D window, then click the Physics button in the Properties window (see picture in the Plasma Objects section above).
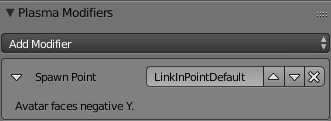
Click Add Modifier and choose Spawn Point.
Sounds
To rewire your sound emitters, see the sounds tutorial.
Cameras
Cameras were added as of Korman 0.07. A tutorial can be found here.
Subworlds
Subworlds have been enabled in Korman. A tutorial for this will be added soon.
Collision
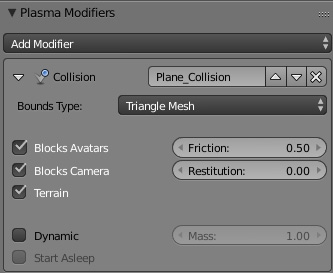
For every object you want to be solid, select it in the 3D window, and under the Physics panel, click Add Modifier and then click Collision.
For floors, check Blocks Avatars, Blocks Camera and Terrain. If you'd like the floor to be "slippery", uncheck Terrain.
For simple objects, Convex Hull is usually the best option. For more complex objects, choose Triangle Mesh.
NOTE: Triangle Mesh should be used as sparingly as possible to help Age performance. Use Convex Hull where possible instead.
NOTE 2: Flat planes cannot have Convex Hull collision or URU will crash.
Footstep Regions
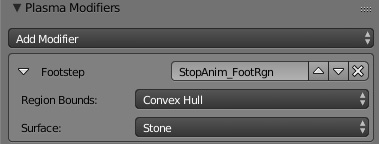
To set up your footstep regions, you can use the footstep modifier by going to the Physics window, clicking Add Modifier and selecting Footstep.
Region Bounds should be set to Convex Hull for simple objects and Triangle Mesh for more elaborate meshes.
Surface will choose what type of footstep sounds to use.
Transparency
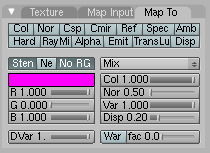
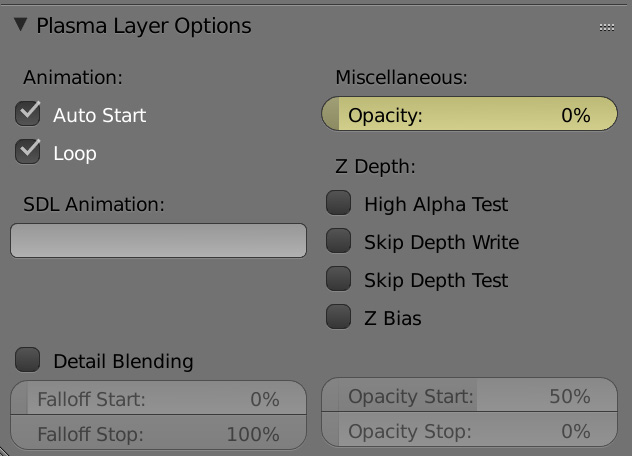
In PyPRP, for partial transparency of a full texture, the Col slider under Map To was sometimes used.
You can carry over your settings from this panel for all affected textures by pressing the Layer Opacities button in the Tools panel in the 3D View window.
For easier access, Korman makes layer opacity its own separate function instead of utilizing an unused, unrelated Blender slider.
You can find this panel by clicking the Textures button in the Properties window, then scrolling to the last panel.
Animations
For detailed instructions on setting your old animation curves in Korman, see the animations tutorial.
Clickables
For detailed instructions on setting various clickables in Korman, see the clickables tutorial.
Ladders
For detailed instructions on creating Ladders in Korman, see the ladders tutorial.
SDL File
You can now export SDL state files directly from Korman. Simply switch to the Text Editor window (where your old AlcScript, Book, etc should be) and add a new file. Rename it from Text to [YourAge}.SDL, then copy and paste the contents of your old SDL file in. Korman will now automatically export the SDL along with the other Age files. You can also update the file from here as needed too.
Python Scripts
Korman can also directly export any custom Python scripts you may have. Using the same method as the SDL file, create a new Text entry in the Text Editor and rename it [MyPythonFileName].py, then copy and paste the contents of your Python file into it.
In the header (where you renamed the Text), if you middle click and hold, you can scroll it side to side. Scrolling all the way to the right will give you an Export checkbox. Check this if you'd like Korman to export the file along with the rest of the Age files.
Try to include only custom scripts and not any modified Cyan Python scripts in any publicly released export. This could lead to problems for shard owners and/or users of your Age
Changes Between PyPRP and Korman
- Objects left with no material and not set as regions will not lock up the export (they export as invisible).
- NO MORE ALCSCRIPT!
- You can export for three different versions of URU, not just Path of the Shell/Complete Chronicles. This includes Myst Online: Uru Live.
- You can now animate the scale of an object (ie shrink, grow, squish or stretch it).
- A new, more visual node-based system of wiring for responders.
- Shiny, K'veer-like floors with more accurate reflections (MOUL only - see Dynamic Camera Maps).
- No more need to copy sounds in with the blend file or convert to WAV format. You can link to the OGG sounds in URU's SFX folder directly.

