
Giving It Substance
In this chapter, we're going to texture the rocks, and add a patch of fertile soil.
Contents
UV Mapping
If you read the Blender Noob To Pro tutorial, you probably already know about creating textures. But you may have missed what UV Mapping is.
Basically, UV mapping is precisely assigning vertices or faces to parts of your texture.
The coordinates that a vertex gets assigned on the texture are called U and V - hence the name UV mapping.
- Note:
- In Uru, UV Coordinates are set per-vertex, while in Blender they are set per-face (meaning that a vertex can have separate UV coordinates for each face that it's attached to).
- The plugin does accurately handle this (by duplicating vertices for each face that has different UV coordinates), so don't worry too much - but to avoid getting too many vertexes duplicated, it's always best to have similar uv coordinates for as much vertices as possible.
- Most automatic UV calculations already put uv coordinates
We're going to let blender automatically unwrap the island we just made, into nice UV coordinates.
You can start by making one Blender window a UV/Image Editor window.
After that, you can select your object (when you're in object-mode) and press [F] to switch to UV editing mode.
It's best to put the view from straight above by pressing the [7] key on your numpad. (That makes automatic mapping easier later on)
Don't forget to select all the faces by using the [A]-key.
It should look like this, when you're in UV Edit mode now:

As you can see, the UV/Image Editor window, shows the UV coordinates for each selected face.
Right now, all faces use the same part of the texture - you can imagine how ugly that must look....
We're going to fix that by having blender "unwrap" the texture.
Press [U]-key on your keyboard to bring up the following pop-op menu that gives us a few options:

We are going to use Unwrap, the topmost option.
As you can see in the result below, it tries to accurately map the surface to a flat sheet of texture, but at the same time it translates the relative size of the faces correctly to texture space. (Letting larger faces have a bigger part of the texture than smaller faces)
The result if this operation is below:

It looks a bit weird, I know, but it has a texture map that is balanced to the size of the faces, and that is the most important here.
UV Mapping in Blender 2.46
This is a little bit different as in Blender 2.45. In Blender 2.46 is no UV editing mode anymore. You can do it as follow: Go in the object mode and select your object. Go now with "TAB" to the edit mode and press "U" on your keyboard. You get now in the edit mode the pop-op menu with unwrapped options as in Blender 2.45 (see above).
Making the island rocky
First, we are going to give the entire island a rocky material. After all, we need a bit of solid surface to plant something on.
To do this, we are going to use the following two textures:


Base Rock
The first texture, we will apply as a basic terrain.
Make a new material to the mesh, and add a texture to it - call it Rock or something like that:

Make the color something like in the image above.
Since we are making a rock, we can get away with letting it have a bit of specularity if you wish.
To do that, set the specularity slider and hardness slider.
Now, we are going to add the texture.
Go to the textures panel, and load in the rocky texture from above. Make it look like below:

By having the MIPMAP button pressed, PyPRP is told to make MipMaps of the image (a set of continually smaller images used to render at greater distances.)
The INTERPOL button tells PyPRP to compress the texture.
Now, it's probably a bad idea to have this entire texture encompass the entire island. So, we're going to scale it up a little...
In the Material Tab, select the Rock texture, and then select the Map Input panel:

Set the map input button to UV, telling PyPRP to use the UV map.
For scaling it up, we're going to use the SizeX and SizeY fields.
As in the example picture, set them both to 6.0. This will make the texture image 6 times smaller in rendering. That way it's a bit smaller and more realistic.
Rocky Detail
We now have a bit of a problem:
If we make the texture any smaller - it will get too repetitive, not showing us large outlines of the rocks, as we are used to in real life. But on the other hand, at the moment, it does not give enough detail to convey a realistic result.
To solve this, we will use the second texture I provided - Rock_detail.png This image has a lot of transparency (alpha), except on the areas that are close to the edges. It will be used to give the a more detailed rocky effect to the terrain.
- Note:
- This image was made in GIMP from the first rocky texture by adding an layer mask for transparency, and using the result of an 'edge detect' for the mask.
Add it to the material like you did before (call it RockDetail), but this time, make the SizeX and SizeY quite a bit larger, as this texture must be a lot smaller. Around 32.0 for both should be ok.

Now, we have another trick:
It would be nice if the influence of this map would fade a bit with distance. To accomplish this, we are going to influence the creation of the mipmaps, so that each new mipmap level gets a little more transparency than the previous one.
Go to the Texture tab, and make your settings look like this:

The USEALPHA button will ensure that your texture gets compressed in a format that preserves transparency. (Even though pyprp should detect that automatically)
Our fading trick however, is accomplished by the filter field.
On every new mipmap level that is created, the transparency (alpha) of the texture is multiplied with this number.
So, by setting it lower than 1.0, each mimpap level gets a little more transparent than the last one.
The influence of the texture will thus fade with distance.
Set the filter field to a value of about 0.9, that will be just right for our purposes.
If you did all this, the terrain will have a nice rocky texture that has both detail, and is not too repetitive.
Adding a bit of soil
Now, we should have a little vegetation on our island. However, it is a well known fact that plants don't grow that well on rock alone.
We will need to add a patch of fertile soil for us to have that grass upon.
We will use this texture for the soil:

New Material
For the soil, we will be making a new material on the same mesh.
Go to the Edit Panel, look for the Material section and press New.
You should now have a new material on the mesh.

In the Material Panel for this mesh, you can now switch between the materials and (re)name them.
 You should use the copy/paste tool in the Texture tab of the Material Panel to copy the materials from the first material onto this one. Also make the new material identical to the first one in every way possible.

Above: The texture copy/paste buttons
Stenciling
What is it
With stenciling, we're going to blend another layer nicely onto another layer. This way, we can make the new soil blend in nicely with the existing rock texture.
Stenciling requires two layers:
One stencil layer, that has a greyscale mode of operation. Black means that the next texture will be fully transparent there, while white means fully opaque at that point. Anything in between is well, partial transparency.
And directly following it, a normal layer that shows the texture you want to 'stencil' on to the other layers.
Stencil layers can use another UV Layer than the layer it affects, making it a very powerful tool.
Create the layers
We will start by adding the two layers:
- For the first one, just add a new one, and name it Dirt/Stencil
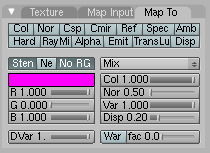
- Now, go to the Map-To panel, and press both the Stencil button and the NoRGB button.
-
- For the next one, use the copy/paste tools to copy the RockDetail texture, and name it Dirt

Next, we're going to add the textures to it.
For the stencil layer we will use a Blend texture - in sphere mode. It's use will become appearent later.

For the Dirt layer, apply the Sand_3.pngtexture I provided above.
Applying the new Material
Now, it is time to select on which part of the mesh we want to place the material.
Go to edit mode, and select the faces (in face-select mode) that you want to have the dirt material.
The valley in the middle seems like a good choice. Don't be afraid to take a bit of the higher edges with it, as we'll need that for proper blending.

Now, go to the Mesh Panel, select the 2nd material, and press Assign.
Now, the selected faces are assigned to the second material.
Keep these faces selected!
UV Mapping the Stencil layer
As I said earlier, the stencil layer can use another UV map.
We're going to use that feature to make the blend really nice.
To add a new UV Layer, go to the Mesh Panel, and locate the button that makes a new UV Layer.
Press it, and rename the newly created layer to Stencil
Press the two buttons left to it to make it the active layer (meaning that we can edit it).

Now, go to UV mapping mode by pressing [F] while in object mode.
You'll see that the faces of this material are still selected.
You can use the following image in the UV/Image Editor to help in the mapping:

Press [U] on the keyboard and select Unwrap
Now, rotate and scale the mapping in the UV/Image Editor to make the mapping match where you want the texture to shine through.
 Don't be afraid to go outside the box - if you use Blend Textures, it will be fully transparent outside of the edges.
Applying the new UV Map to the stencil layer
To tell the stencil layer to use our new UV layer, we'll need to go back to the Material Panel, select the Stencil layer, and go to the Map-Input panel.
There, select the UV option, and enter the name of the UV layer in the text field:

There, we're done now. If you want you can tweak the UV layer a bit until you think you are fully satisfied.
If you were to export and link now, it would look a bit like this:

Continue
After we have soil, we are ready to start Planting Some Grass