Korman:Ladders
| This is a tutorial page.Versions available: PyPRP; 3ds Max; Korman. |
![]() This page is a stub. You can help us by expanding it.
This page is a stub. You can help us by expanding it.
Ladders are great for getting around in Uru. They're a compact, albeit slow, method of getting an avatar up or down a vertical space. Understanding how they work is useful for building them correctly.
The most important thing to know about ladders in Uru is that there is a single ladder-climbing animation. All ladders therefore have exactly the same pitch, and are always in heights which are an even multiple number of hand-over-hand loops. Whether you are climbing a metal ladder in Negilahn, stones jutting from a wall in the Restoration Guild, a rope ladder in Teledahn, or a collapsed rope bridge in the Cleft, they are all the same ladder, and the Avatar's hands land in exactly the same place on each. The key points in the ladder are the surfaces the avatar mounts and dismounts from, and the top edge of alternating left and right "rungs".
Korman provides multiple tools to simplify the process of creating ladders.
Ladder Template
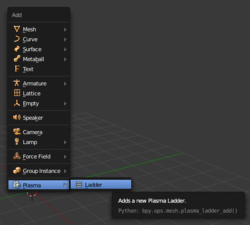
The simplest way to create a ladder or ladder-type object for your Age is using the built-in ladder guide. Place your 3D cursor near the bottom of the place where you wish to create a ladder, then while in object mode, select the Add menu (Shift-A), choose Plasma->Ladder. A ladder guide will be created with default settings at that location.
Be sure to set the options before you modify the guide in 3D view; as with all Blender "Add" tools, this commits your current options and you will not be able to modify the creation options once you've accepted it.
The provided options are as follows:
- Name: The name that will be used as a prefix for the items in the ladder template's group.
- Height: The number of rungs the ladder will have. These will always be in multiples of two, because each "loop" of the climbing animation contains one rung for each hand. The minimum is six because that is the minimum height of a ladder that the avatar can mount and then dismount. You'll want to set this to a height that comes closest to joining your two endpoints.
- Width: The width of the ladder. This is mostly cosmetic, but the minimum width is the minimum spacing needed for both hands to find purchase.
- Rung Height: The height/thickness of each rung. Mostly cosmetic, as only the top edge must be aligned to the animation and the bottom edge cannot overlap the next rung below.
- Template Guides: Ladder, Ground, and Rungs allows you to enable or disable the creation of portions of the ladder guide you don't want or need.
- Full-width/Half-width rungs: If you want to use an irregular "ladder" such as the stones jutting from the wall in the Restoration Guild, or the broken slats of the rope bridge in the Cleft, this option allows you to display which rung will be used by which hand. As long as the portion shown by the guide is aligned with your mesh, the animation will look correct. The rest of each "rung" can be broken/irregular/non-uniform.
- Upper/Lower Entry: These options allow you to create one-way ladders, by either removing the region for the upper or bottom portion, or leaving it disabled by default (useful for a ladder which isn't initially active/accessible).
Once you have the options set to your satisfaction, move the ladder to align with existing geometry if necessary.
Always move the ladder guide as a group! It is selected when created, but if you need to re-select it, select any part and then Select Group->Grouped (Shift-G). If you separate the guide, the regions may no longer work as expected.
To complete your ladder, either line up existing meshes you've created for the rungs and ladder with their respective parts on the guide, or used the rungs, back, and floor to become the meshes themselves (just be sure not to move them independently). The guide parts have been set to display as Wireframe for the Maximum Draw type in the Object-Display panel, so if you choose to use them as meshes it may be desirable to set them back to the default Textured option.
Ladder Modifier
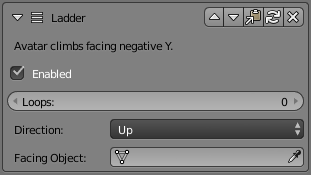
The ladder modifier gives you complete control over your climbing, which is especially useful if you want to accomplish something unusual in your Age. If you created a ladder using the provided template guide, the bottom and or top entry regions will already have a ladder modifier applied with the options pre-set to conform to what you selected when creating the ladder. You can modify the options given, but be aware that doing so may cause it to no longer work as expected.
You can also apply the Ladder Modifier to a manually-created region. The options are simple:
- Enabled: Specifies whether this ladder region is enabled at Age start. Some Ages will benefit from a ladder which is disabled until some puzzle is solved.
- Loops: The number of additional loops the climbing animation will play after the initial mount and before starting the dismount portion of the animation.
- Direction: Specifies whether the avatar should mount upward or turn and mount downward, continuing to climb in that direction for the number of loops given before dismounting.
- Facing Object: By default, the avatar will mount the ladder facing directly into the -Y axis of the ladder's entry region. If you have a circumstance where the Avatar should activate climbing from a different direction (such as a ladder which can only be approached from the side, which would normally not activate the climb), you can specify a facing object separate from the region.


