Korman:Cameras
| This is a tutorial page.Versions available: PyPRP; 3ds Max; Korman. |
This tutorial will teach you how to wire cameras using the Korman plugin.
Contents
[hide]Introduction
As of version 0.07, Korman supports the export of cameras. These are especially handy if you want to have a more cinematic angle as you walk through a particular area of an Age or to just keep the default camera a bit closer behind the avatar.
This tutorial will go through all the options and types of cameras in order to better control it in-game.
What you'll need
- A camera region that activates the camera
- The camera object itself, in some cases pointed towards the scene you desire. This is optional if you're using an Auto Follow camera region (see below).
Camera Region
While this can technically be any shape you'd like, a cube mesh resized to the area you'd like to encompass works the best.
For best results, when finished resizing and shaping your region, reapply the scale by pressing Ctrl+A and selecting Scale.
Camera Modifier
In order to tell the camera to turn on, we need to set the region with the camera modifier.
In the Properties window, head over to the Physics panel, click on Add Modifier and then click Camera.
The drop down menu will give you two choices:
- Manual Camera: The default option. Use this if you're activating a camera object.
- Auto Follow Camera: For use when you'd like to adjust the camera that follows behind the avatar. See below for settings.
Camera
Depending on what you'd like the camera to do, once you add the camera object itself, you may have to move and rotate it to frame the scene you'd like in an age. If you set the camera to fix itself on the avatar or object, then you only need to worry about placement.
To see how things will look through the camera, select the camera, then either press Ctrl+Numpad0 or in the 3D View, press View->Cameras->Set Active Object as Camera
NOTE to PyPRP users: There is no need to turn the camera around 180 degrees after placement anymore. Korman compensates automatically, so face the camera exactly as you'd like it to appear in-game.
Once your camera is set the way you like, you can then click on the Data panel button (looks like an old style movie camera). This panel will give you several options to adjust.
Default Options
These are settings that can be modified for any camera.
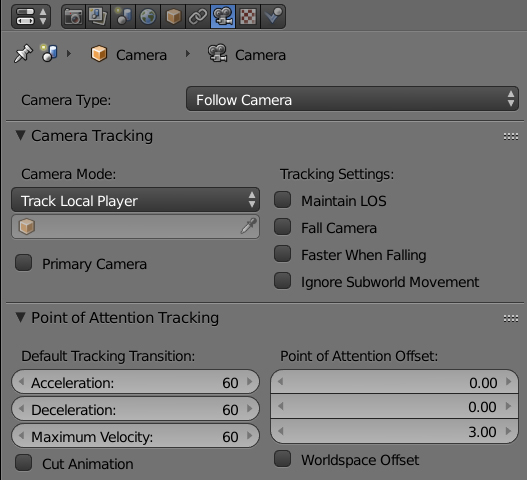
Camera Tracking
- Camera Mode: Options are Track Local Player (follows the avatar), Track Object, or Don't track (camera stays stationary).
- Primary Camera: Click this if this will be your Age's default camera.
Tracking Settings
Check any of these that you'd like to apply to your camera:
- Maintain LOS: LOS = line of sight. Tells the camera it should track the object no matter what.
- Fall Camera: The camera will align vertically with the avatar when they fall. Example: Bahro caves.
- Faster When Falling: The camera's velocity will have a floor when the avatar is falling. Example: The Great Shaft?
- Ignore Subworld Movement: Use this if you don't want the camera tied to any subworld activity.
Point of Attention Tracking
- Default Tracking Transition: The options here...Acceleration, Deceleration, and Maximum Velocity...tell the camera how fast or slow to slide into place (assuming the transition isn't set to cut).
- Point of Attention Offset: This is the settings that can offset the camera from a tracked object's origin. For instance, if used to follow an avatar, if you entered the settings of 0, 0, 6, top to bottom, the camera focuses on the head, while 0, 0, 0 would focus on its feet. Use the settings that look best when the camera follows what it's tracking.
The first field offsets the camera to one side or the other. The second field offsets it towards or away from the object, while the third field offsets the camera up and down.
Cut Animation and Worldspace Offset are not used(???)
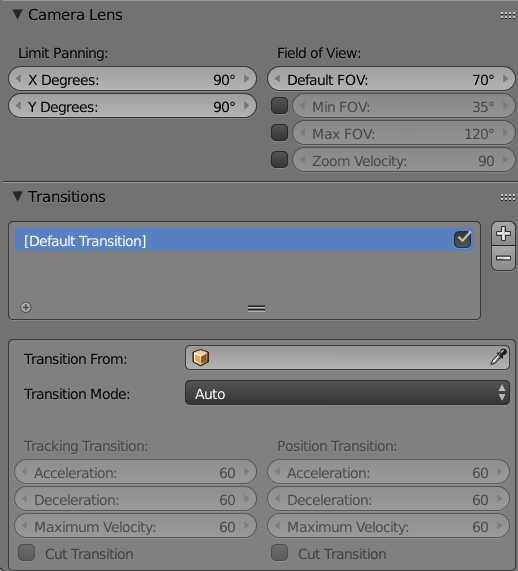
Camera Lens
- Limit Panning: This controls how far a user can move the camera side to side and up and down while right clicking the mouse. Set both of these to 0 if you don't want the camera to move at all.
- Field of View: Adjusts how much the camera shows vertically. Using these values, you can limit how much the user can zoom in and out using the mouse wheel.
Transitions
This panel is used to further set up a camera's transitional behavior. By default, this panel is empty.
Start by pressing the + to add a Default Transition. New options will appear.
- Transition From: Use this option to choose another camera from which to use this particular transition. Leave it empty if you'd like the transition to apply to all other cameras.
- Transition Mode: You can use Auto to let the two cameras' properties decide how to transition, you can use Manual to tweak the transitions yourself, or use Ignore Camera to omit that particular camera from this transition.
- Tracking Transition (Manual Only): Adjust the rate of speed the camera slides into place when entering the region.
- Position Transition: For animated cameras, how quickly the camera itself slides into place (???)
- The Cut Transition boxes should be checked if you'd prefer the camera cut directly to the default position with no "sliding into place" at all.
Camera-Specific Options
Some cameras will have extra options appear in the panel after you select them.
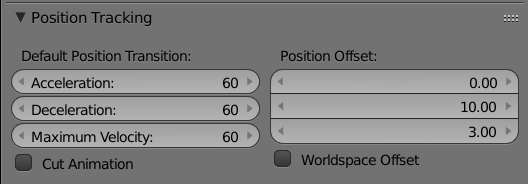
Position Tracking
- Default Position Transition: (Fixed and Follow Cameras) Determines how fast the camera itself slides into position.
- Position Offset: (Follow Camera only): Position of the camera relative to the avatar as it follows. The first value moves the camera to the avatar's right or left. The second value moves the camera in front of or behind the avatar. The third value moves the camera up and down.
- Some examples: Values of 0, 10, 6, top to bottom, will place the camera closely behind the avatar. Values of 0, -2, 6 will place the camera directly in front of the avatar's face (not IN it), giving a first person perspective.
Circle Camera Settings
The next panel will only appear if you create a Circle camera.
- Center: The object to which the camera will focus on and distance itself from its center/origin.
- Position on Circle: Here, you can choose if you'd like the camera to be on the Closest or Farthest point on the circle from the object of attention.
- Velocity: How fast the camera circles around in degrees (per second).
- Radius: How far out from the center the camera should be situated in blender units (1 unit = 1 foot in URU)
Animated Camera Settings
This panel will only be usable if your camera's location and/or rotation have been animated or if it's on a rail.
- Animation
- Start On Push: Starts the animation as soon as the camera has been activated.
- Pause On Pop: Stops the camera at that point in the animation. Resumed at that point when the avvie re-activates the camera.
- Reset On Pop: Puts the camera back to the beginning of the animation after exiting.
- Rail: Choose which point on the rail, Closest or Farthest, the camera should be in relation to the object of attention.
Don't forget to also attach an animation modifier to the camera!


