Difference between revisions of "Korman:Environment Maps"
m (→Important Things To Remember) |
m (→Setting Up the Texture) |
||
| Line 80: | Line 80: | ||
Next, choose your Empty as the '''Viewpoint Object''' for dynamic camera maps. For regular environment maps, you can choose the reflective object itself. | Next, choose your Empty as the '''Viewpoint Object''' for dynamic camera maps. For regular environment maps, you can choose the reflective object itself. | ||
| + | |||
| + | Also, you'll want to set your '''Clipping: End''' setting to a very high number. | ||
<blockquote>NOTE: The '''Clipping''' start and end values determine how far into the distance the environment map will render. | <blockquote>NOTE: The '''Clipping''' start and end values determine how far into the distance the environment map will render. | ||
Revision as of 14:34, 31 July 2022
| This is a tutorial page.Versions available: PyPRP; 3ds Max; Korman. |
This tutorial will explain how to set up reflective surfaces exported by Korman.
Contents
[hide]Introduction
Reflective surfaces in URU are achieved with environment maps, a special type of layer that uses the surroundings to create a reflection.
In URU, there are three types:
- Dynamic Environment Map - Can be used for (imperfect) reflections in all versions of URU.
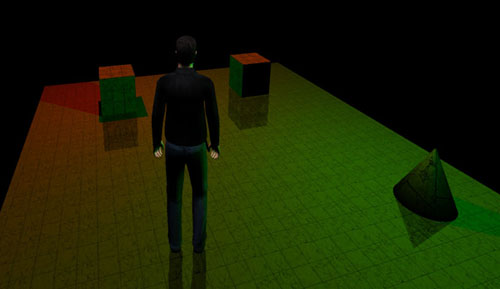
- Dynamic Camera Map - (Pictured above) This version can only be used in Myst Online. It is much more accurate than a regular environment map and, surprisingly, less resource-heavy.
- Example: K'veer floor in Myst Online: URU Live
- Camera Environment Map - Uses an image to simulate a reflection. Implemented as of version 0.08.
- Example: Bevin fountain water
What You'll Need
- An object on which you'd like a reflecting surface
- A texture specifically for the environment map
- A blender Empty
Setting Up
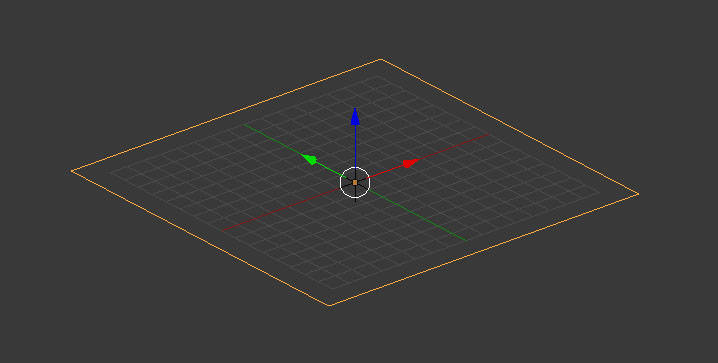
For this example, we'll use a flat plane that has been UV mapped.
For the environment map to work, we need a separate Empty object.
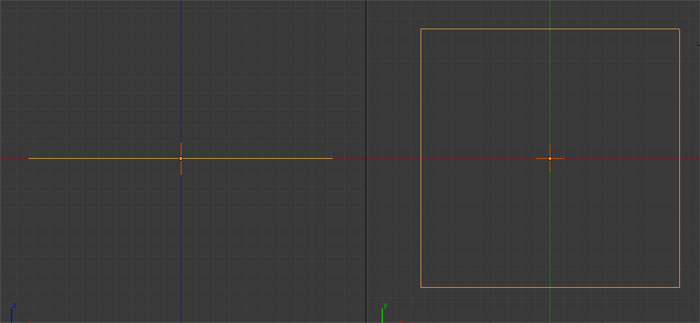
You'll want to position it at or near the center of the reflecting surface, and for height, you'll want it just level with your surface.
This is because the Empty will tell the game engine exactly where to "mirror" the associated objects relative to your material's surface, so if it's not level, the reflection won't look right, particularly for objects on or right next to the reflective surface.
Here's our example plane with a properly placed Empty, viewed from the side and from the top:
In the example above, the plane is orange while the empty is a darker orange.
The Empty Object
Select the Empty and name it something unique that you'll remember. Next, switch over to the Properties window and choose the Physics button.
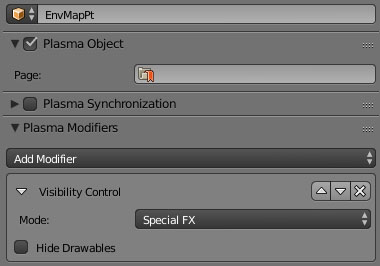
At this window, click Add Modifier, then choose Visibility Control.
In the Mode drop-down menu, choose Special FX, then make sure Hide Drawables is unchecked.
Make sure the Plasma Object box is ticked or your reflection may not appear in the correct position.
Your Empty is now properly set up for the environment map.
The Reflective Object
Next, we go to our plane. Let's add a material, then a regular texture for a bit of surface detail.
An environment map can be overlain onto a texture or have a texture overlain onto it or both. For the former, you would use the Opacity slider at the end of the Textures window on the Environment Map layer to see the regular texture underneath after export. For the latter, the texture overlain on to the environment map would need an alpha channel.
Example: Brick texture -> environment map with less than 100 percent opacity -> stone cracks decal with alpha.
If it's required, an environment map's opacity can also be animated.
Setting Up the Texture
Once you have the material set and the textures in order, it's time to set up the environment map texture.
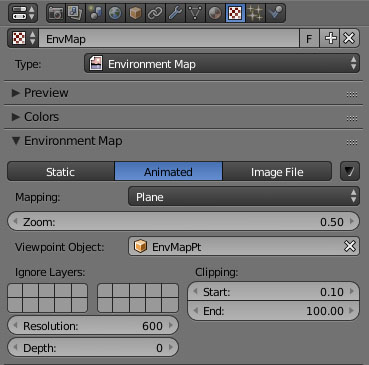
For Type, switch to Environment Map. A panel like the one above will appear.
Most of the settings can be left alone, but there are a few to change.
- If you want a regular environment map (less accurate), under Mapping, choose Cube. Static will tell the game to only update it once upon Linking in while Animated will keep refreshing the image (which slows the game down).
- If you want a dynamic camera map (more accurate reflections), choose Animated and under Mapping, choose Plane. If you choose Static for a dynamic camera map, the reflection will still be fairly accurate, but the avatar and moving/animated objects won't be properly reflected. Again, this is ONLY available in MOUL-based shards!
Next, choose your Empty as the Viewpoint Object for dynamic camera maps. For regular environment maps, you can choose the reflective object itself.
Also, you'll want to set your Clipping: End setting to a very high number.
NOTE: The Clipping start and end values determine how far into the distance the environment map will render. If your Age is wide open, you'll want to increase the End value.
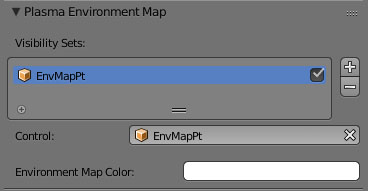
After that's done, scroll to near the end of the Textures window to the Plasma Environment Map panel.
In this window, press the + sign to add a new Visibility Set. Next, click in the Control box and choose the name of your Empty object.
NOTE: it is best to use only one visibility set here for dynamic camera maps. Regular environment maps can have multiple controllers.
The Environment Map Color is the solid color the environment map will reflect if there is only void to reflect (ie no objects) or if things go beyond the Clipping end value mentioned above. If you have a darker Age, black is usually the best color for this, while white is good for brighter Ages. You can change this color to whatever looks best for the situation.
Reflecting Objects
If we were to export now, the environment map would still only be the one solid Environment Map Color. To reflect things, we need to attach a Visibility Set modifier to each object we want in the reflection.
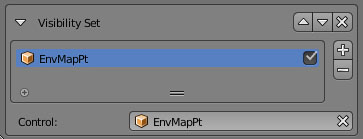
Select any object you would like to reflect. Switch to the Physics panel of the Properties window and click Add Modifier. Choose Visibility Set.
Much like the texture from earlier, we want to press + to add a new Control. Click in the Control box and choose the Empty object with our Visibility Control.
You can add as many Controllers as you like so that the object can be reflected on multiple surfaces.
This will cause the object to reflect on the surface, mirrored at the position of the Empty object. You can do this for as many objects as you like.
Objects that can be reflected
These objects have been tested and confirmed to work:
- Static objects
- Animated objects and/or animated textures
- Sprites (such as lamp bloom)
- Lamps that affect the avatar
- Imagers
Vertical Reflection
The same concept can be applied to vertical surfaces as well for a mirror-like effect.
The setup is all the same, except the empty object's local Z axis must be pointing horizontally instead of vertically, out and away from the reflective surface.
Cubic Environment Maps
To Be Added
Important Things To Remember
A few key things to remember about multiple environment maps:
- The environment map texture, in all cases except Cubic Environment Maps, must be single user. If it's not, it will have a number like the one shown below when you select it from the list in the Textures panel:
Click that number to make it single user. If there is no number, it's already single user and good to go.
- Conversely, Cubic Environment Map textures can be shared between multiple materials as it's just a series of static images.
- For camera maps, each texture must have its own Empty object with its own Visibility Control.
- Each object to reflect on any map (again, except Cubic Environment Maps) must have the Empty object of each surface to which it will reflect referenced in its Visibility Set modifier. Remember, it's OK to have multiple Controllers in that modifier.
Troubleshooting
NOTE: Most of these are for dynamic camera maps, which can be the most tricky.
- Something is blocking my environment map when I look at it from a certain angle.
- Note that you can't have any reflected objects below the Empty if it's very close to or under your environment map surface. If you do, it will reflect in an odd way, possibly blocking your environment map at certain angles.
- My reflected objects are not at the right height.
- Again, make sure the Empty is situated level with the reflective surface.
- I see the reflection, but it's tiled and all over the place.
- Remember that each dynamic camera map needs its own texture and Empty object with a Visibility Control. Regular environment maps only need their own texture.

