Difference between revisions of "PyPRP:First Age"
| Line 1: | Line 1: | ||
| − | So you are interested in age creating huh? But you are | + | So you are interested in age creating huh? But you are reluctant, because everything seems so overwhelming. After all, everybody else in here is already an expert in Blender, programming, you name it. All you know about Blender is that thing that makes a lot of noise in the kitchen, and programming? That is for geeks! How can you possibly catch up with the rest? You better forget about it... you will never get the hang of age creation. |
| − | Hold it right there, buddy! | + | Hold it right there, buddy! If that sounds like you, you have come to the right place! Creating an age, admittedly, has a learning curve, but if I can do it, so can you! All we need is a little instruction... once you understand the basics, you can create ages too. This tutorial does not teach Blender or programming, but just shows you how to get your creation in Uru. Once that is out of the way, then you can fully concentrate on age creation! |
| Line 155: | Line 155: | ||
| − | Two new choices appear next to where you just clicked. Don't worry with "Compound" at all, but click on the word "Box". From the choice menu that pops up, select Static Triangle | + | Two new choices appear next to where you just clicked. Don't worry with "Compound" at all, but click on the word "Box". From the choice menu that pops up, select Static Triangle Mesh. See screenshot 16. |
| Line 171: | Line 171: | ||
| − | But... but... I see no changes! That's right, you won't. PyPRP objects are added to another layer, to be exact, layer 2. Of course you want to admire your spawnpoint, right? After all, you may want to change the location your avie links in when entering the age for the first time. Look at those 20 tiny little white squares. You thought they were teeth, did you? No, in fact, they are layers. This will prove useful later, when you start adding a sky for example. You can stow it away to another layer, and not have it in the way all the time. But that is for later... now, we want to see our spawn point in layer two. Sure, go ahead, click on the second square! See screenshot 18. Ah, there it is! I don't have to explain how to go back to layer one, do | + | But... but... I see no changes! That's right, you won't. PyPRP objects are added to another layer, to be exact, layer 2. Of course you want to admire your spawnpoint, right? After all, you may want to change the location your avie links in when entering the age for the first time. Look at those 20 tiny little white squares. You thought they were teeth, did you? No, in fact, they are layers. This will prove useful later, when you start adding a sky for example. You can stow it away to another layer, and not have it in the way all the time. But that is for later... now, we want to see our spawn point in layer two. Sure, go ahead, click on the second square! See screenshot 18. Ah, there it is! I don't have to explain how to go back to layer one, do I? Just click the first square, that's all. |
| Line 179: | Line 179: | ||
| − | + | I know you are chomping at the bit to fill your brand new age with objects, but first, let us see if we can manage to export our plain plane to Uru. Once we know it works, THEN we can start to add objects. | |
| + | |||
In the top menu, click File - Export - PyPRP. See screenshot 19. | In the top menu, click File - Export - PyPRP. See screenshot 19. | ||
Revision as of 22:34, 16 May 2008
So you are interested in age creating huh? But you are reluctant, because everything seems so overwhelming. After all, everybody else in here is already an expert in Blender, programming, you name it. All you know about Blender is that thing that makes a lot of noise in the kitchen, and programming? That is for geeks! How can you possibly catch up with the rest? You better forget about it... you will never get the hang of age creation.
Hold it right there, buddy! If that sounds like you, you have come to the right place! Creating an age, admittedly, has a learning curve, but if I can do it, so can you! All we need is a little instruction... once you understand the basics, you can create ages too. This tutorial does not teach Blender or programming, but just shows you how to get your creation in Uru. Once that is out of the way, then you can fully concentrate on age creation!
Fist, let's assume a few things.
1. You have installed Uru – Complete Chronicles
2. You have installed the UruLibraryManager (ULM) (see http://ulm.hbyte.net, scroll to the bottom)
3. You have installed Blender 2.45 (see http://www.blender.org/download/get-blender)
4. You have installed Python 5.1, PyPRP and the required plugins (see http://guildofwriters.com/wiki/Installing_PyPRP)
5. You are comfortable with (at least) lessons 1 to 5 of Jennifer's tutorial (see http://guildofwriters.com/wiki/BlenderBeginnersClassroomIndex)
Don't worry if step 4 or 5 seems impossible at first, it can be done! If you are really stuck, be sure to ask help in the GoW forum (http://guildofwriters.com/phpbb)
All done? Then let's get started, shall we? Don't you just long to see your very first age in Uru?
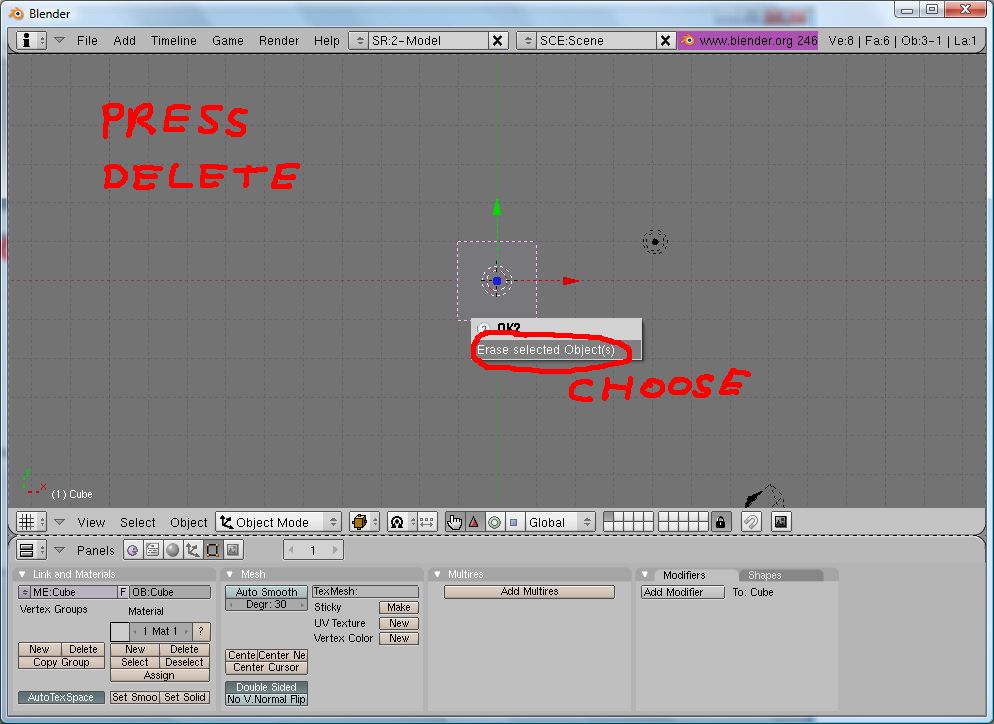
Age creation takes place in Blender, so let's go there. Now that you have followed some of Jennifer's tutorials, you are relatively comfortable with the windows presented here. You may delete the standard cube (right click on the cube to select it, press delete and click "Erase selected object(s)"). After all, by now, we can create trees and cones, who needs a cube anyway! You can't wait to fill the empty screen with all those goodies you are able to create, but wait a moment! First, we need to make sure Uru CC sees our creation as an actual age. You did install PyPRP, did you, in step 4? Great!
To begin with, let us change the buttons window to the scripts window. Click the "Buttons" menu (the button that looks like this: =) and then choose "Scripts window" (the button with the green python). See screenshot 1.
Screenshot 1
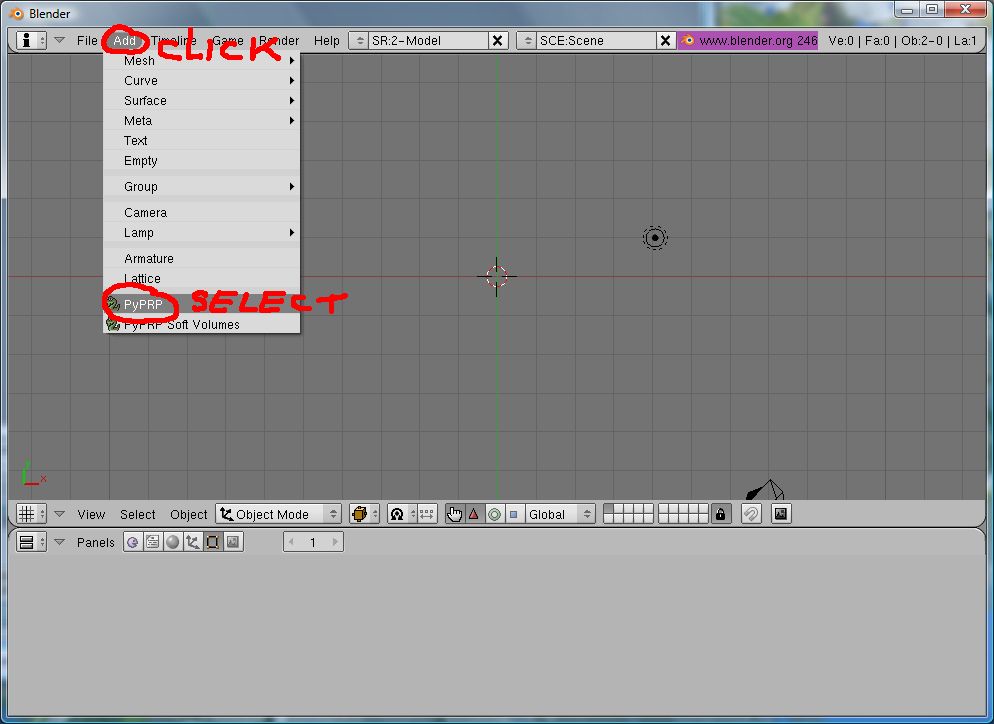
In the new menu presented there, click Scripts - Add - PyPRP. See screenshot 2.
Screenshot 2
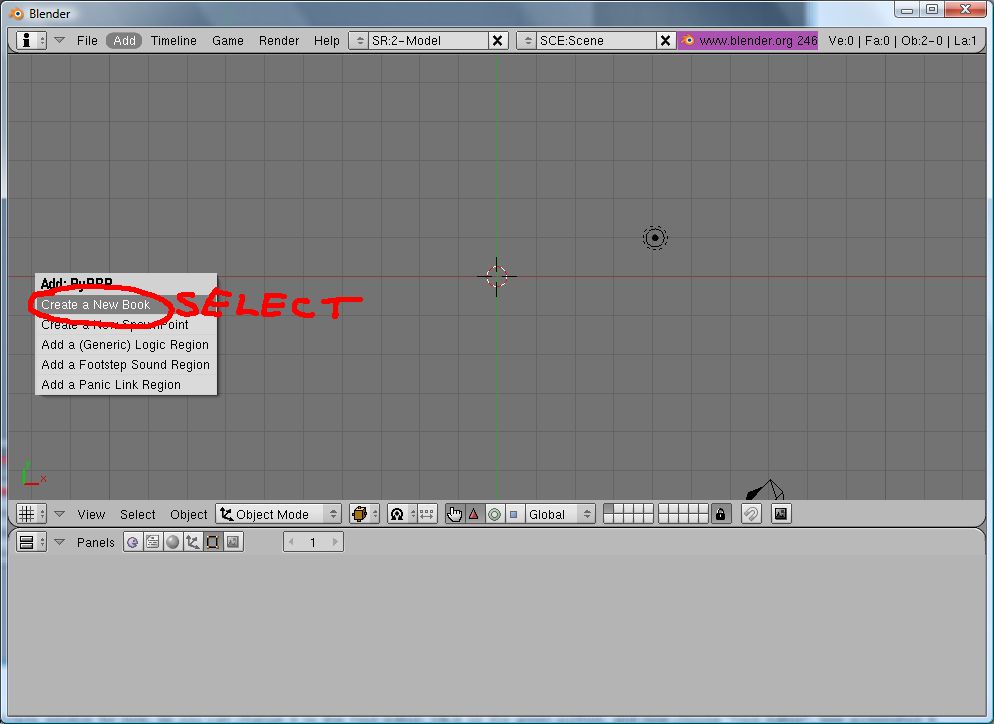
Then, click "Create a New Book". See screenshot 3.
Screenshot 3
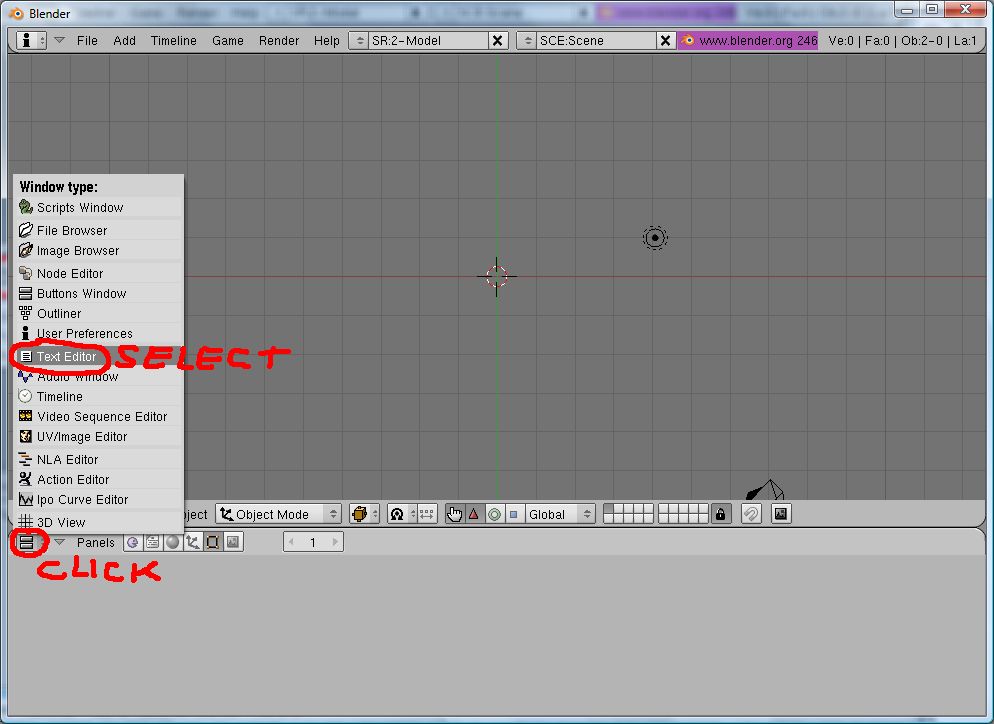
You're done with the Scripts window for now, so we are going to change it to the Text Editor. Click on the green python, and now choose "Text Editor". See screenshot 4.
Screenshot 4
Incidently, did you see the menu change magically? Where it said "Scripts" at first, now it says "File" and all the buttons have changed.
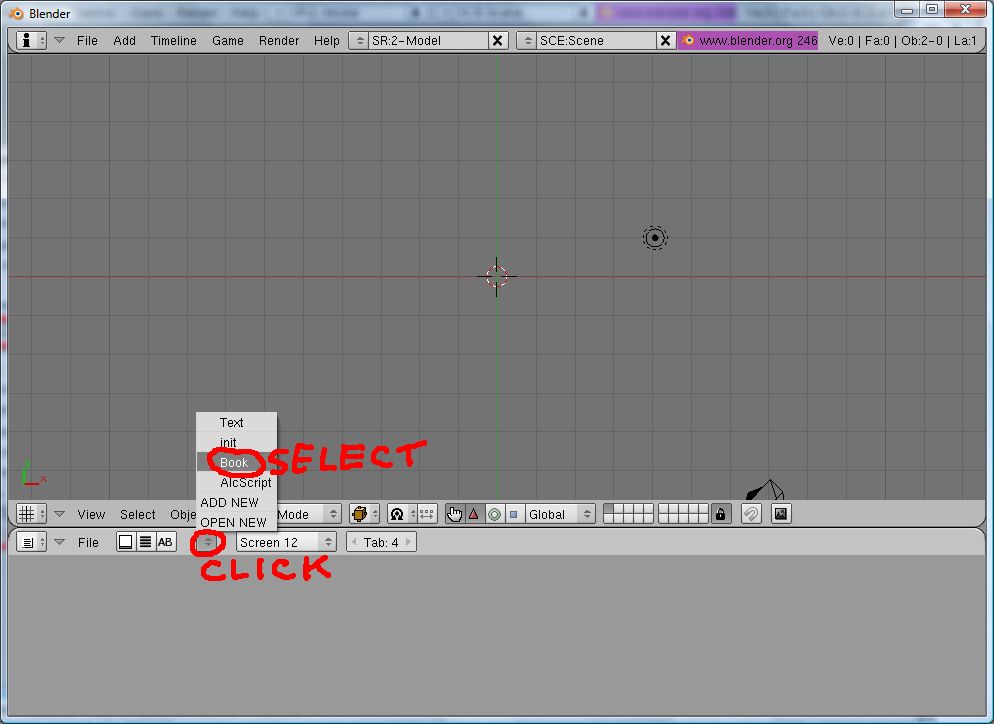
Not to worry, all we are interested in now is the book we just created. Click the little button that looks like two triangles pointing up and down, and choose "Book". See screenshot 5.
Screenshot 5
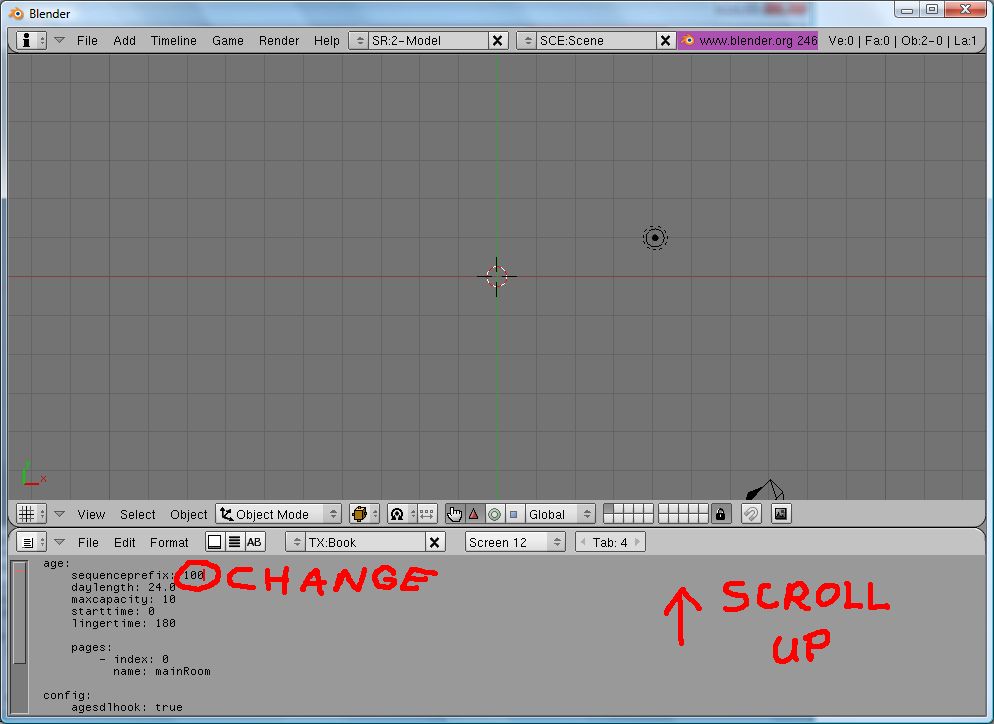
But... nothing happened?! Oh yes, it did. Click in the bottom grey area and use your "Up" arrow key to scroll up. Whoa, lots of cryptic text, and I know nothing about programming! Chill, buddy, we only need to change the number behind "sequenceprefix", we can do it. You see, every age needs to have a unique number, otherwise they conflict with each other. So why don't you give it some nice, random number between 1000 and 9999. Make sure you don't accidently delete the space between the word "sequenceprefix" and your number! See screenshot 6.
Screenshot 6
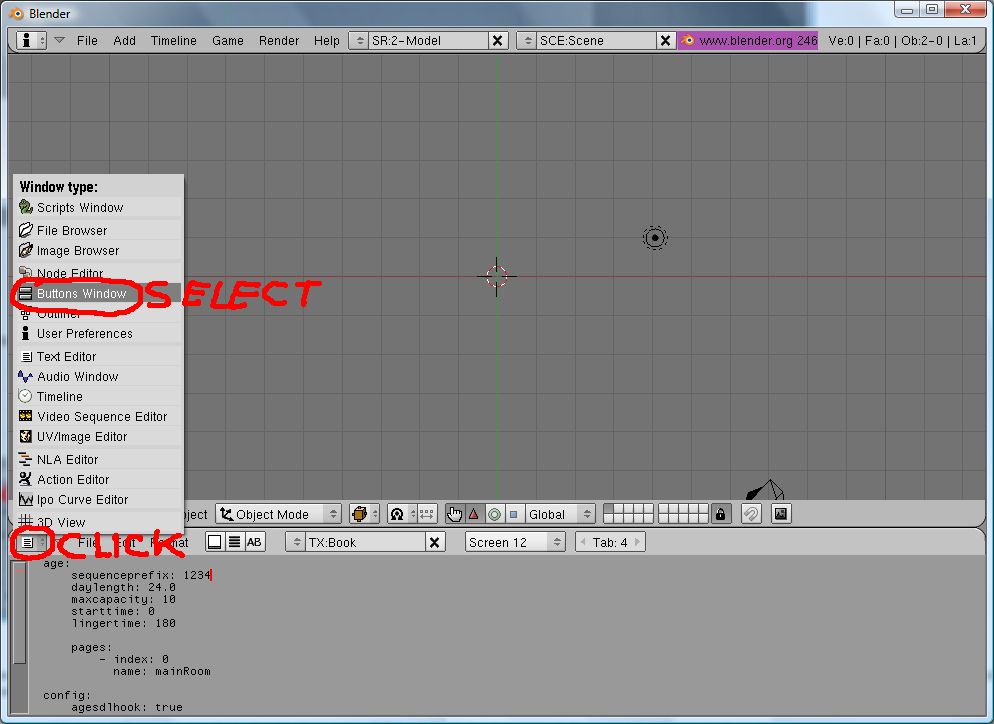
We're done with the Text Editor for now, so you can change it back to the buttons window. See screenshot 7.
Screenshot 7
All this work and we haven't created a single object yet! That is true, but it had to be done. Now, it is time for to add some solid ground for us to stand on. We don't want to fall back to Relto the second the we enter the age, do we?
Tip: are you sure you are still in the top view? This is the standard view when you start Blender, but press the 7 on your numeric keyboard - with Numlock on - to make sure. We want a floor that is horizontal... not a slide.
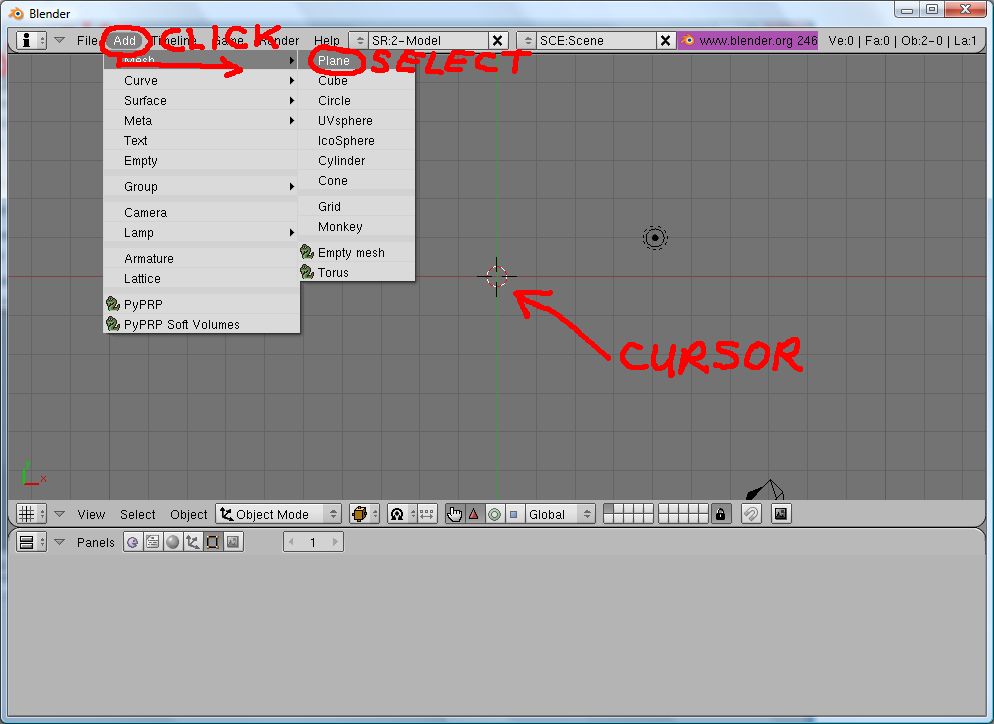
In the file menu, click Add - Mesh - Plane. See screenshot 8.
Screenshot 8
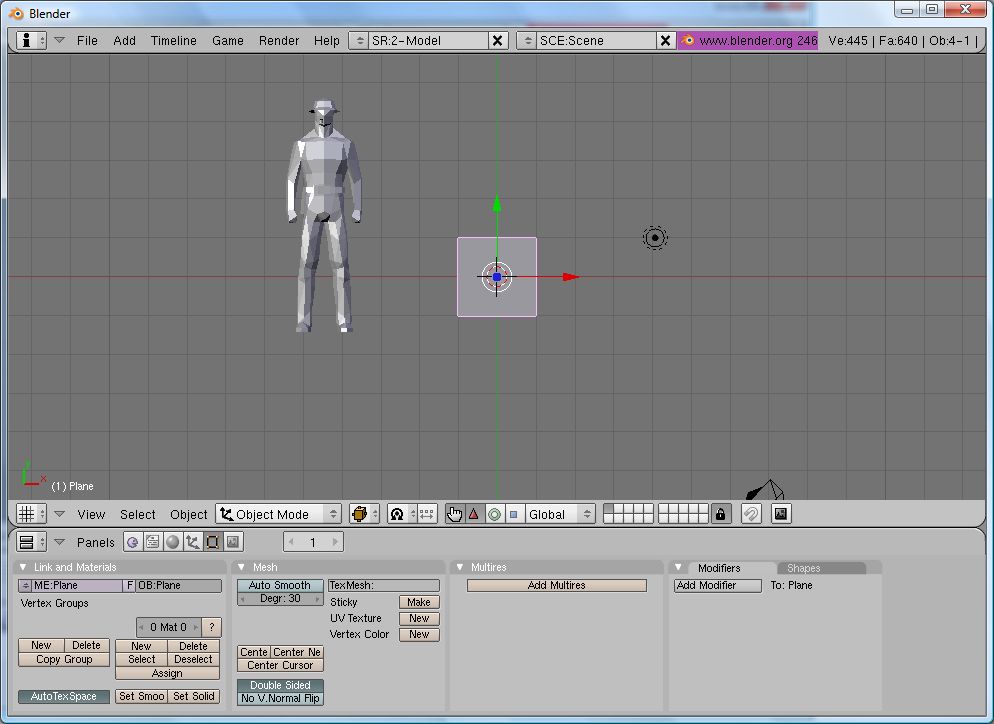
Now take a quick peek at screenshot 9 below. Do you see the size of an avie, compared to our brand new plane? That doesn't give much room to roam, does it? We really need to scale up that plane a bit! But first, let us start some good habits and switch back from Edit mode to Object mode. See screenshot 9. (Tip: you will need this a LOT, a quick way to change between edit and object mode is the TAB key)
Screenshot 9
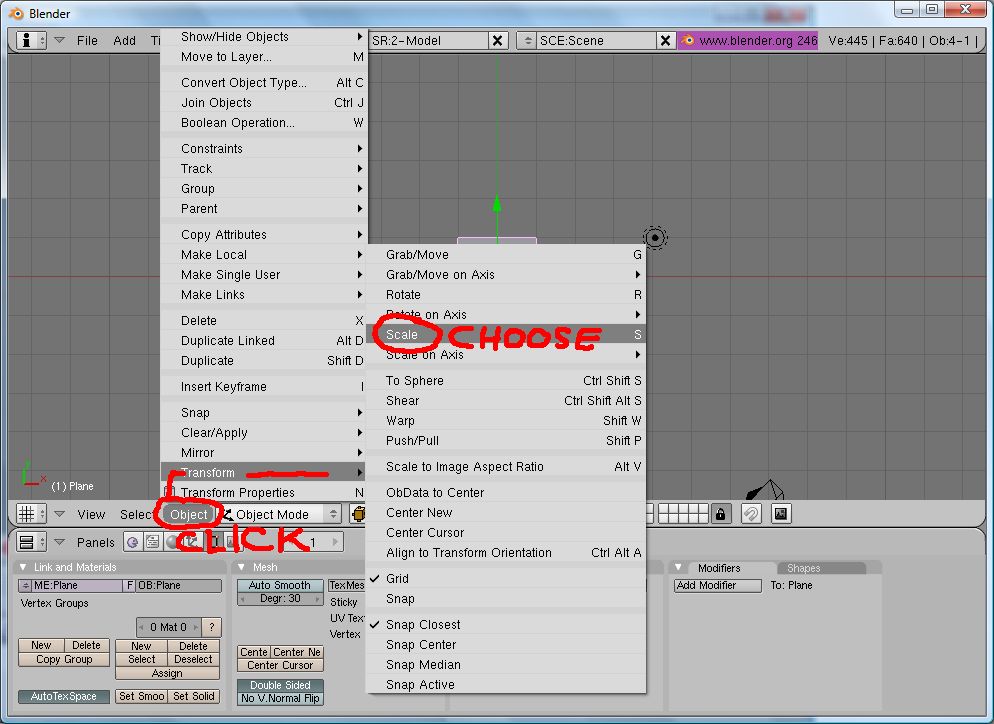
To scale an object, click on "Object" in the 3d View window, then Transform, then Scale. See screenshot 10.
Screenshot 10
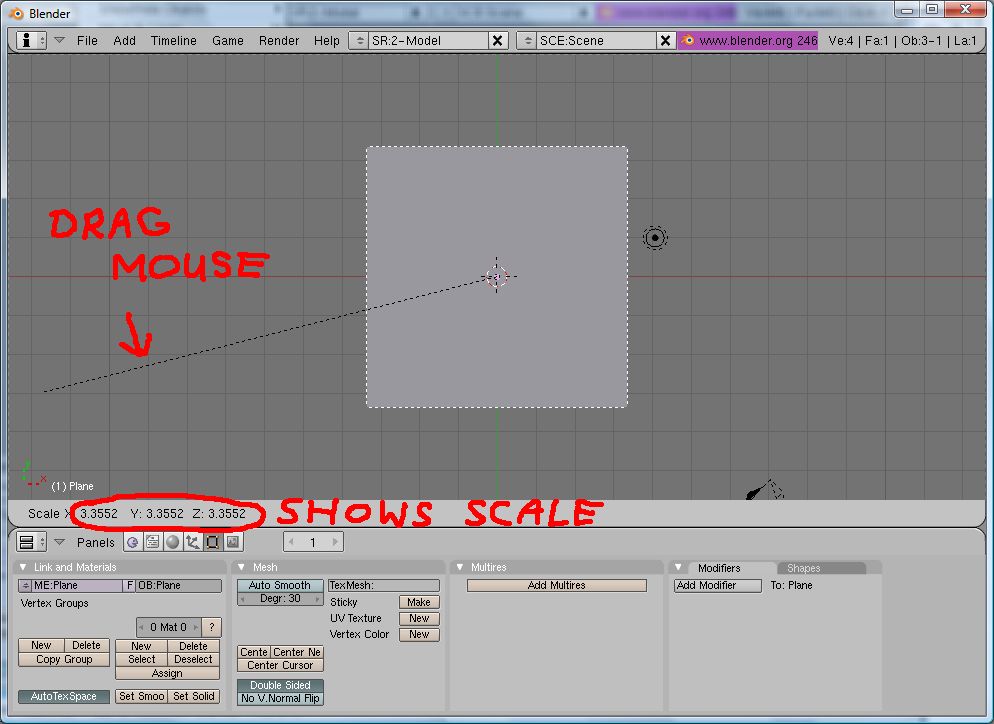
Drag your mouse a bit... ooh, the size of the plane changes with it. But no matter how far we move the mouse, we can't scale much more than 3 or 4 times what we have now. And we SO wanted a BIG plane! You can see the scale change when you drag your mouse. See screenshot 11.
Screenshot 11
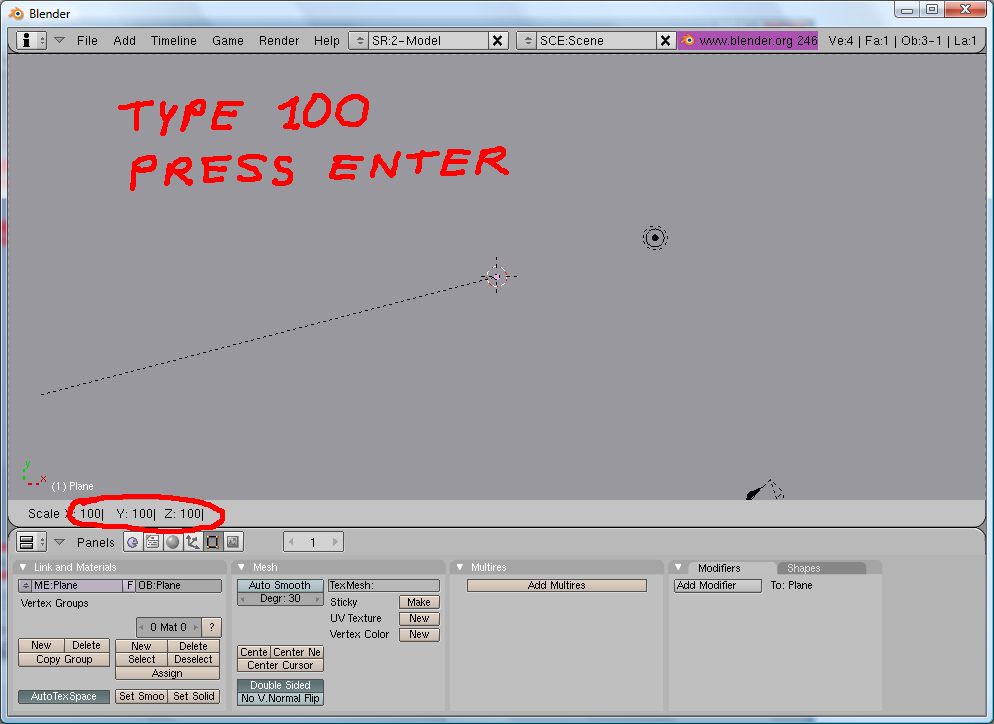
Let's think BIG, and scale the plane by a factor 100. Well, that is easy! You are still in the scale mode, right? Ok, pry your fingers away from the mouse, towards the keyboard. Type 100 and press the Enter key. Voila! Our plane is huge now, in fact we cant even see the edges anymore. See screenshot 12. (Tip: use the scroll button on the mouse to zoom in and out, but for this tutorial we don't need it yet)
Screenshot 12
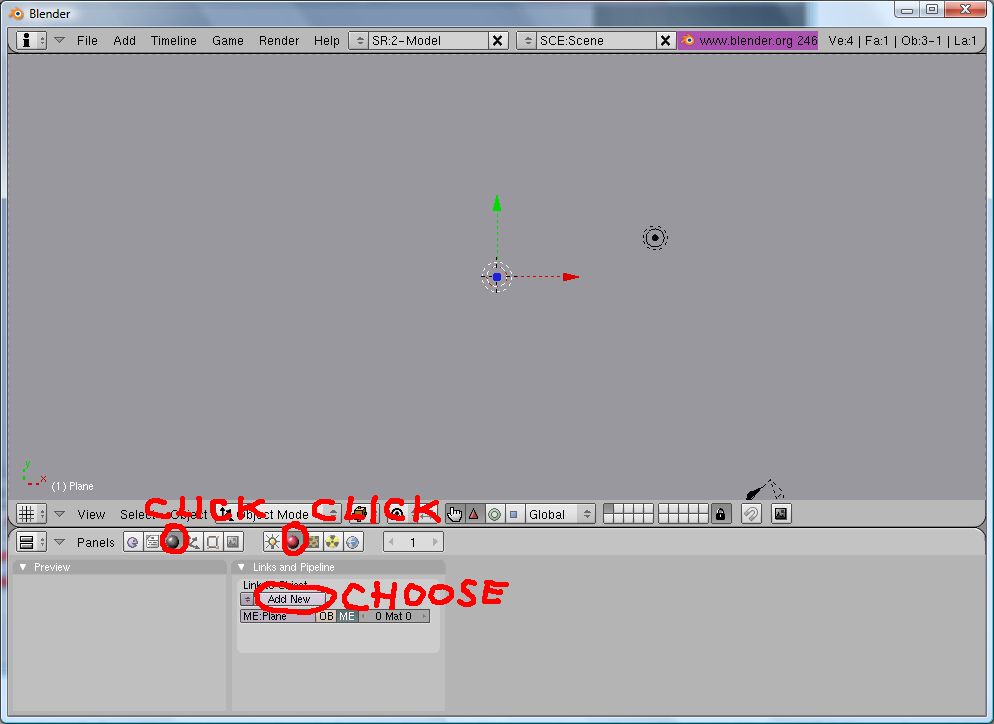
Did you notice your plane is a VERY dull shade of grey? That won't do at all. We wanted something like an exiting green, didn't we? Yes, we did. And even if we didn't, we still need to add a "material" to our plane to make our age work in Uru. From Jennifer's tutorials you may have learned already how to add real life textures, but let us not try that yet. For now, let us be satisfied with a nice color. Ready? Look at screenshot 13. You see where I circled the two circles? (yes I know how that sounds). Make sure they are selected by clicking on each one by one. Then, under Links and Pipeline, click "Add New".
Screenshot 13
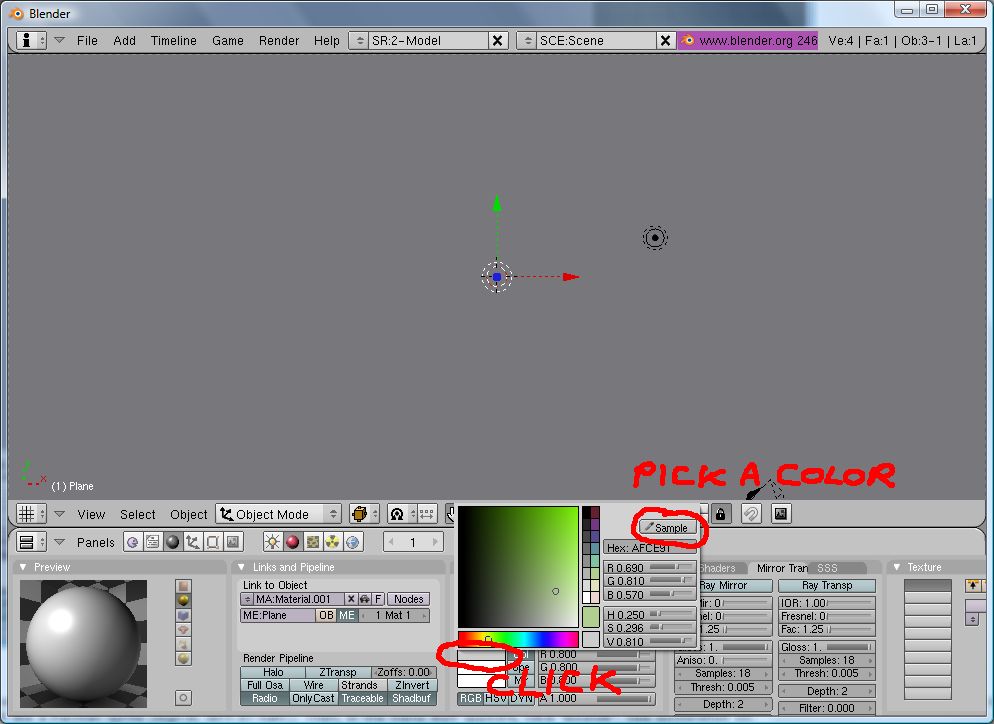
Umph, lots of choices all of a sudden! Not to worry, the color button is there as well! You see the grey bar and the two white bars? Click the grey bar and choose a color you fancy. Then, click on the button "Sample" and pick a color. See screenshot 14.
Screenshot 14
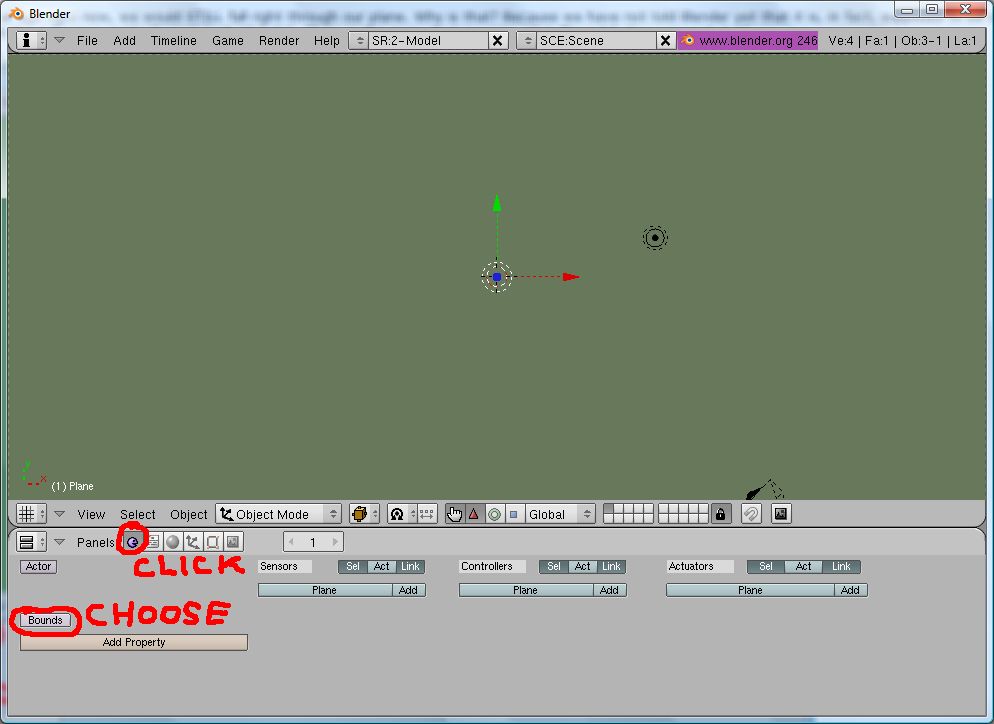
If we were to export our age right now, we would STILL fall right through our plane. Why is that? Because we have not told Blender yet that it is, in fact, supposed to be solid. Click on the button right next to Panels, the one that looks a bit like a Pacman sprite. Then, in the menu that appears, click "Bounds". See screenshot 15.
Screenshot 15
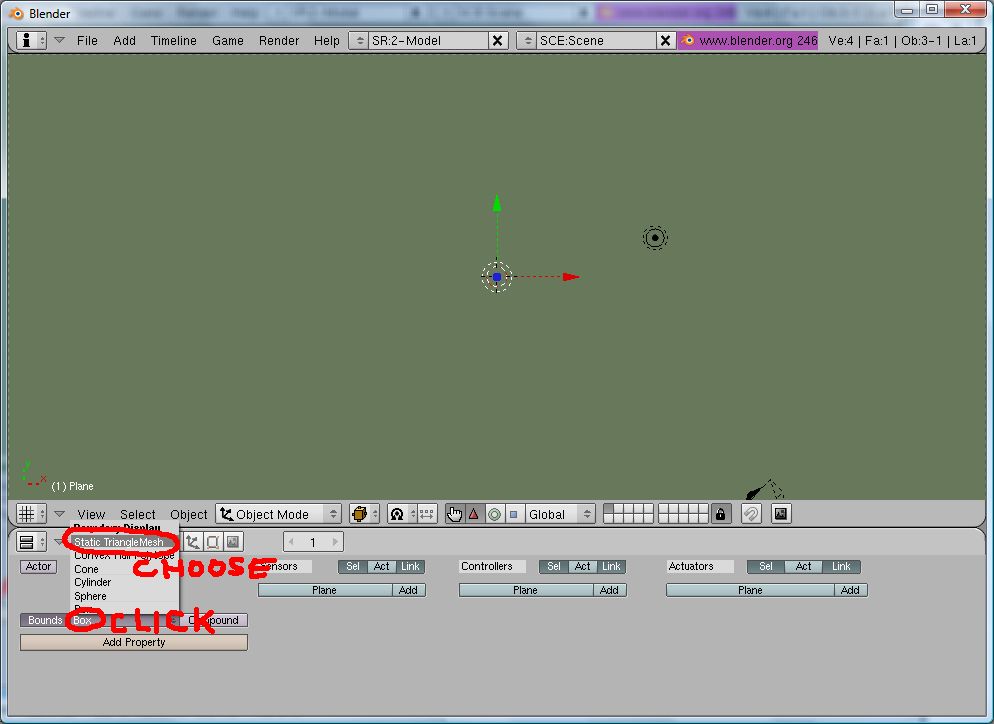
Two new choices appear next to where you just clicked. Don't worry with "Compound" at all, but click on the word "Box". From the choice menu that pops up, select Static Triangle Mesh. See screenshot 16.
Screenshot 16
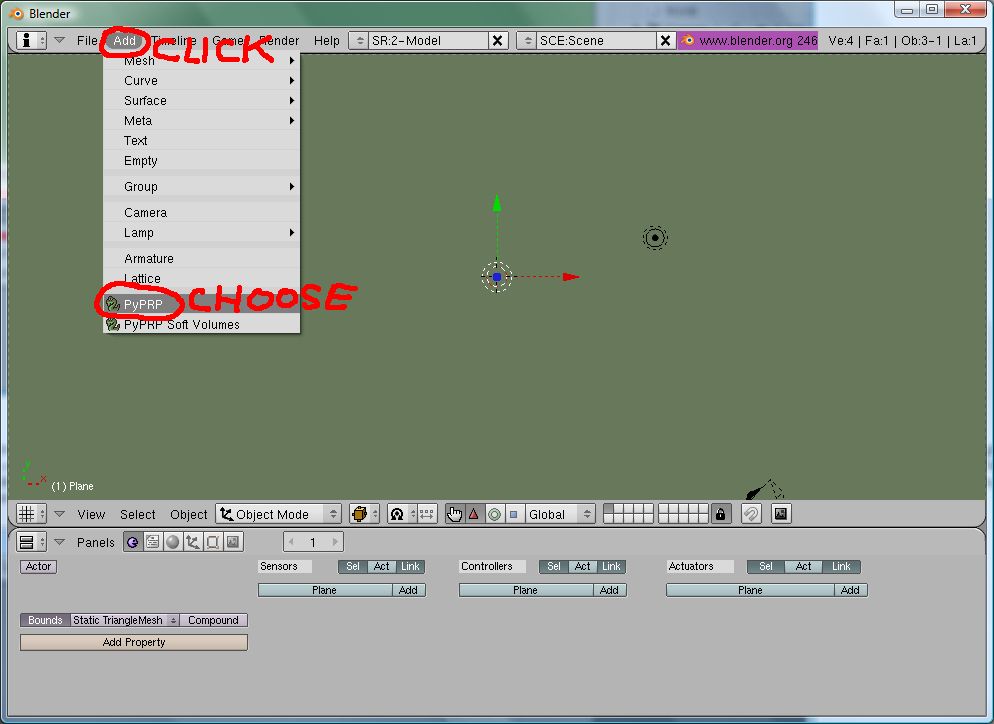
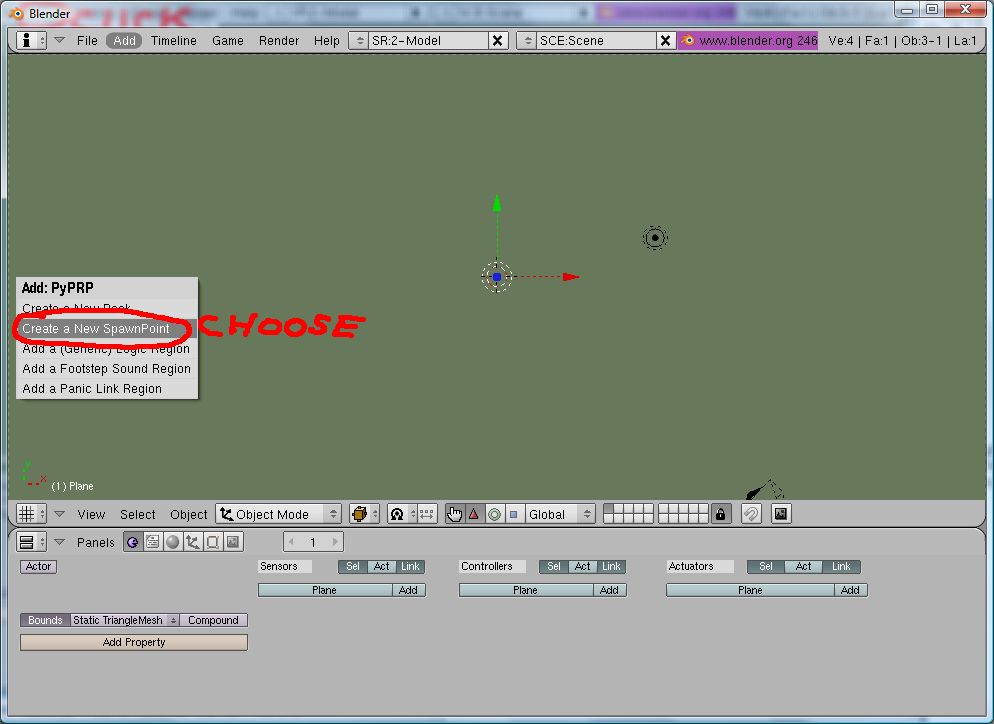
Almost done, bear with me just a little while longer! Now, we need to add one more code from our Scripts menu. Remember how to change back to the Scripts menu, the one that looks like a python? If not, look again at screenshots 1 and 2. Got it? Ok this time, we won't add another book, but a spawn point. Click Scripts - Add - PyPRP - Create a New Spawnpoint. See screenshot 17.
Screenshot 17
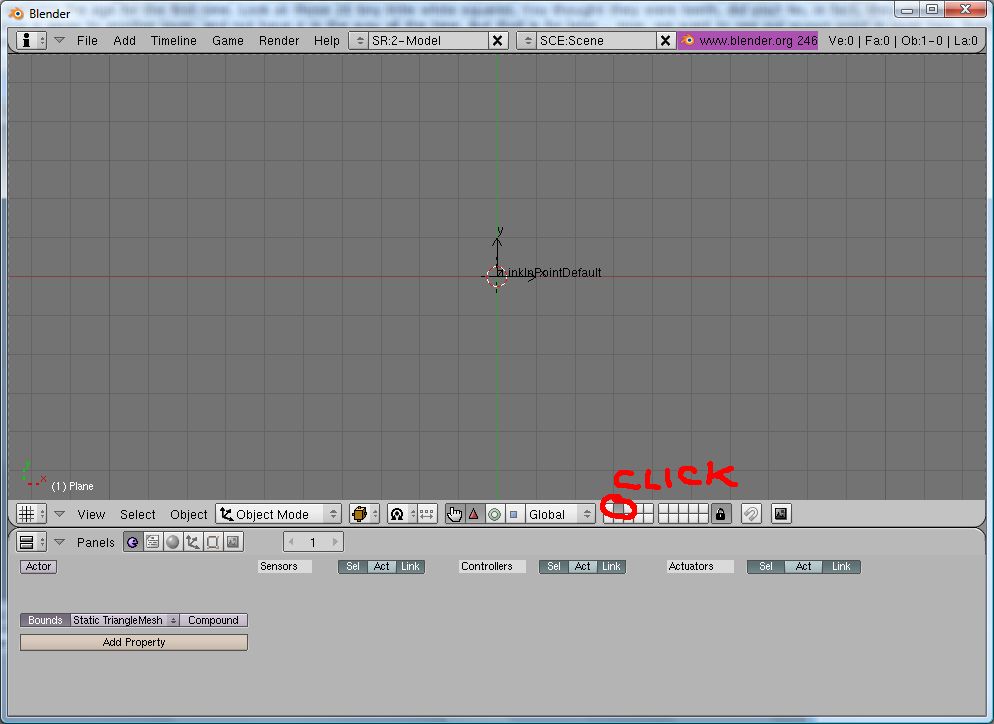
But... but... I see no changes! That's right, you won't. PyPRP objects are added to another layer, to be exact, layer 2. Of course you want to admire your spawnpoint, right? After all, you may want to change the location your avie links in when entering the age for the first time. Look at those 20 tiny little white squares. You thought they were teeth, did you? No, in fact, they are layers. This will prove useful later, when you start adding a sky for example. You can stow it away to another layer, and not have it in the way all the time. But that is for later... now, we want to see our spawn point in layer two. Sure, go ahead, click on the second square! See screenshot 18. Ah, there it is! I don't have to explain how to go back to layer one, do I? Just click the first square, that's all.
Screenshot 18
I know you are chomping at the bit to fill your brand new age with objects, but first, let us see if we can manage to export our plain plane to Uru. Once we know it works, THEN we can start to add objects.
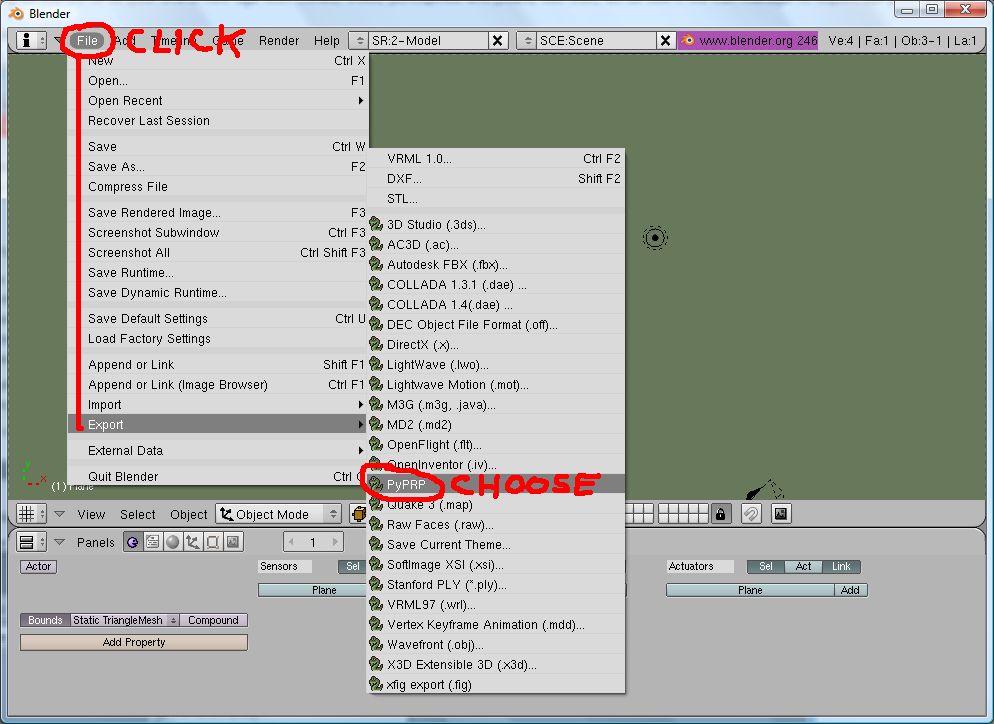
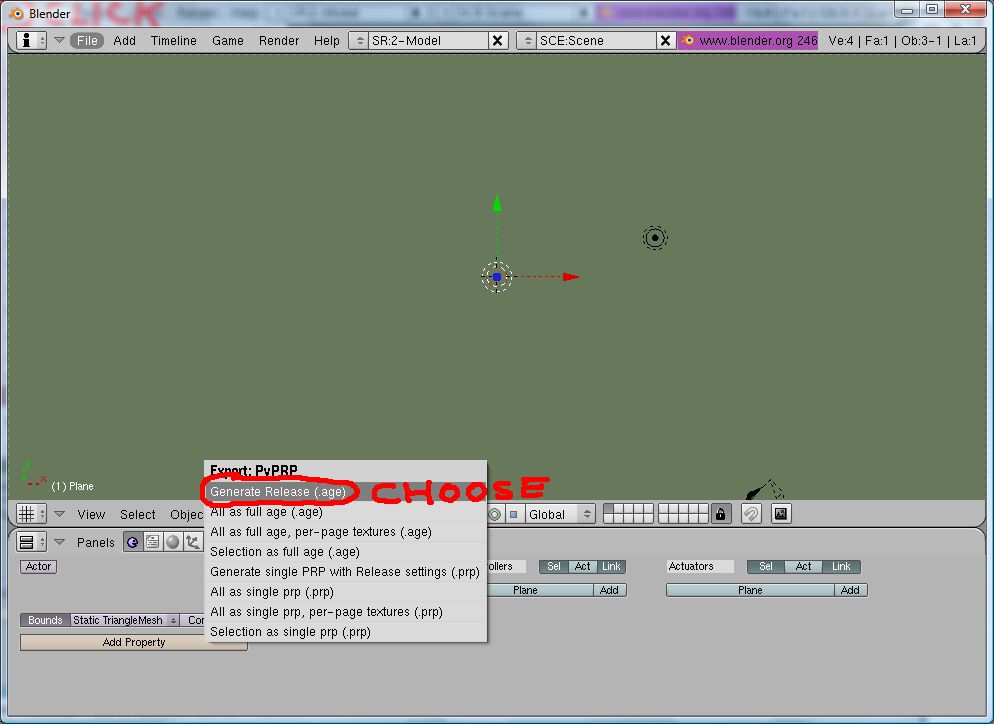
In the top menu, click File - Export - PyPRP. See screenshot 19.
Screenshot 19
Then, click "Generate Release (.age)". See screenshot 20.
Screenshot 20
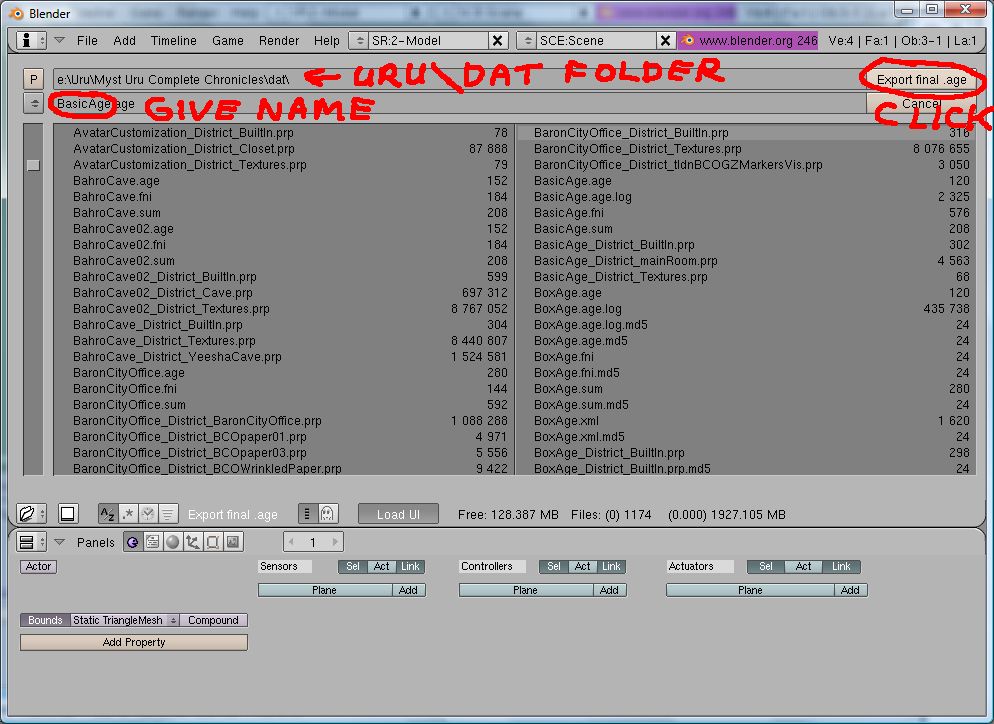
Choose a name for your new age, and make sure to select the folder where Uru - Complete Chronicles is installed. Then go to the "dat" folder. See screenshot 21
Screenshot 21
Finally, click "Export final .age". See screenshot 22.
Screenshot 22
We are nearly, nearly there.
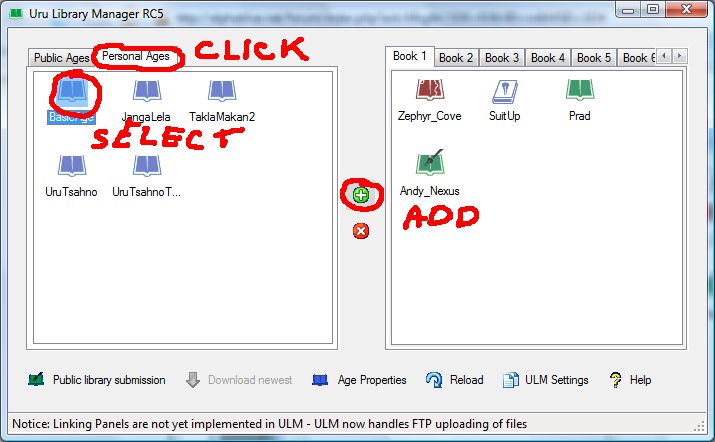
Only one more step to do! We need to tell ULM (that you installed in step 2 of this tutorial) about our new age. That pretty much explains itself, but see screenshot 22 for an brief explanation.
Screenshot 23
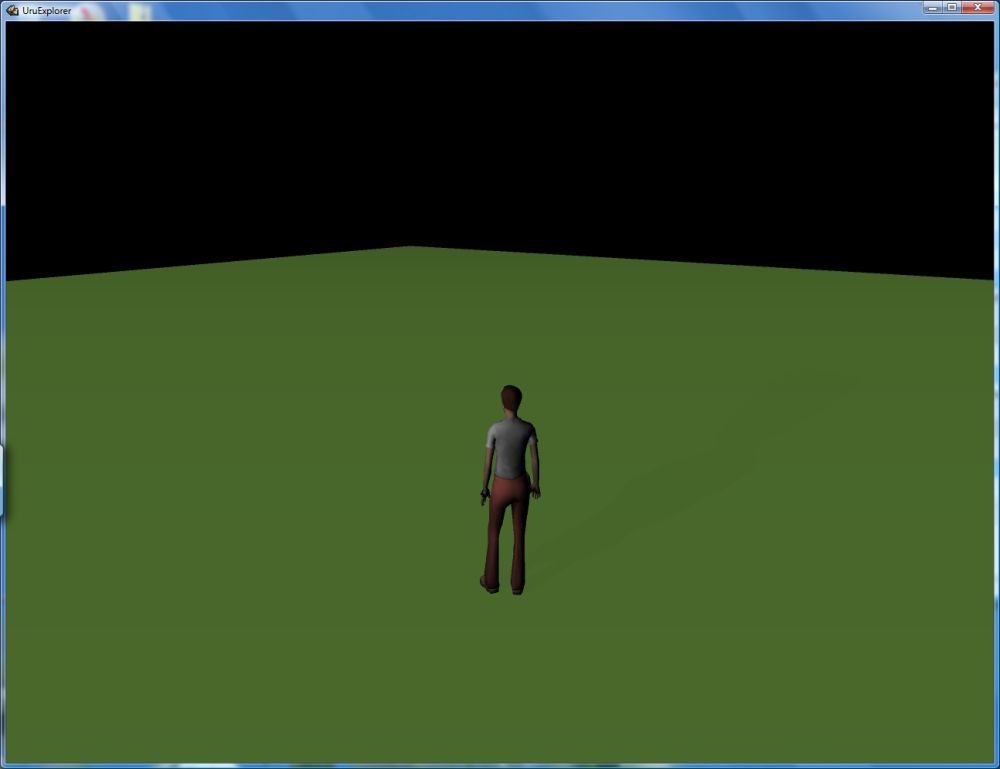
Yes, finally, that was really all!!! Now, start the game, and use the book on the bottom bookshelf to visit your newly created age. Admire, and dream of all the goodies you are going to add...........
Screenshot 24

