
Difference between revisions of "How to make an Object Clickable"
(instructions for updated simpleclick added) |
(facing condition added) |
||
| Line 1: | Line 1: | ||
Given that you have an object in your scene (e.g. a book), this tutorial explains how to make it "clickable" - when you click on the book, it will trigger a script. | Given that you have an object in your scene (e.g. a book), this tutorial explains how to make it "clickable" - when you click on the book, it will trigger a script. | ||
| + | |||
| + | |||
| + | == Preparing the object == | ||
You will first need to create a "click region" around your object. Below are the steps to create a click region: | You will first need to create a "click region" around your object. Below are the steps to create a click region: | ||
| Line 76: | Line 79: | ||
# paste default glue section here | # paste default glue section here | ||
</pre> | </pre> | ||
| + | |||
== Adding a click sound == | == Adding a click sound == | ||
| Line 91: | Line 95: | ||
Change "MyEmitter" to the name of your sound emitter. | Change "MyEmitter" to the name of your sound emitter. | ||
| − | |||
| − | The simpleclick quickscript has been updated to add more flexibility. You can find this update the [http://svn.guildofwriters.com/pyprp_nightly.zip nightly build]. | + | == Recent updates == |
| + | |||
| + | The simpleclick quickscript has been updated to add more flexibility. You can find this update in the [http://svn.guildofwriters.com/pyprp_nightly.zip nightly build]. | ||
| Line 119: | Line 124: | ||
Last but not least, all existing simpleclick quickscripts should still produce the same results as they did before this update. | Last but not least, all existing simpleclick quickscripts should still produce the same results as they did before this update. | ||
| + | |||
| + | |||
| + | == Facing condition == | ||
| + | |||
| + | A quickscript update has been added to the [http://svn.guildofwriters.com/pyprp/trunk/src/alc_QuickScripts.py SVN trunk] on May 14, 2008 (available in the [http://svn.guildofwriters.com/pyprp_nightly.zip nightly build] May 15). | ||
| + | |||
| + | This update makes it possible to show the hotspot of a clickable object only if the avatar is facing its negative Y-axis. | ||
| + | |||
| + | |||
| + | # Make sure to set the Transform Orientation (Alt Space) to Local (yellow circle) | ||
| + | # Rotate the clickable until the green arrow of the Y-axis points in the opposite direction you want the avatar to face (yellow arrow) | ||
| + | # You may find that the axis is now correct but the object has a wrong orientation. In that case you can apply the rotation (Ctrl A) and try again. If you play a bit with apply and rotate you will eventually get it right. | ||
| + | |||
| + | [[Image:Facing_condition.png]] | ||
| + | |||
| + | |||
| + | Now add the "facevalue" property to your Alcscript. This sets the facing tolerance. | ||
| + | |||
| + | <pre> | ||
| + | ObjectName: | ||
| + | physical: | ||
| + | pinned: true | ||
| + | quickscript: | ||
| + | simpleclick: | ||
| + | pythonfile: myPythonFile | ||
| + | region: MyClickRegion | ||
| + | facevalue: 0.9 | ||
| + | </pre> | ||
| + | |||
| + | Working tolerance values are between 0 and 1 (not exactly 0 or 1). Low values are for high tolerance angles. A value close to zero means that the angle is close to 180 degrees, but it will still prevent the avatar from hitting the clickable while facing away.<br> | ||
| + | The higher the value, the lower the angle. 0.9 seems a useful general purpose value that gives the avatar just enough slack. | ||
Revision as of 19:13, 14 May 2008
Given that you have an object in your scene (e.g. a book), this tutorial explains how to make it "clickable" - when you click on the book, it will trigger a script.
Contents
Preparing the object
You will first need to create a "click region" around your object. Below are the steps to create a click region:
- Choose Scripts->Add->PyPRP, then choose "Add a (Generic) Logic Region". It will appear in layer 2.
- Select it, then move it to the place where the avatar will be standing when they attempt to click on the object.
Below is an example of a click region surrounding a book.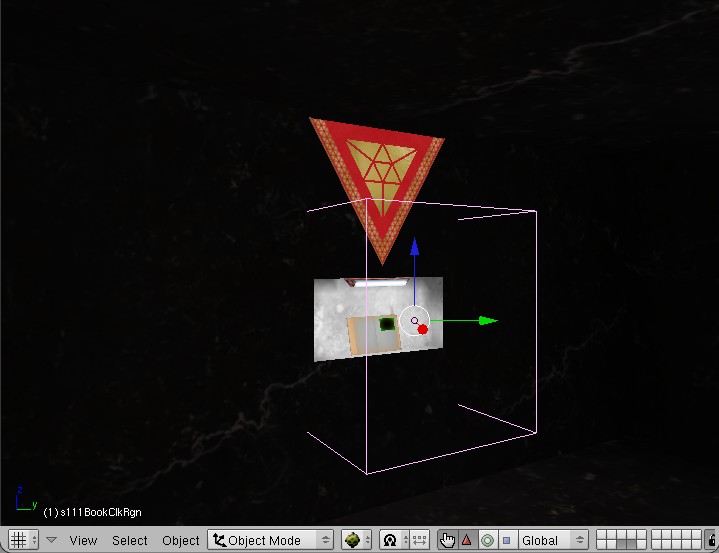
- Scale it so that it can encompass an avatar and the object that is clickable, then hit Ctrl-A to apply scale and rotation into the vertices.
- Rename the object to something meaningful (e.g. MyClickRegion)
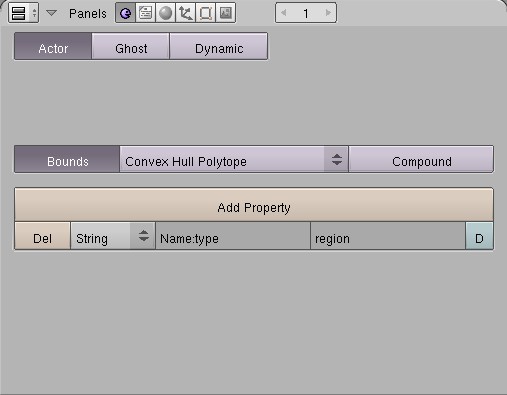
- On the Logic panel:
- Click on Bounds, then set it to "Convex Hull Polytope"
- Click the Actor button on the Logic panel
- Your Logic panel should look like this:


Next, you need to prepare your object to be "clickable":
- Select the object
- On the Logic panel:
- Click on Bounds, then set it to "Convex Hull Polytope"
- Click the Actor button on the Logic panel
- Add the following AlcScript entry:
ObjectName:
    physical:
        pinned: true
    quickscript:
        simpleclick:
            pythonfile: myPythonFile
            region: MyClickRegion
But change "ObjectName" to your object's name, "myPythonFile" to the name of your python file, and "MyClickRegion" to the name of your click region.
Now you're ready to write your script. If you wish to write a journal, please use D'Lanor's Dynamic Book Template.
Adding an avatar animation
ObjectName:
    physical:
        pinned: true
    quickscript:
        simpleclick:
            pythonfile: myPythonFile
            region: MyClickRegion
            animation: <animation name>
            animtarget: <animation start>
Change <animation name> to the name of an animation without the Male/Female prefix. Change <animation start> to the name of an object placed at the position where you want the animation to start.
The animation will not run automatically. We need a bit of Python script to activate it.
actClickableObject = ptAttribActivator(1, 'Clickable object activator')
strObject = ptAttribString(2, 'Object string')
Behavior = ptAttribBehavior(3, 'Avatar animation')
kAnimSeconds = 2.0
kAnimID = 1

class myPythonFile(ptModifier,):

    def OnNotify(self, state, id, events):
        if ((id == actClickableObject.id) and state):
            Avatar = PtFindAvatar(events)
            Behavior.run(Avatar)
            #this timer allows the avatar animation to finish
            PtAtTimeCallback(self.key, kAnimSeconds, kAnimID)


    def OnTimer(self, id):
        if (id == kAnimID):
            #here comes the action for your clickable


# paste default glue section here
Adding a click sound
ObjectName:
    physical:
        pinned: true
    quickscript:
        simpleclick:
            pythonfile: myPythonFile
            region: MyClickRegion
            soundemitter: MyEmitter
Change "MyEmitter" to the name of your sound emitter.
Recent updates
The simpleclick quickscript has been updated to add more flexibility. You can find this update in the nightly build.
It is now no longer necessary to use a Python file if you only want to trigger a sound and/or avatar animation. In this case you can leave out the pythonfile line.
Even if you are using a Python file the avatar animation can now run without being triggered by Python. To control this we have a new optional flag called autorun. The values for autorun are true or false. The following example creates an automatic avatar animation.
ObjectName:
    physical:
        pinned: true
    quickscript:
        simpleclick:
            pythonfile: myPythonFile
            region: MyClickRegion
            animation: <animation name>
            animtarget: <animation start>
            autorun: true
Not using a Python file always results in an automatic avatar animation. This ignores the autorun setting (the false value would make no sense here).
If a pythonfile is specified autorun defaults to false, assuming you will trigger the animation in your Python file (this matches the old behavior). This default behavior can be altered by adding autorun: true as shown in the exampe above.
Last but not least, all existing simpleclick quickscripts should still produce the same results as they did before this update.
Facing condition
A quickscript update has been added to the SVN trunk on May 14, 2008 (available in the nightly build May 15).
This update makes it possible to show the hotspot of a clickable object only if the avatar is facing its negative Y-axis.
- Make sure to set the Transform Orientation (Alt Space) to Local (yellow circle)
- Rotate the clickable until the green arrow of the Y-axis points in the opposite direction you want the avatar to face (yellow arrow)
- You may find that the axis is now correct but the object has a wrong orientation. In that case you can apply the rotation (Ctrl A) and try again. If you play a bit with apply and rotate you will eventually get it right.

Now add the "facevalue" property to your Alcscript. This sets the facing tolerance.
ObjectName:
    physical:
        pinned: true
    quickscript:
        simpleclick:
            pythonfile: myPythonFile
            region: MyClickRegion
            facevalue: 0.9
Working tolerance values are between 0 and 1 (not exactly 0 or 1). Low values are for high tolerance angles. A value close to zero means that the angle is close to 180 degrees, but it will still prevent the avatar from hitting the clickable while facing away.
The higher the value, the lower the angle. 0.9 seems a useful general purpose value that gives the avatar just enough slack.