Korman:Detail Textures
| This is a tutorial page.Versions available: PyPRP; 3ds Max; Korman. |
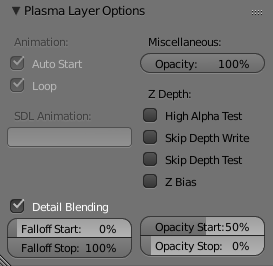
Materials with "Detail Blended" texture layers are useful in avoiding textures that would otherwise be too blurry or pixelated when your avatar (or more specifically, your active camera) gets close to them, while also avoiding excessive tiling on large objects when you are very far away.
This is particularly noticeable with large areas (walls, floors, terrain) that will be seen from a distance and close up. Good UV mapping helps, but cannot completely stop this from happening with large surfaces.
Using a "detail" texture layer solves this by slowly blending one of the material's texture layers into another one, in real time, as the camera gets closer to the object. As the camera gets closer to the material, the amount of blending gets more intense until you eventually see only the "near" texture layer. The opacity of the "near" texture changes from 0% to 100% as the camera gets closer, and it does so in real-time, while the "far" texture goes from 100% to 0% opacity.
Note for former PyPRP users: The main difference between using this option in Korman from PyPRP is that your textures images do not need an alpha channel in Korman. In fact, images with no alpha give the best results.
You can use the same texture image file for both the "far" texture layer and the "near" texture layer, although you will often be using completely different images for "far" and "near". However this tutorial will use the same image for simplicity.

