PyPRP:Getting Started
| This is a tutorial page.Versions available: PyPRP; 3ds Max; Korman. |
The aim of this tutorial is to serve as an introduction to the way PyPRP works by helping you build a sample functional Age.
Alternatively, you can follow this video tutorial, presented during Mysterium 2008 live. The resulting Age file is available for download here.
Contents
Prerequisites
You must have read the following tutorials:
- PyPRP:Installing, since you obviously need PyPRP installed and working.
Additionally, you'll need Blender 2.49b as this is the only working version for the latest plugin; this tutorial was originally written for Blender 2.45, so some sections might require slightly different approaches today.
Setting Up
Building an Age is a complex task; as such, you'd better make sure that you are well set up for the task.
Preparing Blender
This tutorial will assume that your screen looks something like this, where 1 represents a 3D view, 2 a text editor, 3 a scripts window, and 4 a buttons window. Make sure you delete the cube loaded into Blender by default.You'll also want a reference object for scale in your Age. The unit used in Blender is the standard US Foot. So 1 unit on the grid in Blender = 1 foot in Uru (1 foot = 30.5 centimeters). As a reference, the male avatar in Uru is 6 feet high (1.80 meters) and 2 feet large (60 cm). You can easily see the scale in Blender with the grid in the 3D views. Creating a simple object with these dimensions, such as a cylinder, can be useful for reference, and you are advised to do so now. Alternatively, you can use this dummy avatar model (pictured to the right), which you can import through File -> Append or Link, navigating to the avatar.blend file, clicking on Object and finally on the DummyAvatar Object.
Adding A Book
Each needs certain information to describe the basics of how it operates. In PyPRP and Blender, this information is stored in a text file (a text file that is stored internally in Blender, to be precise). This is done by adding a Book with PyPRP:- Go to the Scripts Window, and press Scripts -> Add -> PyPRP. Now select "Add Book" from the popup menu. This creates a default Book file.
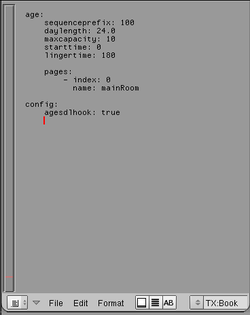
- In the text window, press the button with two arrows and select "Book" from the unveiled pop-up menu. This will display the default properties and values (as pictured to the right). Most of these are not important right now, but two are of special importance:
- age.sequenceprefix: each Age for Uru has its own unique id number called the sequence prefix. There can't be two Ages on an Uru installation sharing the same sequence prefix, otherwise Uru will just crash. You'll need to change the value for testing and distribution; to make sure your sequence prefix is unique, visit the Uru:CC Sequence Prefixes list and reserve your own number.
- age.pages: this is a list of page descriptions, each item being prepended by a dash sign and consists of at least two properties: the index, which is the number of the page, and the name, which is the name of the page. These pages are used to logically separate the content of Uru Ages, with different names. For this example, one page called mainRoom will be sufficient.
Note for future reference that the Book file's syntax follows the same structure as AlcScript, a scripting language for your Ages.
Setting Fog Settings
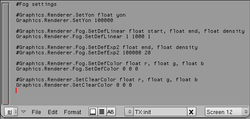
Fog settings are defined in.fni files. Since the default values might not be to your taste, you should specify your own values in it. Since when you created your Book file, an .fni was also automatically created, you can open it up by selecting "init" from the text editor dropdown. The file is pictured to the left.
Scripting With AlcScript
When you created your Book, you also created an empty AlcScript file which is useful to add various advanced features to your Age. For now, you can leave it empty.
Modelling
Under construction.
Texturing
Under construction.
Adding Atmosphere
Under construction.
Adding Sounds
Under construction.
Adding Objects
Under construction.
Final Result
Under construction.


