Korman:Great Zero Beam
| This is a tutorial page.Versions available: PyPRP; 3ds Max; Korman. |
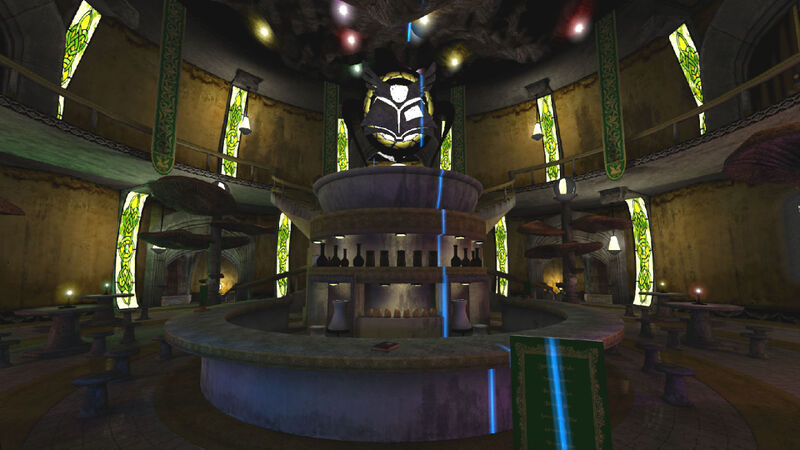
This tutorial will show you how to set up a Great Zero beam with Korman.
Contents
Getting Started
There are only two things needed for a Great Zero (GZ) beam itself: an Area lamp and the Great Zero beam texture.
Adding the Lamp
To add the Area lamp, in the 3D View, click Add, then Lamp, then Area.
Rename the lamp to something unique, presumably with GreatZero or GZ in it to easily locate the lamp object later.
Press G to adjust the lamp's location.
You may also have to rotate the lamp so that it's pointing horizontally. Press R, then X twice, then 90.
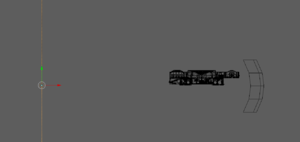
Note that you will want the lamp to be approximately where the Great Zero itself is relative to your location, except you want the lamp to be level on the global Z axis to most of your Age (see example to the right).
Lamp Settings
Thankfully, there's not much to do here, but there are a few things you want to adjust.
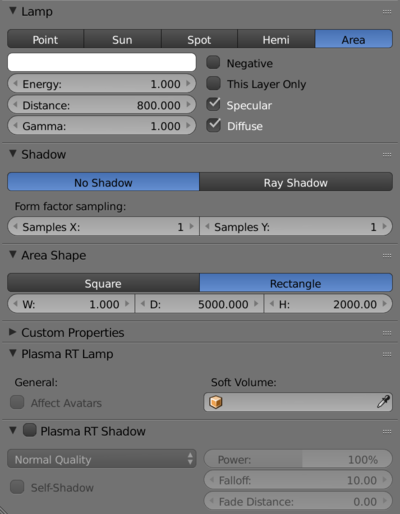
- Area Shape: You'll want to switch this from Square to Rectangle. This will bring up some settings just below.
- Width: For the Great Zero beam, we only want the width of one texture length, so set this to 1.
- Depth and Height: These tell the lamp how far to cast the beam. To be safe, set both of these into the quadruple digits like the example above.
- Soft Volume (optional): You can set the lamp to a soft volume if you only want it to appear in certain areas (or exclude it if the soft volume is inverted). Since the GZ beam seems to permeate almost all surfaces inside and out, this is optional.
Lamp Texture
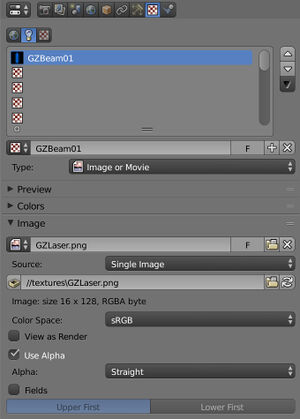
Next, we need to switch over to the lamp's texture panel (see image at right).
Under the texture list, press New. Name this something unique, such as GZBeam.
Next, open up the Great Zero beam texture. You can use this one direct from the URU files and used under Attribution NonCommercial ShareAlike 4.0 International (CC BY-NC-SA 4.0) [1]:
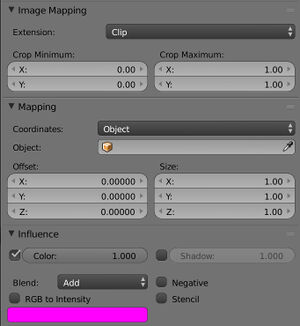
Now we need to fiddle with a few of the settings to make this work. You can double check your work using the images to the right.
- Under Image Mapping, Extension should be switched from the default Repeat to Clip.
- Under Mapping, Coordinates should be set to Object. The object itself can be left blank as in the example.
- Under Influence, for Blend, change this from the default Mix to Add.
Once that is done, we should be ready to animate the lamp.
Animating the Beam
Now that the lamp itself is set up, we now need to animate the Area lamp to rotate as the GZ beam should.
Switch one of your windows over to the Timeline window.
Here, make sure the current frame is set to zero (see above example).
Now, select your GZ Area lamp in the 3D View window, press I, then choose Rotation.
This will add your first keyframe. We now want to rotate the lamp along the global Z axis clockwise.
- First, in the Timeline, set your keyframe to 900.
- Next, in the 3D View window, with the Area lamp selected, press R, then Z, then -90. This will rotate the beam clockwise by 90 degrees.
- Once this is done, press I, then click Rotation to add a new keyframe at frame 900.
You'll want to repeat the previous three steps for frames 1800, 2700, and 3600. If done right, your beam should make a full rotation in 2 minutes, approximately the same as other instances of the beam in Cyan's Ages.
Setting the Animation Curve
However, if you export now, your beam will stop and start again at each keyframe. This is because, when first created, animation keyframes use bezier curves. We want things to be linear.
To solve this, we'll need to switch over to the Graph Editor.
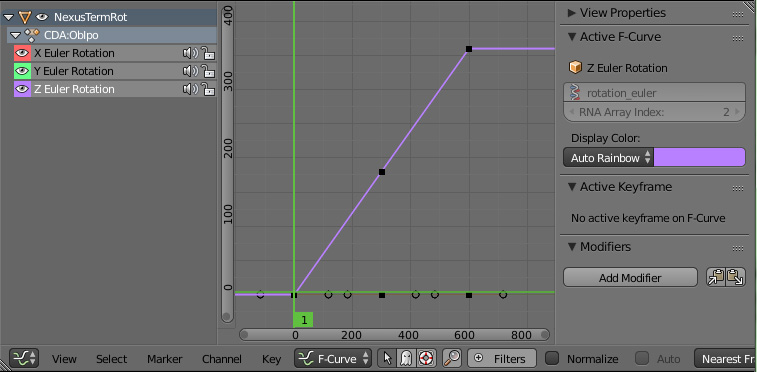
This is your animation curve. You may notice it's a bit...well, curvy. We want this to be a straight, even line.
To do this, make sure all your keyframes are highlighted orange by pressing A a few times while your cursor is in the window.
Once that's done, press T.
In the dialog that pops up, under Interpolation, choose Linear. You'll notice your animation curve will straighten out to look like the example above.
Your animation will now be smooth and continuous.
Animation Modifier
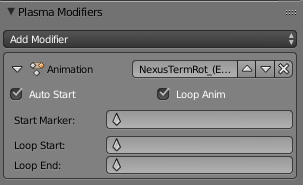
To export the new animation, you'll need to attach an Animation Modifier to the Area lamp and adjust a few settings.
By default, both Auto Start and Loop Anim are selected.
- If you want your beam to be started with an SDL state (recommended for MOULa and other online shards), uncheck Auto Start.
- If you prefer your beam to always be running, leave Auto Start checked.
In either case, leave Loop Anim checked!
Casting RT Lighting
While we're adding modifiers, also add the Cast RT Shadow modifier. The default settings for this should be fine.
Wiring the Lamp to Python
To get our Great Zero beam up to online shard standards, we'll need to set things to one of Cyan's Python scripts.
Let's switch over to the Node Editor window. If you need to familiarize yourself with Logic Nodes and Python Nodes, now would be a good time.
To start, let's create a new node tree by pressing the + button on the menu bar. Be sure to name the node tree something unique that you'll remember.
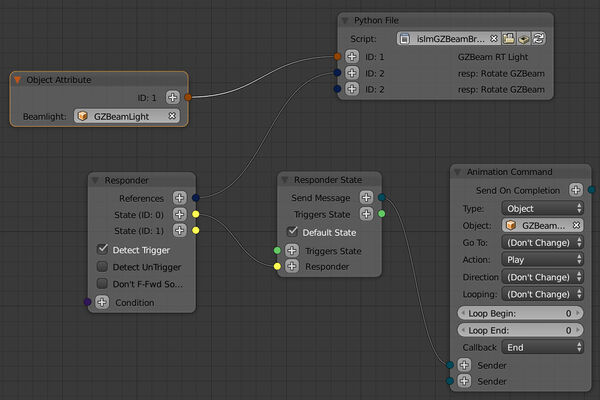
To start, add a Python File node and choose the Cyan Python script named islmGZBeamBrain.
From there, you can follow the example above.
- For the first node (ID: 1), you want to press the + button and, in the node that appears, choose the Great Zero area lamp object.
- For the second node (press +), you want to create a responder similar to the one above that tells our area lamp to start its animation. Since we left Loop Anim checked, the beam will continuously animate once this responder starts it.
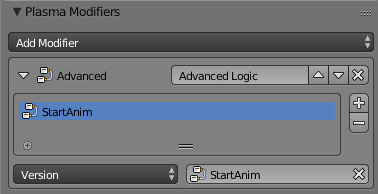
Lastly, add an Advanced modifier to the area lamp, press +, and select the node tree we just set up to properly export it along with everything else.
Setting to an SDL State
For MOULa and most shards, the Great Zero beam is set to an SDL state to facilitate the starting and potential stopping of the Great Zero. Here, we will now set that up.
Creating an SDL File
With Korman, creating an SDL file is relatively easy. Simply navigate one of your windows to the Text Editor and press the + button to add a new text block.
Name the new text block YourAgeName.sdl, with your actual Age name in place of YourAgeName.
You'll most likely add more lines to this (or already have one started), but for this example, let's pretend we're starting a fresh SDL file.
STATEDESC YourAgeName
{
    VERSION 1

    VAR BOOL islmGZBeamVis[1]    DEFAULT=0    DEFAULTOPTION=VAULT

}
This will essentially tell URU to start the beam in your Age if the islmGZBeamVis bool variable is set to true.
Note that the state must be named islmGZBeamVis for it to work with the Python script we wired up above.
Having it set as DEFAULT=0 means that, by default, your beam will be off.
The section DEFAULTOPTION=VAULT is standard for MOULa and other shards as it leaves control of the Great Zero beam in the hands of the shard admin. It also makes it so any and every instance of the Age will run the beam.
Testing Your Beam
Note that this is only needed if you didn't check Auto Start and wired things up with the Python script and SDL state.
While in-game with an internal client, press the ~ key to bring up the console.
Type the following into the console to activate the beam:
age.sdlstatebool islmGZBeamVis true 0
Wait for a bit and, if everything has gone well, you should see your Great Zero beam pass over your Age!
Troubleshooting
If your Great Zero beam does not appear or looks odd:
- Check your lamp's settings. Height and Depth are very important and need to be very large (quadruple digit numbers)
- Check your texture settings. The GZ beam texture should be set to Clip and Add as described above or things may not look right with the beam.
- Check your Python node tree and SDL file. These must appear exactly as described or Cyan's script won't activate the beam correctly.
If your Great Zero beam only appears once and, after several minutes, does not reappear:
- Make sure Loop Anim is checked in the animation modifier of your area lamp.
If your Great Zero beam appears to stop and start at certain points:
- Make sure your lamp's animation curve has it's keyframes set to Linear and not Bezier. The animation curve should look like a straight, 45-degree diagonal line.

