Quick Ladders and Stairs with DupliFrames
This is less of an "Age Building" tutorial, and more of a "How to use Blender" tutorial than I would normally put on this wiki, but this seems to be a very common problem for age building, and I already wrote a tutorial on how to bake textures, so who cares. Hopefully this will save you some time building your next age.
Contents
Introduction
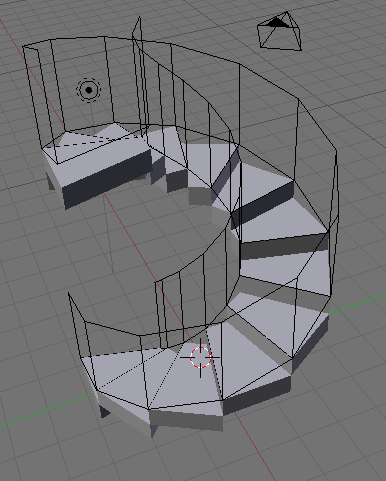
In this tutorial, I will show you how to use Blender's DupliFrames feature to quickly build repetitive objects like stairs and ladders. Put simply the DupliFrames tool creates a copy of an object for each frame of that object's animation. By moving and rotating your object you can easily create long strings of objects. The example will be a spiral staircase, because it demonstrates most of what you can do.
Make the step
First, delete that default cube, ([X]) set the view to top, ([7]) and add a 12 sided circle. ([Space] > Add > Mesh > Circle, setting the verts in the popup to 12.) Extrude and scale it to make a washer. ([E] > Only Edges,[S],[3],[Enter]) Select the face at the top of the view, and extrude it up 0.5 units. ([E],[Z],[0],[.],[5]) Select the adjacent faces making up the first step, ([Ctrl][+]) invert the selection, (Select > Inverse) and delete the faces. ([X] > Faces)
Calculate your size
This staircase will have 13 steps and go 360 degrees around. The step is 0.5 units high so we will raise the step 6 units, and rotate it 360 degrees over 13 frames:
(steps - 1) * step_height = offset = 12 * 0.5 = 6
Create the animation
First, create a keyframe for the first step. ([I] > LocRot) This will save the location and rotation of the step in the first frame of the animation. Now set the frame count to 13. (That little box with the 1 in it in the top bar of the buttons window) Next, move the step up 6 units. ([G],[Z],[6]) If you now rotate your object 360 degrees by using, [R],[Z],[3],[6],[0] Blender will "simplify" things for you by actually rotating it 0 degrees. We will have to enter the rotation manually. Open the transform properties for your object, ([N]) and type 360 into the "RotZ" field. Now you can set the second keyframe. ([I] > LocRot)
Use DupliFrames
Now that your animation is done, you can set DupliFrames to create your duplicates, but first, you should set the "DupEnd" value in the "anim settings" panel ([F7]) to the number of the last frame in your animation. This tells tells Blender how many frames it should make duplicates for. If the number is too low, not all of your duplicates will show up, and if it is too high, you'll have a few hundred extra copies of the object in it's final position. With that done, press the "DupliFrames" button. Boom, an object appears for each frame! ... But wait, they don't seem to be lining up properly. This is because the default interpolation method for animations is not linear. With the object still selected, make an "IPO Curve Editor" window. With the mouse in that window, press [A] to select all the curves, then select Curve > Interpolation Mode > Linear, or press [T],[2]. The steps should now line up perfectly. Congratulations! you're done. You can leave the object in this mode, or you can separate them by "making the duplicates real" ([Ctrl][Shift][A]) to turn them into a set of linked objects.
Wrapping up
With this method you can quickly make ladders, stairs, spiral stairs, stacks of objects, screws, chains, and all manner of repetitive things. While it may seem rather involved at first, once you know how it works, it can be done in a few seconds, and is one of Blender's more powerful tools. The stairway we just created is not ideal for use in Uru though, as it is stepped. However, you can easily repeat the same process on a sloped object to create a collider ramp for your staircase as shown below. You can find a more in-depth tutorial explaining some other things you can do with dupliframes at the Blender Wiki here.

