Difference between revisions of "Korman:Lighting"
m (→Technical Information: Add clarification.) |
(→Other Details: Add images.) |
||
| Line 23: | Line 23: | ||
To create a premade lamp flare, place the 3D cursor at the light (or the object representing the light) as this will be the center of the lamp flare, and use Shift-A to Add->Plasma->Lamp Flare to add a new one to the scene. | To create a premade lamp flare, place the 3D cursor at the light (or the object representing the light) as this will be the center of the lamp flare, and use Shift-A to Add->Plasma->Lamp Flare to add a new one to the scene. | ||
| + | |||
| + | [[File:KormanAddPlasmaLampFlare.png|250px]] | ||
| + | |||
| + | [[File:KormanLampFlareTemplateOptions.png|right]] | ||
In the "Add Lamp Flare" operator panel, you have the option to name this lamp flare (it may be a good idea to name it after the type or location of the lamp it's associated with, especially if you intend to create many!), the distance from the center the flare should rotate around, and the lamp flare's material. The first time you create a lamp flare, a new material will be automatically generated and selected for you, named "FLAREGEN". | In the "Add Lamp Flare" operator panel, you have the option to name this lamp flare (it may be a good idea to name it after the type or location of the lamp it's associated with, especially if you intend to create many!), the distance from the center the flare should rotate around, and the lamp flare's material. The first time you create a lamp flare, a new material will be automatically generated and selected for you, named "FLAREGEN". | ||
Revision as of 04:29, 3 August 2020
| This is a tutorial page.Versions available: PyPRP; 3ds Max; Korman. |
![]() This page is a stub. You can help us by expanding it.
This page is a stub. You can help us by expanding it.
As Plasma is an older engine that predates the advanced lighting effects many newer games can take advantage of, an Age Builder must consider lighting more directly. Korman can automatically do some of the work, such as baking lightmaps and vertex colors, but needs the guidance of the artist in how they want to accomplish the desired effects and mood.
Contents
[hide]Lighting
(( To Be Completed ))
Lightmaps
(( To Be Completed ))
Vertex Colors
(( To Be Completed ))
Other Details
Once the Age has been lit as described above, there are still some added details and effects that really help make an Age come alive and feel less flat. Plasma doesn't perform any HDR, bloom, or in-camera effects, so these must be manually simulated where desired.
Lamp Flares
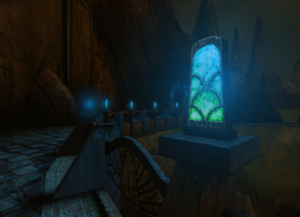
Lamp flares (sometimes called halos) are a visual effect that helps ground a light or other emissive source into a scene, much in the same way that a shadow grounds objects and avatars. Making a lamp flare look correct without causing artifacts takes some work, so Korman provides a premade template that does most of the work for the artist.
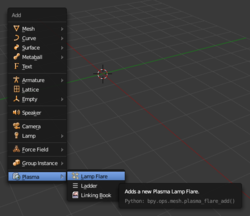
To create a premade lamp flare, place the 3D cursor at the light (or the object representing the light) as this will be the center of the lamp flare, and use Shift-A to Add->Plasma->Lamp Flare to add a new one to the scene.
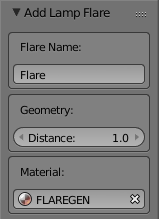
In the "Add Lamp Flare" operator panel, you have the option to name this lamp flare (it may be a good idea to name it after the type or location of the lamp it's associated with, especially if you intend to create many!), the distance from the center the flare should rotate around, and the lamp flare's material. The first time you create a lamp flare, a new material will be automatically generated and selected for you, named "FLAREGEN".
Be sure to set these options before you modify the flare in the 3D view; as with all Blender "Add" tools, this commits your current options and you will not be able to modify the creation options through the operator panel once you've accepted it.
One last thing must be done to complete your lamp flare: setting the image texture to use for your halo. With the flare still selected, go to the Material pane, select the FLAREGEN material (or whichever you selected, if you changed this option), and then go to the Texture pane. Open or Select a texture image for the FLAREGEN texture the same as you would any other image texture in Blender for Korman. All other options should already be pre-set correctly. You're done!
Creating any subsequent lamp flares do not require additional texture set-up as long as you use the same material. If you want different lamp flares to appear differently (such as separate yellow lamps and blue lamps, demonstrated in D'ni city locations), the easiest way is to click the [+] button (Add New Material) on the FLAREGEN material (not the texture) to duplicate it. This will create a new copy of the original FLAREGEN, which you can edit to use a different texture image. Set any new lamp flares to use this material instead.
For your lamp flare texture, it works best to use an image that includes alpha transparency. Often a simple circular gradient will do. It is also important to make sure the lamp flare's gradient reaches 100% transparency before it reaches the edge of your image, or else your lamp flares will have abrupt edges and look "cropped" or square-ish in-game. Information on how to create this texture is specific to your chosen image editing software, and should be easily found when looking for lamp flare texture tutorials for that software.
For your lamp flare to work correctly, make sure to always move it by moving the parent empty object, the rest of the flare will move with it. If you wish to adjust the distance from the center of rotation after creation, be sure to move the "Flare_Visible" child object only along its local Y axis.
Technical Information
These lamp flares work by using several of Plasma's special effects and modifiers together. This section describes how the auto-generated Lamp Flare works, which is useful for modifying them or creating your own should you need a custom effect.
The Lamp Flare consists of an empty situated at the center of the "lamp" which can be either the true light source, or more often, the object that "appears" to be the light (such as the fixture emitting the light). This empty has a Swivel modifier applied to it, set to Sprite, and it is rotated so that it always faces the player's camera no matter the angle they approach from.
Parented to this empty is a plane. This plane is the visible object that the player will see as the flare itself, and due to being parented to the empty, it will swivel. Instead of swiveling at its own center, it will swivel around the empty at the distance set by the artist, allowing it to clear the geometry and not appear to be inside the lamp or fixture. On this plane is set an Opacity Fader modifier set to Line-of-Sight, which causes it to vanish or appear with a quick half-second fade out or in when its center is occluded by other objects. This is important, due to the Plasma Layer options...
The FLAREGEN material and texture have important options pre-set for the artist that ensure the flare will not cause unsightly edges of transparency around other semi-transparent objects (such as trellises, railings, plants, and other lamps) nor obscure others entirely. The FLAREGEN material is set Shadeless, because it wouldn't make sense for a light source to be affected by shadows, and the FLAREGEN texture has three important options set: Skip Depth Write, Skip Depth Test, and Z-Bias. These are described more fully on the Textures page; in summary Skip Depth Write makes sure the flare doesn't hide or cut into other transparent objects behind it, Skip Depth Test makes sure that it isn't partially obscured but instead properly "bleeds over" as an over-bright lamp should, and Z-Bias prevents Z-fighting should it be placed too close to another object.


