Difference between revisions of "Korman:Textures"
m (→Image or Movie) |
Tsar hoikas (Talk | contribs) m (→Image or Movie) |
||
| Line 71: | Line 71: | ||
For '''Image Sampling''', make sure '''Use''', '''MIP Map''' and '''Interpolation''' are checked. | For '''Image Sampling''', make sure '''Use''', '''MIP Map''' and '''Interpolation''' are checked. | ||
| − | + | '''NOTE''': If your image is going to be used in a Linking Book or Journal, uncheck MIP Map and Interpolation. | |
'''Image Mapping''' will determine if your texture is continuous or not. | '''Image Mapping''' will determine if your texture is continuous or not. | ||
| Line 87: | Line 87: | ||
* '''Blend''' is how the texture will mix with others. Generally, this is set to '''Mix'''. | * '''Blend''' is how the texture will mix with others. Generally, this is set to '''Mix'''. | ||
* '''Add''' and '''Multiply''' are used to "merge" into a texture below based on shades of black and white. | * '''Add''' and '''Multiply''' are used to "merge" into a texture below based on shades of black and white. | ||
| − | + | '''NOTE''': Multiply was used for lightmaps in '''PyPRP''', but that method has since been replaced with Korman's [[Korman:Getting Started#Lightmapping|lightmapping modifier]]. | |
'''Plasma Layer Options''' is a custom panel for Korman. | '''Plasma Layer Options''' is a custom panel for Korman. | ||
Revision as of 22:05, 7 January 2016
| This is a tutorial page.Versions available: PyPRP; 3ds Max; Korman. |
This tutorial will explain various types of textures that can be used with Korman.
Contents
Introduction
Multiple textures can be layered over each other to create many desired effects. Some textures can be used as a stencil to "mix" two textures together, while others can be used to simulate lighting and shadow (aka lightmaps).
Proper UV mapping and texture settings are essential to making an object look realistic in URU. This tutorial will show you the various methods, but it's always best to adjust and experiment with the given settings to see if something works better.
Getting the Best Textures
There are many texture sites that offer free textures for use in 3D modeling. You can search the internet for "free textures" to find one that fits your purposes.
Some sites include:
More to be added
You can also go out and get a texture yourself by taking a picture of a surface of your choice. Things to remember about making your own textures:
- Make sure the surface is evenly lit (otherwise more editing may be needed later).
- Higher resolution will make the surface of your object look better.
- Good photo editing software will be needed to properly prepare your texture, particularly if you want to make it tile properly (ie smooth and continuous).
- While Korman will adjust picture size, it's best to keep your picture's dimensions in multiples of 4.
- Examples: 64 by 64, 256 by 512, 1024 by 1024, etc.
Which Types to Use
While Blender supports a wide range of image file types, generally, JPG, BMP and PNG are used.
NOTE: PNG is used for textures with alpha transparency.
All images are exported into DDS format by Korman upon export.
Getting Started
Before you can add textures, be sure to add a material to the object first and modify setting accordingly.
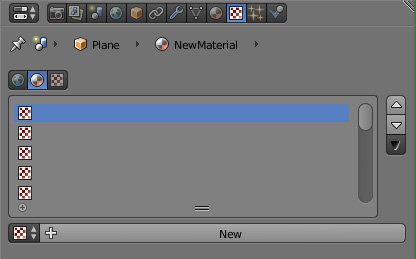
Once that's done, click on the Textures button next to the Materials button (white and red-checkered box).
The top three buttons determine where to place the texture. Make sure the middle one (material) is selected.
The up and down arrows to the right of the texture list can move the order of the textures in the material. Simply select a texture and use the arrows to move it up and down on the list.
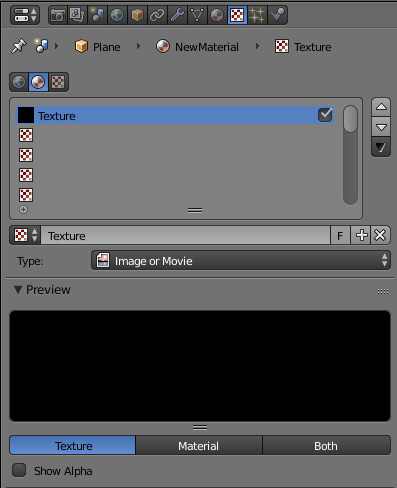
Click on the New button to add our first texture.
Just above Type:, you can rename the texture to something unique if you'd like.
The checkbox next to each texture MUST be checked for Korman to export it. If you'd rather have the texture there for later, but prefer it not be exported, uncheck the box to the right of the texture.
For Type:, Korman currently uses two kinds:
- Image or Movie: uses an image file (movie files are not supported at this time)
- Environment Map: used for reflective surfaces
Image or Movie
For the time being, we'll use Image or Movie.
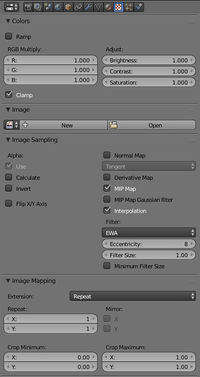
The Colors panel can adjust the settings of your texture locally (RGB value, brightness, contrast, and saturation).
The Image panel is where you can choose your image file.
For Image Sampling, make sure Use, MIP Map and Interpolation are checked. NOTE: If your image is going to be used in a Linking Book or Journal, uncheck MIP Map and Interpolation.
Image Mapping will determine if your texture is continuous or not.
- Repeat is used for a continuous texture.
- Clip is used if you'd like the texture to only appear once at the center of the UV map (decals).
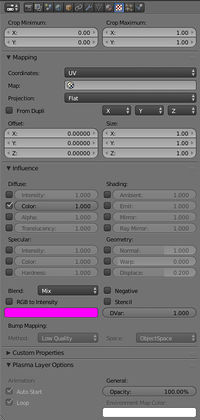
Mapping is how the texture will appear on the object. Generally, this is done with a UV map for more precise mapping. See UV mapping below.
- Select which UV map you'd like to use with the Map form. If none is selected, Korman will use the first UV map on the list.
- You can alternately use Generated in Coordinates for a continuous, yet less precise, mapping.
- Offset is mostly used in animations.
- Size is generally set at 1 for X, Y, and Z for it to appear exactly as it does in the 3D view. Increasing the value will "shrink" the texture while decreasing it will make it larger.
Influence is usually best with default settings. For regular textures, only Color should be checked and at a value of 1.
- Settings for this are a bit different with Stencils. See below.
- Blend is how the texture will mix with others. Generally, this is set to Mix.
- Add and Multiply are used to "merge" into a texture below based on shades of black and white.
NOTE: Multiply was used for lightmaps in PyPRP, but that method has since been replaced with Korman's lightmapping modifier.
Plasma Layer Options is a custom panel for Korman.
- You can set the behavior of your texture animations with Auto Play and Loop.
- With the opacity slider, you can set the transparency of the entire texture...and even animate it too to have it fade in and out.
Environment Maps
For reflective surfaces, such as the floors in the Guild Pubs and K'veer, an environment map is used.
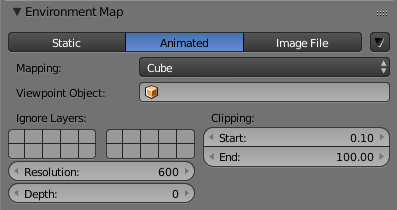
Switching the Type from Image or Movie to Environment Map brings up a different panel:
- Static, Animated, Image File: These determine how URU will render the environment map.
- Static will update the map only once upon entry. This is good for Age performance but cuts back on realism.
- Animated will refresh the map periodically. Good for realism, but slows performance. Plus it may also crash Path of the Shell/Complete Chronicles installations.
- Image File is not supported in Korman.
- Mapping
- Cube is used for Dynamic Environment Maps (which are less precise and don't reflect the avatar).
Example: Guild Pub floors.
- Plane is used for Dynamic Camera Maps, which are more precise AND reflect the avatar, but ONLY work for Myst Online: URU Live.
Example: K'veer floor in foyer (with the large window to the cavern).
Opacity
Environment Maps are where the Opacity slider in Plasma Layer Options comes in handy. If opacity is set to 100%, you'll ONLY be able to see the reflection. If you set the opacity to something lower, you can see any textures underneath the Environment Map texture.
Special Types of Textures
These are textures with special settings designed to do various functions.
Stencils
If you'd like two textures to "mix" into one another, such as the paths in Eder Kemo, a stencil is used. Generally, the stencil is black and white with shades of grey. White will cause the texture to appear fully, while black will cause it to disappear, while various shades of grey will give the texture varying shades of transparency.
Example
To be added

