Difference between revisions of "PyPRP:Great Zero Beam"
m (→Blender Animation) |
m (→Adding Coordinates) |
||
| Line 99: | Line 99: | ||
Rotation is also important. The local Y axis of the empty acts as the "line" of the Great Zero (where the direction coordinate reaches 0). You can use the empty itself to determine its local XYZ. In the end, the Z axis should be pointing straight up and the Y axis where the Great Zero's line would be. | Rotation is also important. The local Y axis of the empty acts as the "line" of the Great Zero (where the direction coordinate reaches 0). You can use the empty itself to determine its local XYZ. In the end, the Z axis should be pointing straight up and the Y axis where the Great Zero's line would be. | ||
| − | '''''Again, for reference: this line runs down the hallway to the Guild Hall (blocked) through the | + | '''''Again, for reference: this line runs down the hallway to the Guild Hall (blocked) through the tall rock formation in the courtyard and down the middle section of the Great Stairs in Ae'gura.''''' |
Once you have your empty properly placed and rotated, you can use AlcScript to set it as the GZ origin. | Once you have your empty properly placed and rotated, you can use AlcScript to set it as the GZ origin. | ||
Revision as of 11:52, 31 May 2015
| This is a tutorial page.Versions available: PyPRP; 3ds Max; Korman. |
Contents
Introduction
This will show you how to add the beam from the Great Zero to your cavern location.
Before You Start
You will need to determine approximately where the Great Zero is in relation to your cavern location. You are going to place a Projection Light (see ProjectionLights) at this point. So if your creation is on the cavern wall, you will need to place this light very far away for the proper effect.
You will also need the "grtzlaserproj" texture from either the city files or one of the Guild Pubs. For legal purposes, this texture can't be reposted here, so you must find it yourself or create an equivalent (it's basically a blue line with a black background).
Blender Work
Adding The Light
Once you have found the location you'd like to place the "Great Zero", left click on it to set the cursor there. Make sure the cursor is also slightly below your cavern location on the z-axis so the beam will encompass everything from the bottom floor up.
Next, click Add->Lamp->Area. Name this new area lamp something unique that you will remember (F9, under Links and Materials). We want this lamp facing the correct way, so press Alt+Spacebar, then click Local to switch to the lamp's local orientation. We must make sure that the local Z-Axis (blue) is facing horizontally and that the square representing the lamp's area is also facing that way.
Press R, then X, then 90, then Enter to do so if it is facing down.
Adjusting Light Settings
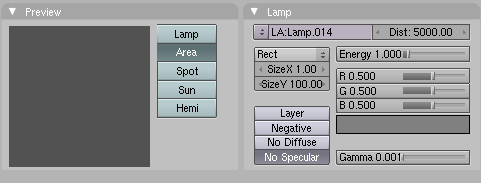
We need to adjust a few settings with the lamp. Click on the lamp button (F5, the light bulb button). Set your area lamp to the following settings:
Note: Gamma is set to 0.001 (its lowest setting).
Leave "Size X" (width) as 1. "Size Y" can only go up to 100, so if you need the height of the beam increased further, see the AlcScript below. "Dist" determines the depth of the beam, ie the distance from the light's source to your location. The maximum Blender can set it to is 5,000. If this needs to be more as well, see the AlcScript below.
Setting the Material
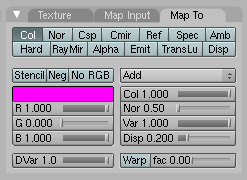
Much like footprints or ripples in water, we need to add a plane out of sight to set up a new material and texture for the beam itself. Click Add->Mesh->Plane. Once it's created and selected, press Tab, then press U, then click "Unwrap". Hit F5, then click the Material button (red ball). Add a new material and name it something unique. Make sure to turn Shadbuf OFF. Put your settings to the following:
Next, click on the texture button (to the right of the material button) and add a new texture as well, also naming it something unique. Under "Texture Type", choose "Image". Make sure MipMap, Interpol and UseAlpha are all turned on. Select Clip as well. Next, select the "grtzlaserproj" texture you recovered earlier.
Back in the Materials button, click on the "Map Input" tab and choose "Object". Under the "Map To" tab, switch from "Mix" to "Add".
AlcScript for a Great Zero Beam
The code for your lamp object should be as follows:
<lamp object>:
    lamp:
        layer: <Material>-<Texture> # From your plane
        flags:
            - movable
            - OverAll
        height: 2000 # Use this if you need a number greater than 100.
        depth: 5000 # Use this if you need a number greater than 5000.
The depth should be a very big number, particularly if your lamp is very far away from your cavern location. If you're not sure, make the depth very large and keep increasing until you finally see the beam, but always keep the width at 1.
NOTE: The coding to set the light to "on" or "off" by the server with the actual Great Zero is not added to this AlcScript yet.
Animating The Light
Of course, we'll need the beam to rotate properly, and for that, we need to animate it. If you'll recall, the Great Zero rotates clockwise, so use the following directions to do that. The GZ takes about two minutes to rotate, so this will set your emitter to rotate once for that amount of time.
Blender Animation
For more information on Blender animation basics, be sure to read the Blender 3D: Noob to Pro Wikibook's section on the subject. With that in mind, make sure your keyframe is set to 1 to start. Select your GZ light in the 3D window. Press I, then click "Rot" to record the light's position for that frame. Set your keyframe from 1 to 900 (30 seconds). Next, press R, then Z, then type -90 to rotate the light 90 degrees clockwise around the global Z axis. Press I then click Rot again to set the new rotation for this frame.
Repeat this process for frames 1800, 2700 and 3600 to make the light do a full rotation in two minutes.
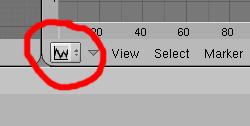
Now, if things are left like this, the animation will stall a bit at the beginning and end. To fix this, go to the IPO Curve Editor window.
You should see three lines with various points for your animation (you may need to use the mouse wheel to zoom out to see them). If you don't see anything, make sure your IPO Type is set to "Object". Keep pressing A until all the various points on the curves are selected (they'll be white instead of black). Next, press T, then 2 for a "Linear" curve to straighten out the ends and have one smooth, continuous rotation.
By default, PyPRP exports animations on a loop, so no more is needed here for now.
And that should do it! You should now have a working Great Zero beam in your cavern location.
Adding Coordinates
So we have a nice, shiny beam from the Great Zero, but what about coordinates? The tricky part with this is that it requires a more precise location of the Great Zero for realism. If your cavern location is somewhere on Ae'gura, for example, proper placement is crucial.
If you feel up to the task, then setting up a Great Zero point of origin is very simple.
First, select your light from before and press Shift+S and then 4 to move your cursor to the light's center point.
Next, click on Add->Empty. This will place an empty at the same position as your light source and it will act as your Great Zero's origin.
Name it something unique. Depending on where your cavern location is elevation-wise, you'll need to adjust its position on the Z axis (press G, then Z).
For reference: in Ae'gura, the GZ origin point is 1,510.613 Blender units up from lake level.
Rotation is also important. The local Y axis of the empty acts as the "line" of the Great Zero (where the direction coordinate reaches 0). You can use the empty itself to determine its local XYZ. In the end, the Z axis should be pointing straight up and the Y axis where the Great Zero's line would be.
Again, for reference: this line runs down the hallway to the Guild Hall (blocked) through the tall rock formation in the courtyard and down the middle section of the Great Stairs in Ae'gura.
Once you have your empty properly placed and rotated, you can use AlcScript to set it as the GZ origin.
<Empty>:
    calibration: broken/repaired/calibrated
Use only one of the three options above. If you just want to put the empty in for later but don't want it to do anything yet, use broken. If you'd like it to show coordinates but are unsure if you've placed your empty properly, use repaired for incorrect coordinates. If you're quite sure you've accurately placed the empty, use calibrated for accurate coordinates.
Export once more and you're done!
Note that you will have to complete the Great Zero's marker quests for any coordinates to appear at all.

