Difference between revisions of "Animating Textures"
| Line 99: | Line 99: | ||
</pre> | </pre> | ||
As an extra command I added "gotobegin" so that next time the animation starts from the beginning. | As an extra command I added "gotobegin" so that next time the animation starts from the beginning. | ||
| + | |||
| + | [[Category:AlcScript]] | ||
Latest revision as of 09:08, 18 April 2011
This will be a quick overview of the new animation feature, and a simple explanation of what can currently be done with it.
Contents
What are Animated Textures
Animated textures are textures which have one or more of their attributes changing over time. An example of this is flowing water, where the UV coordinates of a texture are changed every frame, and the texture appears to "slide" across the surface. Currently only changing the UV mapping coordinates, opacity, and color is supported.
How is it done
To create a texture animation, start with a material that has at least one layer.
Although not required, it is recommended that you have an IPO curve editor window open while creating the keyframes, so you can see when they are set. Make sure you set the IPO Type to Material. If you are not animating the bottom layer, you will need to set the channel number next to the dropdown to show the curves for the appropriate layer. (the bottom layer is layer 0)
Select the layer you want to animate, and move to the "map input" panel. With the frame counter set to 1, press [I] and select "Ofs" to create a keyframe for the offsets. NOTE: you must have your mouse in the material panels area in order for this to work; if your mouse cursor is in the IPO panel, pressing I will not create the key.
Then, change the frame counter to 30. This puts the next keyframe of your animation 30 at frame 30, or 1 second into the animation. The offset values "OfsX, OfsY, and OfsZ". These values will be added to the UV coordinates of the texture when it is rendered in plasma, so change these values, and then press [I] again to create another keyframe at the current frame. (30)
All texture animations by default loop repeatedly, assuming that the last keyframe is the end of the animation. It is suggested that you make sure that the last frame of the animation is roughly the same as the first frame. Also, currently the interpolation mode in plasma is always linear, even though the curve editor may show another interpolation style.
All three curves (OfsX, OfsY, OfsZ) must be present, and they must have the same keyframes (automatically the case when you only use the [I] key to set keyframes and don't modify them afterwards).
In the same way, using the sizeX, sizeY, sizeZ fields and their ipo curves created by pressing [I] and selecting Size, you can animate the scale of the texture.
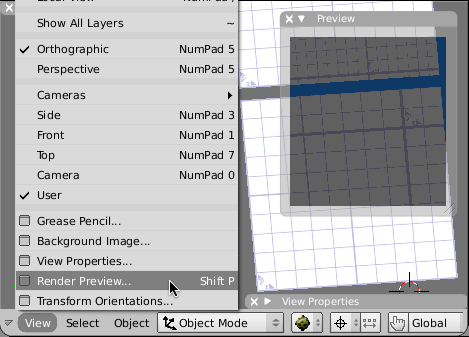
To see what your offset or scaled texture will look like in Plasma at the current frame number, use the Render Preview panel from the View menu, since the textured real-time view will not reflect the offset or scale:
Compatibility Note: In PyPRP 1.5 and earlier, texture offset and scale was exported in a different manner than shown in the Render Preview, and animation of scale was not supported.
Opacity
Using the Col ipo curve, corresponding to the Col slider on the Map To panel, the opacity of a texture can be animated. You can insert a Col keyframe by either pressing [I], selecting All Mapping, and then deleting all the other ipo curves generated by that, or by selecting Col in the margin of the ipo window and then ctrl-clicking in the window.
If your object turns out black instead of transparent, push the Transp button in the Draw panel of the Object buttons to put it into a blend span.
Compatibility Note: There is a bug in PyPRP 1.5 and earlier that caused any texture with an opacity animation to appear completely transparent.
Changing Animation Settings
If you don't like how your texture animation came out, simply delete the IPO curve points (put your cursor on the IPO editor screen and press a until the dots are white, then press delete) and redo the above steps with a large frame number. Before testing your age again, however, remember to delete your age's .sav file.
.sav files are found in the Uru installation directory (usually Program Files\Ubisoft\Cyan Worlds\Myst Uru Complete Chronicles) under this path:
<Uru Directory\sav\<random numbers>\current\<age name><more random numbers>.sav
Controlling Layer Animations
If you do not want the layer animation to loop continuously you can use the following AlcScript to stop it when the age loads.
<object>:
    visual:
        matanims:
          - mat: <material name>
            flags:
              - stopped
Starting a layer animation can be done with a responder using this AlcScript.
          - type: responder
            responder:
                states:
                  - cmds:
                      - type: animcmdmsg
                        params:
                            receivers:
                              - 0043:<material>-<texture>
                            cmds:
                              - continue
                        waiton: -1
                    nextstate: 0
                    waittocmd: 0
                curstate: 0
                flags:
                  - detecttrigger
The receiver name must contain both the name of the material and the texture, separated by a hyphen.
In this case my material is called "MatSphereSprite" and my texture "glare". So the receiver name becomes "MatSphereSprite-glare".
And finally we can stop the layer animation again with this AlcScript.
          - type: responder
            responder:
                states:
                  - cmds:
                      - type: animcmdmsg
                        params:
                            receivers:
                              - 0043:<material>-<texture>
                            cmds:
                              - stop
                              - gotobegin
                        waiton: -1
                    nextstate: 0
                    waittocmd: 0
                curstate: 0
                flags:
                  - detecttrigger
As an extra command I added "gotobegin" so that next time the animation starts from the beginning.


