Difference between revisions of "Decal Blending"
| Line 1: | Line 1: | ||
[[Category:Writing Tutorials]] | [[Category:Writing Tutorials]] | ||
| − | |||
Based on an older tutorial by Aloys, decal blending has recently been simplified and made more accessible. | Based on an older tutorial by Aloys, decal blending has recently been simplified and made more accessible. | ||
Revision as of 21:39, 20 January 2008
Based on an older tutorial by Aloys, decal blending has recently been simplified and made more accessible.
Contents
[hide]Decal Material Blending (Relto Style)
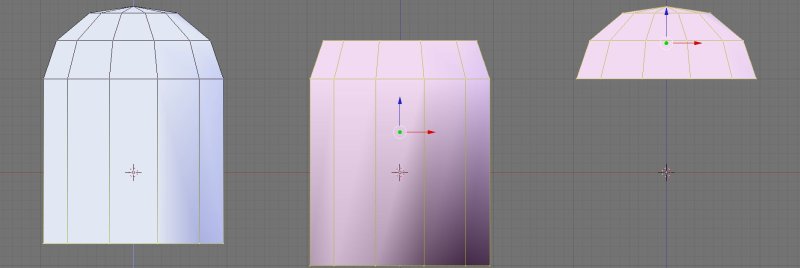
If you look around Relto, or many other cyan ages, like Kemo, you'll see places where one texture seems to fade seamlessly into another. In many cases this transitioning between two textures is done by by making the edge of one of them transparent. For an example, we're going to blend this grassy top onto this rocky cylinder.
For this tutorial, I'm going to assume you know how to edit meshes and materials in blender.
Create the decal meshes
Go into edit mode and get yourself sphere. (Space-Add-Mesh-UVSphere-Segments:12) Delete (X) the bottom half of the vertices. Extrude (E) it downward to create the cylinder.
Select the top portion of your object and duplicate it. Separate it from the rest of your object. (P-Selected) Then delete the top portion of the object. (not really necessary, but it's a waste of faces)
Texture and set the material properties
Select the top object and take it into UV face select mode. Select all the faces. Unwrap (U-Unwrap) the uv coordinates, and use the uv image editor to add a texture. (Image-Open) Then set the material texture to match the uv texture. (be sure to hit UV in the map input settings!) I also generally set "shadeless" to on, mat color to white, and "Amb" to 1. Repeat the process for the rocky lower object, using a different texture.
Paint the Alpha layer
Select the top decal object. Find the vertex color "col" in the Mesh settings and press "new". Rename the new color layer "Alpha". click the buttons to the left of that color layer to ensure that is the layer you're working on. Take the object into Vertex Paint mode and set all the vertex colors to white. Then paint black around the edge as shown in the first picture. The areas that are black in this color layer will be drawn as transparent in URU.
Export and see if it worked
The way the objects were created, the overlapping meshes are in the exact same position. If you move the overlapping verts in either of the meshes, you will get bad-looking z fighting artifacts, so be sure your mesh is final when you separate it, and if you have to edit the overlapping vertices, simply repeat the duplicate-part process from the start.
When two objects are in the exact same position, the last one drawn will take precedence. The PyPRP plugin will automatically set transparent objects to be drawn last, but if you have problems with this, then try increasing the "Zoffs" value in the material settings. To shuffle the draw order in blender, select to object you want in front, then the one behind, then parent and un-parent them. (ctrl-p, alt-p)
- Nadnerb


