Difference between revisions of "ProjectionLights"
(→Add the light) |
(→Add the light) |
||
| (5 intermediate revisions by the same user not shown) | |||
| Line 5: | Line 5: | ||
== Set up the material == | == Set up the material == | ||
| − | First, we need to create the layer that will be attached to the lamp. Create a plane or other simple object somewhere out of view, and apply a texture to it. Create a new material, and name it. Add a texture layer, name that too, then set the texture to the image you added, and set the "Clip" property. Then, back in the material set the "Ztransp" property on, set the blend mode to "Multiply" | + | First, we need to create the layer that will be attached to the lamp. Create a plane or other simple object somewhere out of view, and apply a texture to it. Create a new material, and name it. Add a texture layer, name that too, then set the texture to the image you added, and set the "Clip" property. Then, back in the material set the "Ztransp" property on, set the blend mode to "Multiply" and set the map input to "Object". |
[[Image:ProjTutMat.png]] | [[Image:ProjTutMat.png]] | ||
== Add the light == | == Add the light == | ||
| − | [[Image:ProjTutLight.png|thumb|right| | + | [[Image:ProjTutLight.png|thumb|right|150px|Example]] |
PyPRP 1.3.1 also introduced the last type of light available in plasma, the "Limited Directional" light, which is like a sun lamp, except that the area it affects is limited to a box around and in front of the source. Projection lights will only work (correctly) with Spot lights and LimitedDir lights. In Blender, the LimDir light is the "Area" light. | PyPRP 1.3.1 also introduced the last type of light available in plasma, the "Limited Directional" light, which is like a sun lamp, except that the area it affects is limited to a box around and in front of the source. Projection lights will only work (correctly) with Spot lights and LimitedDir lights. In Blender, the LimDir light is the "Area" light. | ||
| Line 18: | Line 18: | ||
lamp: | lamp: | ||
layer: <name of material>-<name of layer> | layer: <name of material>-<name of layer> | ||
| + | |||
| + | If you want more than one lamp to affect the same surface, you will need to be sure that the layers are separate. (if you use the same layer on multiple lamps, it will only be mapped to one, and it will look like one light) | ||
== Export == | == Export == | ||
| − | DO IT. | + | DO IT. When done, the projection should affect all lit objects, as well as the avatar. |
| + | |||
| + | [[Image:UruExplorer_2008-05-03_21-30-13-57.png]] | ||
Latest revision as of 19:28, 7 June 2008
Preface
Beginning in GoW PyPRP 1.3.1, it is possible to use projection lights. These are lights that "project" a texture onto the surfaces they illuminate. Projections are a standard feature of plasma lights, and blender lights. This tutorial will show you how to light your scene with a projection lamp. (assuming that you have a working scene already)
NOTE: The current implementation of projection lights is what we call a hack. Meaning inelegant code either written very quickly, or in a strange way to get around restrictions. (the latter, in this case) If, at any point in the future, blender's python interface improves, or I become aware of some feature for accessing lamp materials nicely that I've missed, this feature will be rewritten, and this tutorial will become invalid/outdated.
Set up the material
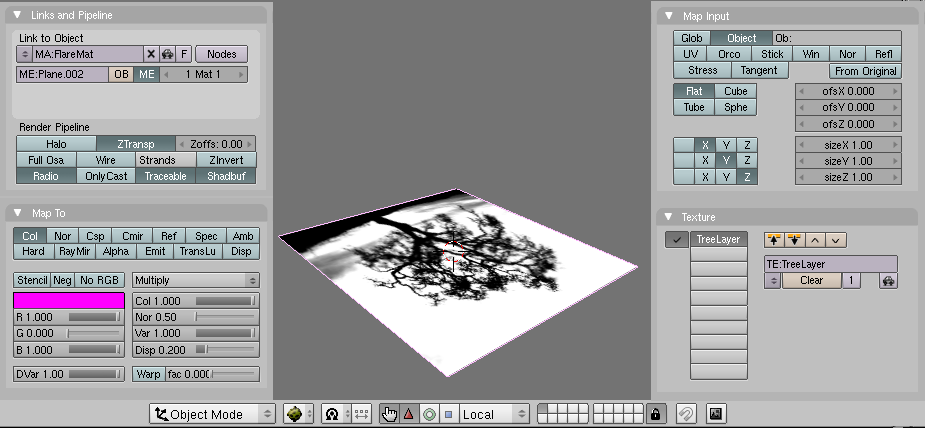
First, we need to create the layer that will be attached to the lamp. Create a plane or other simple object somewhere out of view, and apply a texture to it. Create a new material, and name it. Add a texture layer, name that too, then set the texture to the image you added, and set the "Clip" property. Then, back in the material set the "Ztransp" property on, set the blend mode to "Multiply" and set the map input to "Object".
Add the light
PyPRP 1.3.1 also introduced the last type of light available in plasma, the "Limited Directional" light, which is like a sun lamp, except that the area it affects is limited to a box around and in front of the source. Projection lights will only work (correctly) with Spot lights and LimitedDir lights. In Blender, the LimDir light is the "Area" light.
For this tutorial, create an Area light and aim it at a surface that will be affected by it. The box around it (and the line in front of it) shows the extent of the light's range. (in plasma. Area lights are used in blender for soft shadows) Adjust these bounds to your liking, keeping in mind that in plasma, the texture will be mapped squarely onto this box. Then add an alcscript to the light to attach the layer:
<name of lamp>:
    lamp:
        layer: <name of material>-<name of layer>
If you want more than one lamp to affect the same surface, you will need to be sure that the layers are separate. (if you use the same layer on multiple lamps, it will only be mapped to one, and it will look like one light)
Export
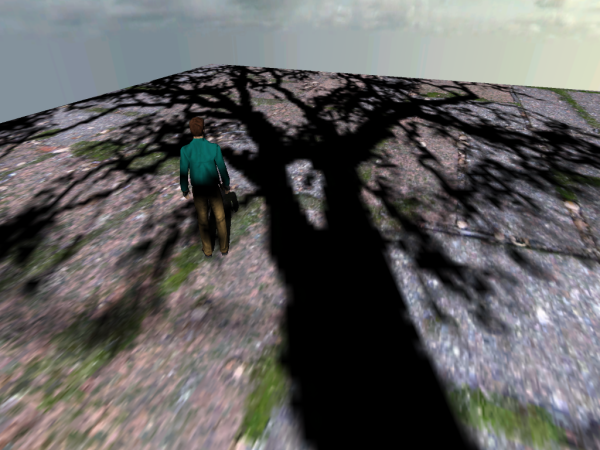
DO IT. When done, the projection should affect all lit objects, as well as the avatar.


