Difference between revisions of "Korman:Vertex Painting"
m |
m |
||
| (One intermediate revision by the same user not shown) | |||
| Line 34: | Line 34: | ||
This will bring up a new colour wheel and brush settings menu on the left side of the screen. | This will bring up a new colour wheel and brush settings menu on the left side of the screen. | ||
| − | [[file:gowvert06.jpg|left]] | + | [[file:gowvert06.jpg|left|80px]] |
The colour wheel will allow you to pick the colours you want, the bar to the left of it will then allow you to adjust the slider to select how bright or dark you want that colour. It is worth noting here that if you push the slider right to the top you will not get white, but if you push it all the way to the bottom you will get black. Once you've pushed it down into the black it will then grey scale the bar allowing for you to access white but will result in the colour you picked being lost. There is a way around this which will be covered in the "colour palette" section. | The colour wheel will allow you to pick the colours you want, the bar to the left of it will then allow you to adjust the slider to select how bright or dark you want that colour. It is worth noting here that if you push the slider right to the top you will not get white, but if you push it all the way to the bottom you will get black. Once you've pushed it down into the black it will then grey scale the bar allowing for you to access white but will result in the colour you picked being lost. There is a way around this which will be covered in the "colour palette" section. | ||
Latest revision as of 12:22, 7 September 2024
Vertex painting is a versatile resource that is used heavily in Cyan's content for Uru/EoA but little utilized by fan created content. It is a great way to add depth to Ages and areas as well as any props within as well as creating the illusion of lighting in areas where RT lighting is not being used. It's not a feature that is specific to Korman but is a feature of Blender itself (although if you are using versions of Blender beyond that which is supported by Korman then there is a high possibility that the feature has been moved or changed).
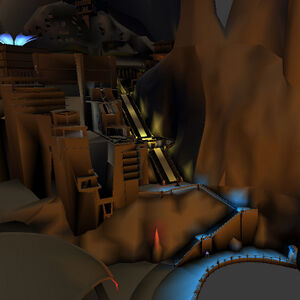
As you can see in this image of Ae'gura, every bit of colour on the meshes is vertex painted. You don't require a tablet to vertex paint, a mouse does the trick just fine [author's note: I use a mouse for all my vertex painting].
Contents
[hide]Colour Theory
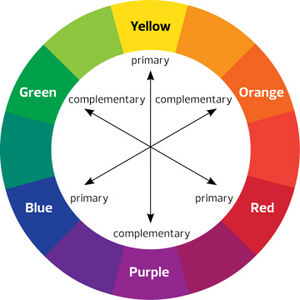
One thing worth keeping in mind is colour theory. Colour theory is the establishment on primary colours, secondary colours and how they interact with each other. Primary colours gives you red, blue, and yellow. By mixing said colours you then get secondary colours of orange, green, and purple. In addition to these primary and secondary colours you have complementary/contrasting colours. These complementary colours are opposite colours on the colour wheel.
As you can see in the first image of Ae'gura they use a lot of blue lighting in contrast with the oranges and browns. This results in the colours "popping" more and having more of an impact. The tones of the contrasting colours used are also important. A vibrant green and a vibrant red are very jarring and hurts the eyes
But if you tone it back a bit, it's not so painful on the eyes.
Another aspect of colour theory is that colours effect mood. Green for example is thought to be calming whilst red is more of an angry colour. The choice of colours within your Ages and areas (not just with vertex painting but with texture colours, FNI settings etc) will have a huge impact on the mood you wish to establish.
If you're interested in reading more about colour theory Colour Matters has a nice little write up.
Getting Started
Vertex Paint Mode Options
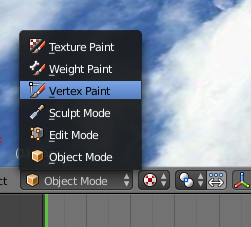
To access the vertex painting mode select the mesh you wish to paint and in the "object mode" drop up menu, select "vertex paint"
This will bring up a new colour wheel and brush settings menu on the left side of the screen.
The colour wheel will allow you to pick the colours you want, the bar to the left of it will then allow you to adjust the slider to select how bright or dark you want that colour. It is worth noting here that if you push the slider right to the top you will not get white, but if you push it all the way to the bottom you will get black. Once you've pushed it down into the black it will then grey scale the bar allowing for you to access white but will result in the colour you picked being lost. There is a way around this which will be covered in the "colour palette" section. Directly under the colour wheel is two boxes side by side, this is your primary colour and secondary colour. The primary colour is whichever colour you are using at the time, the secondary can be set to an alternate colour. This is handy if say you're using a yellow to highlight which you can have in the primary box and a dark blue for shadowing that you can put in the secondary box so that you don't have to keep adjusting the colours between the two.
Radius: Increases/decreases the brush radius pixel size.
Strength: This adjusts how much colour goes on to the mesh you are painting. It's definitely worth playing with this setting until you find a value you're happy with. Lower levels allow for a more gradual build up of colour. This can be especially helpful if you've painted something too bright and want to dial it back a little with a darker colour.
Blend: Adjusts the blend mode of the vertex paint being applied to the mesh and texture. For the most part this will be left set to "Mix".
Alpha: This should be check marked on by default and doesn't need to be adjusted. Despite the name it has no bearing on Alpha vertex painting.
Accumulate: This builds up paint strokes on top of each other to build up colour.
Front Faces Only: Having this checked will mean that only the vertices facing you will take on colour. This will reduce (may not completely stop) any errant colouring winding up on part of the mesh you don't wish to colour.
Fall Off: This will adjust how much the colour drops off dependant on how far the vertices are away from facing the viewer (this is another setting that doesn't really need to be touched).
2D Fall Off: This changes the method of the brush from spherical to a flat circle. It's best not to have this option checked as having it checked will cause errant vertex colouring in other parts of mesh where you may not want colouring to be applied.
There are more settings below this selection but they aren't anything that play any role.
When you switch to "Vertex Paint" mode you will so notice that some of the menu options to the left of the button will change as well.
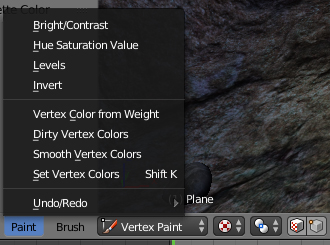
The only one you really want to be mindful of here is the "paint" menu option.
Bright/Contrast: These sliders will adjust the brightness and contrast for all colours applied to the mesh you are currently working on. This can be useful for several reasons. If you happen to find the colours you have used are too dark, then you can adjust them with option to make them brighter. In addition if you want to then apply the same settings to other meshes with the same problem you need only select that mesh, switch to vertex paint mode and then go into the "bright/contrast" mode and it will retain the numerical values and apply them to that mesh too (you can also reapply those values to the same mesh as many times as you want by repeating that process).
Hue Saturation Value: This works the same as the bright/contrast option only this will adjust the hue of the colours on the mesh you are working on. You may have a mesh you've painted blue and you now want it to be green. Instead of repainting it you can use the hue saturation values to move the values of the "hue" bar and make it green. If you then wanted it to be more vibrant green you would only need to adjust the "saturation" bar and make the numerical value there higher.
Levels: This option again is one that will never needed to be touched.
Invert: This will invert all vertex colours on the mesh.
Vertex Colour From Weight: This is another option that won't need to be used.
Dirty Vertex Colours: This will "rough" up any colouring you've done to a mesh. Like the smooth vertex colouring the results of this option can be hit and miss.
Smooth Vertex Colours: This will smooth any vertex colours you have applied to a mesh. If you find your colouring is a bit blocky looking with too sharp lines between colours, this option will make it more gradual colour changes. This setting is a bit finicky, sometimes it works well and sometimes it doesn't.
Set Vertex Colours: This works like a bucket fill. It will fill the entire mesh (or if you have certain faces selected it will colour only those) with solid colour of whichever colour you have selected. This is handy for blocking in base colours.
Colour Palette
One of the super helpful features of vertex painting is the colour drop tool. Whilst in vertex painting mode if you hold down "S" whilst over your mesh you will see the colour dropper icon appear where ever your mouse is currently hovering. If you look at the colour wheel whilst doing this you will see that the colour in either the primary or secondary colour boxes (depending on which is active) will change to match the colour of whatever the dropper is sampling.
This dropper tool had two functions.
- Hold S and Release - Will select the colour the tool is hovering over.
- Hold S and Left Mouse Click - Will select the colour the tool is hovering over and then add it to your colour palette which will appear underneath the primary and secondary colour boxes.
This latter function will be extremely helpful in cataloguing your mainly used colours for easy selection. Once you have picked your core light source colour (of your sun/sky) and your core shadow colour I definitely recommend using the S+LMB option to log those colours for use elsewhere on your Age. Alternatively if you have a colour picked on the colour wheel then click the "+" symbol underneath the colour wheel it will add that colour to your palette.
Light Sources
Depending on the content you're building the main light sources you want to take in to account is the location of the sun (if you're building an Age) and the location of the lake water (if you're building a D'ni location). You will also want to take into account the colour of light that is coming from the sun. A common mistake often seen in the art world is people using white for the suns light and black for the shadows. When you actually look at shadows in the real world they're not black they are cool colours like blues and purples. This is due to how the light refracts in our atmosphere.
So once you've established the direction of your sun on your Age.
Textured View Vs Wireframe View - Face selection for masked painting - which views are better for painting what/pros and cons of masked painting.


