Difference between revisions of "Planting Some Grass"
(Replacing page with '== Adding a patch of grass == == Adding a tree ==') |
(Repair broken links.) |
||
| (17 intermediate revisions by 4 users not shown) | |||
| Line 1: | Line 1: | ||
| + | Of course, no Age is complete without at least a small patch of vegetation.<br/> | ||
| + | |||
| + | In this part we will be discussing two techniques:<br/> | ||
| + | * '''Alpha vertex''' painting for the patch of grass | ||
| + | * '''Billboarding''' bushes and simple plants | ||
| + | |||
== Adding a patch of grass == | == Adding a patch of grass == | ||
| + | For the patch of grass, we will be using the following texture:<br/> | ||
| + | [[Image: Grass_detail.png]] | ||
| + | |||
| + | The texture has a bit of alpha to make it blend in with the terrain better.... | ||
| + | |||
| + | === Making a new plane === | ||
| + | Bur first we will need a place to place the grass.<br/> | ||
| + | We will copy a piece of the floor mesh to place the grass upon. | ||
| + | |||
| + | Enter edit mode on the island surface, and select the faces you want to copy.<br/> | ||
| + | [[Image:Tutorial_CopyPlane.png]]<br/> | ||
| + | |||
| + | Now, press '''Shift-[D]''' to duplicate the faces.<br/> | ||
| + | After that press '''[P]''' to extract those duplicated faces into a new mesh of its own. | ||
| + | |||
| + | Exit edit mode, and select the new plane.<br/> | ||
| + | Don't forget to shift it up (on the z-axis) by about 0.01 feet (0.01 blender units) to ensure it's not obscured by the islands material itself. | ||
| + | |||
| + | === Adding a new material === | ||
| + | Of course, it needs a new material. Delete both materials currently assigned, in the Mesh Panel. (Don't worry, it will stay on your island) | ||
| + | |||
| + | Since the new plane has the same UV coordinates as the parent object, you don't need to UV Map it again.<br/> | ||
| + | Just add a new material, and set the specularity to '''0.0'''<br/> | ||
| + | Now add the grass texture to it. You can set ''SizeX''' and '''SizeY''' in the '''Map-Input''' tab both to '''64''' for a nice result. | ||
| + | |||
| + | === Vertex painting === | ||
| + | Now, go to the Mesh panel, and add a new vertex color layer. Name the new vertex color layer '''Alpha'''.<br/> | ||
| + | Select the new Vertex color layer by pressing the two buttons left of the name, and start painting the edges of the plane black. Be sure to keep the rest white.<br/> | ||
| + | Where the faces of this layer are black, the mesh will become transparent in Uru. Where it is white, it will become opaque. | ||
| + | [[Image:Tutorial_VtxPaint.png]] | ||
| + | |||
| + | Using this technique, you can make the new grass plane blend very nicely with the terrain below it.. | ||
| + | Don't forget to paint the first Vertex layer ('''Col''') all white, to get all of the texture on it. | ||
| + | |||
| + | One thing that still needs to be done, is setting the Z-Offset.<br/> | ||
| + | The Z-Offset is important to the rendering order.<br/> | ||
| + | St it to '''2.0''' to get a good blend.<br/> | ||
| + | [[Image:Tutorial_ZOffset2.png]] | ||
| + | |||
| + | === Suggestions for improvement === | ||
| + | You could also find a flower or weed texture, and use a stencil to get it nicely onto this grass, thus adding another bit of realism. | ||
| + | |||
| + | == Adding plants == | ||
| + | |||
| + | Now that we have some grass, it is time to add some bushes and plants. | ||
| + | |||
| + | === Simple Sprout plant === | ||
| + | We will start by adding a simple, but convincing sprout-like plant. | ||
| + | |||
| + | We will use the following texture:<br/> | ||
| + | [[Image:GreenSprit.png]]<br/> | ||
| + | (This image is lying on its side to make the UV mapping in blender easier) | ||
| + | |||
| + | Because this is a very simple plant, we can get away with making it very simple. | ||
| + | |||
| + | ==== Modeling ==== | ||
| + | The plant will be located on the grass we made earlier, so place your 3D cursor in that area, a little higher than the field of grass. | ||
| + | |||
| + | Now create a simple plane and size it so that it's height is about 2 times its weight.<br/> | ||
| + | (Create the plane in the '''top''' or '''side''' view, if you don't want to be bothered to rotate it afterwards) | ||
| + | |||
| + | While still in edit mode, go to the '''top''' view, select all (press '''[A]'''), and duplicate and rotate the plane that is already there. (To do that, press '''[D]''', and immediately ater that press '''[R]''' and type in '''90''', followed by '''[Enter]''') | ||
| + | |||
| + | It should look like this:<br/> | ||
| + | [[Image:Tutorial SpritPlanes.png]]<br/> | ||
| + | |||
| + | Now, as you will notice, the two planes intersect each other right in the middle.<br/> | ||
| + | This is useful to create the illusion of a three-dimensional plant.<br/> | ||
| + | |||
| + | ==== Uv Mapping ==== | ||
| + | Now, continue to UV-texture the plant. Switch the mode to 'UV Face Select', and add the '''GreenSprit.png''' texture to the UVMap window.<br/> | ||
| + | [[Image:Tutorial UVTex GreenSprit.png]]<br/> | ||
| + | |||
| + | Select at least one face (though it's better to select both), and press the '''Twoside''' button as in the image above. This button is located in the '''Edit''' menu ([[Image:Tuotrial Buttons EditModeSel.png]]) | ||
| + | |||
| + | Now, if you see the plant texture rotated somehow (in the UV Face Select view), do correct the UV Mappings for the wrong plane(s). | ||
| + | |||
| + | ==== Texturing ==== | ||
| + | As a next and final step, add a new material to the object, and add an image texture referring to this texture.<br/> | ||
| + | Don't forget to set '''UseAlpha''' on it. | ||
| + | |||
| + | |||
| + | As a final step, we must give it a '''Z-Offset''', since both this object and the plane of grass beneath it have transparency. | ||
| + | We will need to set the plant's Z-Offset higher than that of the Grass plane, so let's set it to '''3'''. | ||
| + | On the same screen, click the '''ZTransp''' button, so that the planes will not overlap each other. | ||
| + | |||
| + | [[Image:Tutorial SpritZs.png]] | ||
| + | |||
| + | * '''''Note:''''' | ||
| + | *: If you set the plant's Z-Offset lower than 2, the grass plane will override it's drawing, makign it invisible | ||
| + | *: On the other hand, if you set it to the same Z-Offset (2), the transparencies of the grass and the plant will mix. | ||
| + | *: Setting it higher makes the drawing order just right. | ||
| + | |||
| + | Now, it is also important that the plant does not receive any shadows, as that ruins the realism.<br/> | ||
| + | We will make the plant '''Shadeless''' by pressing the appropriate button in the '''Material''' button panel:<br/> | ||
| + | [[Image:Tutorial ShadeLess.png]] | ||
| + | |||
| + | ==== Placement and Copying ==== | ||
| + | Don't forget to place the mesh so that it just touched the grass. | ||
| + | |||
| + | To add a bit more population of this plant, just make a few copies, and resize them a bit.<br/> | ||
| + | Vary in height and width (by scaling on the Z-axis and XY-plane separately) to get some natural diversity. | ||
| + | |||
| + | |||
| + | === A more complex bush === | ||
| + | As nice as these simple plants are, it's also nice to add a bit of a bush.<br/> | ||
| + | We're going to make a bush in the same way Cyan does in Relto and in The Cleft. | ||
| + | |||
| + | As our age is a bit rocky, is will probably have a poor soil. So why not let a few heather bushes grow there.... | ||
| + | |||
| + | As always, here is the texture we'll use:<br/> | ||
| + | [[Image:Heather.png]] | ||
| + | |||
| + | As heather only blooms in the late summer or early autumn, this texture is of course of a non-blossoming heather bush.<br/> | ||
| + | |||
| + | ==== Modeling ==== | ||
| + | |||
| + | Making a bush realistic requires a model that is a bit more advanced than the simple billboard we used earlier. | ||
| + | This model will have a couple of layers of billboards. | ||
| + | |||
| + | We will start the bush with a tube, consisting of 6 segments. | ||
| + | |||
| + | Set the 3D Cursor to a good starting location, and go to top view. | ||
| + | |||
| + | Press '''[Space]''', and choose '''Add'''->'''Mesh'''->'''Cylinder'''.<br/> | ||
| + | In the next dialog, DeSelect '''Cap Ends''', and set it to 6 Vertices, and around 0.5 Radius and 2.0 Height.<br/> | ||
| + | [[Image:Tutorial AddCylinderOpenEnds.png]] | ||
| + | |||
| + | You will now have a simple tube. | ||
| + | |||
| + | ===== Early UV Mapping ===== | ||
| + | To make things easier later on, we will now UV map the image first, before changing the model. | ||
| + | Exit Edit mode, and go to UV Edit Mode. | ||
| + | |||
| + | Now, make all faces twosided (one by one), select them and apply the heather bush texture.<br/> | ||
| + | |||
| + | Now, we will map the texture around the cylinder:<br/> | ||
| + | Go to Top view, press '''[U]''' and select '''Cylinder from View''' | ||
| + | [[Image:Tutorial UVMapBush2.png]] | ||
| + | |||
| + | You will notice that the UV Map may not be compleately in the bounds of your texture. This is not a big problem, as textures are repeated by default, but you can go to the UV/Image editor, select all vertices and move them to fit inside the bounds of the image. | ||
| + | |||
| + | ===== Continue modeling ===== | ||
| + | Now that we have mapped the model, we can go back to edit mode. | ||
| + | |||
| + | We are now going to make two copies of the mesh, each a little larger than the last one, and a little rotated. | ||
| + | Also, each larger tube, must be a little shorter than the smaller ones. | ||
| + | |||
| + | We will start in '''Top view''' | ||
| + | First, select all vertices. Now press '''Shift-[D]''' to duplicate, and follow it byt '''[S]''' to scale. Make it a little larger. Now, press '''[R]''' to rotate it, and rotate it a bit. | ||
| + | |||
| + | Now, go to '''Side view''' ('''NumPad-[3]''') and go into scaling mode ('''[S]'''). Use '''[Z]''' to make the scale affect the Z-Axis only, and make it a bit smaller. Finally, grab ('''[G]''') the scaled cylinder, and move it down, so that it's bottom matches the bottom of the first cylinder. | ||
| + | |||
| + | Now, Go back to '''Top view''', and repeat those steps, to make a third (larger) cylinder. | ||
| + | |||
| + | If you're done, it should look a bit like this:<br/> | ||
| + | [[Image:Tutorial BushStep2.png]] | ||
| + | |||
| + | Next, we will add a cross-plane in the center-cylinder. | ||
| + | |||
| + | Go to '''Top view''' and make sure that A) you have the '''Limit selection to visible''' button '''[i]OFF[/i]''' and B) you are in vertex select mode<br/> | ||
| + | Select two (technically four, but two of them are hidden below the others) opposing points on the inner cylinder, and press '''[F]''' to make a face of them.<br/> | ||
| + | Select two other opposing points in the same inner cylinder, and make a face of those as well. | ||
| + | |||
| + | The result (after adjusting the view) should look like this:<br/> | ||
| + | [[Image:Tutorial BushStep3.png]] | ||
| + | |||
| + | ===== UV Mapping again ===== | ||
| + | UV map the new planes you just created, so that each plane uses about one half of the heather bush texture.<br/> | ||
| + | Also make those faces Two Sided | ||
| + | |||
| + | It should look a little like this: <br/> | ||
| + | [[Image:Tutorial BushStep4.png]] | ||
| + | |||
| + | ===== Finalizing the model ===== | ||
| + | |||
| + | As a final step, we are going to pinch in the bottom of the model, and make the top of it a little wider. | ||
| + | |||
| + | Go into '''Edit mode''' and go into '''Side view'''.<br/> | ||
| + | |||
| + | Now, select all the bottom vertices, and scale them down a little, until you're satsified.<br/> | ||
| + | Next, select all the other (top) vertices, and scale them up a little. | ||
| + | |||
| + | Move and scale the top and bottom vertices until you're satisfied with them. | ||
| + | |||
| + | When you're done, it should look like this:<br/> | ||
| + | [[Image:Tutorial BushStep5.png]] | ||
| + | |||
| + | |||
| + | ==== Texturing ==== | ||
| + | |||
| + | As the UV-Mapping is already done, we will only have to add a new material, and set it right.<br/> | ||
| + | By now, you have done this a couple of times, so you should be comfortable with it. | ||
| + | |||
| + | Add a new material, and add a new texture layer to it. The texture should be an image texture containing the '''Heather.png''' image. Set it to '''UseAlpha''', '''InterPol''' and '''MipMap'''. | ||
| + | |||
| + | Now, we will need the same Z-Offset and Z-Transparency settings as with the simple plants we did earlier.<br/> | ||
| + | The correct settings are below:<br/> | ||
| + | [[Image:Tutorial_SpritZs.png]] | ||
| + | |||
| + | |||
| + | Now, here it is important as well to make sure that the bush does not receive any shadows.<br/> | ||
| + | We will make the bush shadeless too. Go to the '''Material''' button panel and press the correct button:<br/> | ||
| + | [[Image:Tutorial ShadeLess.png]] | ||
| + | |||
| + | ==== Copying and Positioning ==== | ||
| + | |||
| + | As a final step, copy a couple of these objects (in '''Object mode''' ofcourse), and place them where you see fit.<br/> | ||
| + | Perhaps a few on more arid ground.. | ||
| + | |||
| + | Don't forget to change their scale a little to add more realism. You can scale them in height, or width (or even X and Y) separately for more diversity. | ||
| + | |||
| + | === Adding a Moss Crust Decal=== | ||
| + | |||
| + | As a final addition to the age's flora, we will add a Moss Crust to the mountain. | ||
| + | The texture we will use:<br/> | ||
| + | [[Image:MossCrust.png]] | ||
| + | |||
| + | ==== Decals ==== | ||
| + | Decals in 3D software are quite similar to decals in real life. | ||
| + | They're partly transparent surfaces that get put onto another object, in order to change its appearance. | ||
| + | |||
| + | Of course, in 3d environments, they are meant to add realism, while in real life they often do not. | ||
| + | |||
| + | We will however need another surface to put the texture on, that has the same shape as the part of the object it must fit onto. | ||
| + | |||
| + | ==== Modeling ==== | ||
| + | We will put a decal of the Moss Crust onto the mountain, so we'll need to copy a part of the mountain's mesh in order to get it right. | ||
| + | |||
| + | Start by selecting the Island object, and go into edit mode.<br/> | ||
| + | Now, select a triangle (one should be enough as they're pretty large at places) where you would want to add the Moss Crust.<br/> | ||
| + | * '''''Note:''''' | ||
| + | *: You can also select multiple triangles if you want it on multiple locations. You should repeat the steps below for each of those triangles | ||
| + | |||
| + | With the triangle selected, duplicate and separate it ('''Shift-[D]''' followed by '''[Esc]''' and '''[P]''' does the trick) | ||
| + | Exit the edit mode, select the new object, and move it by a fraction of a foot (0.05 feet should be sufficient) in order to ensure that it remains visible. | ||
| + | |||
| + | ==== UV Mapping ==== | ||
| + | Next, remove the material from the new object, and remove the Stencil UV map | ||
| + | |||
| + | Go into '''UV Mapping mode''' and scale the face up, so that it encompasses the texture nicely. (Don't forget to add the Moss Crust texture to the face in the UV/Image Editor) | ||
| + | |||
| + | This picture shows how it should look:<br/> | ||
| + | [[Image:Tutorial DecalStep2.png]] | ||
| + | |||
| + | |||
| + | ==== Texturing ==== | ||
| + | Make sure that the existing materials are removed from the object, and add a new one. | ||
| + | |||
| + | As you are accustomed to by now, add a new texture, and make it an image texture containing the MossCrust texture. | ||
| + | The settings '''UseAlpha''' '''InterPol''' (actually used for enabling compression) and '''MipMap''' will work. | ||
| + | |||
| + | But, for this decal texture, we will set another setting.<br/> | ||
| + | Notice how there is a selection of buttons, among which there are '''Clip''' and '''Repeat''' | ||
| + | |||
| + | By default it is set to '''Repeat''', making the texture repeat.<br/> | ||
| + | But for these decals we will set it to '''Clip''', this way the decal will be used only once, (within the UV image editor's image bounds) | ||
| + | |||
| + | [[Image:Tutorial DecalTexSettings.png]] | ||
| + | |||
| + | ==== Finishing up ==== | ||
| + | Well, there's nothing more to do...<br/> | ||
| + | I guess you could repeat the process for more patches of moss crust, and change the scale on those patches a little each time, but that's entirely up to you. | ||
| − | == | + | == Continue == |
| + | Now that we have all the flora there, let's get this place down from space onto a nice planetside, and start [[Adding Atmosphere]]... | ||
Latest revision as of 12:31, 12 May 2012
Of course, no Age is complete without at least a small patch of vegetation.
In this part we will be discussing two techniques:
- Alpha vertex painting for the patch of grass
- Billboarding bushes and simple plants
Contents
[hide]Adding a patch of grass
For the patch of grass, we will be using the following texture:
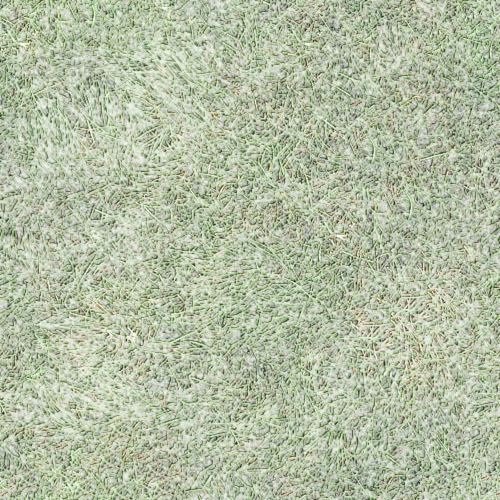
The texture has a bit of alpha to make it blend in with the terrain better....
Making a new plane
Bur first we will need a place to place the grass.
We will copy a piece of the floor mesh to place the grass upon.
Enter edit mode on the island surface, and select the faces you want to copy.
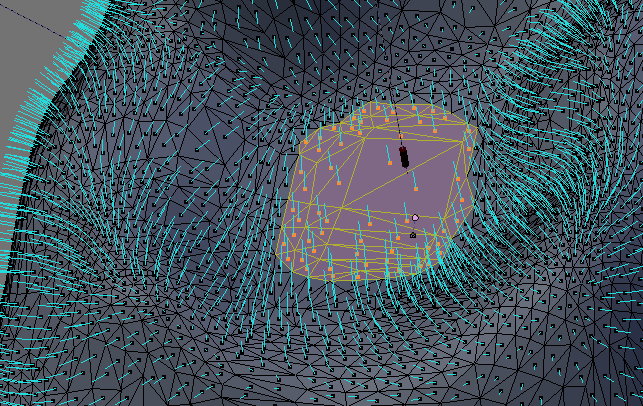
Now, press Shift-[D] to duplicate the faces.
After that press [P] to extract those duplicated faces into a new mesh of its own.
Exit edit mode, and select the new plane.
Don't forget to shift it up (on the z-axis) by about 0.01 feet (0.01 blender units) to ensure it's not obscured by the islands material itself.
Adding a new material
Of course, it needs a new material. Delete both materials currently assigned, in the Mesh Panel. (Don't worry, it will stay on your island)
Since the new plane has the same UV coordinates as the parent object, you don't need to UV Map it again.
Just add a new material, and set the specularity to 0.0
Now add the grass texture to it. You can set SizeX' and SizeY in the Map-Input tab both to 64 for a nice result.
Vertex painting
Now, go to the Mesh panel, and add a new vertex color layer. Name the new vertex color layer Alpha.
Select the new Vertex color layer by pressing the two buttons left of the name, and start painting the edges of the plane black. Be sure to keep the rest white.
Where the faces of this layer are black, the mesh will become transparent in Uru. Where it is white, it will become opaque.
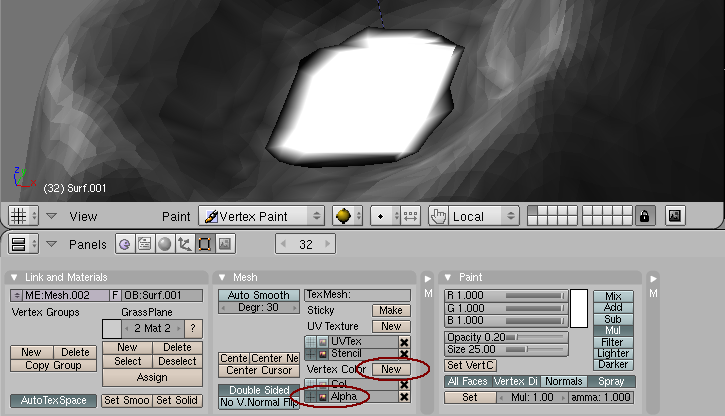
Using this technique, you can make the new grass plane blend very nicely with the terrain below it.. Don't forget to paint the first Vertex layer (Col) all white, to get all of the texture on it.
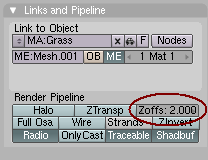
One thing that still needs to be done, is setting the Z-Offset.
The Z-Offset is important to the rendering order.
St it to 2.0 to get a good blend.
Suggestions for improvement
You could also find a flower or weed texture, and use a stencil to get it nicely onto this grass, thus adding another bit of realism.
Adding plants
Now that we have some grass, it is time to add some bushes and plants.
Simple Sprout plant
We will start by adding a simple, but convincing sprout-like plant.
We will use the following texture:
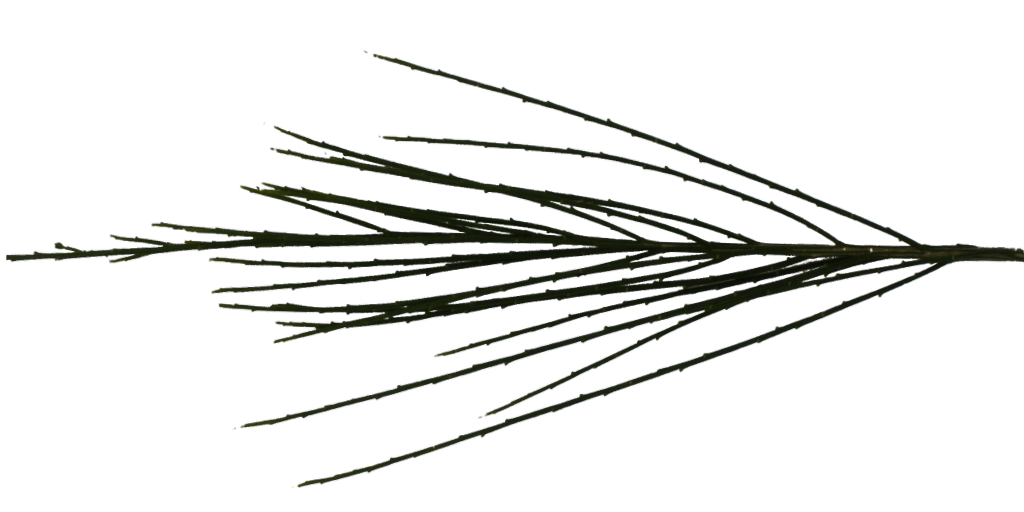
(This image is lying on its side to make the UV mapping in blender easier)
Because this is a very simple plant, we can get away with making it very simple.
Modeling
The plant will be located on the grass we made earlier, so place your 3D cursor in that area, a little higher than the field of grass.
Now create a simple plane and size it so that it's height is about 2 times its weight.
(Create the plane in the top or side view, if you don't want to be bothered to rotate it afterwards)
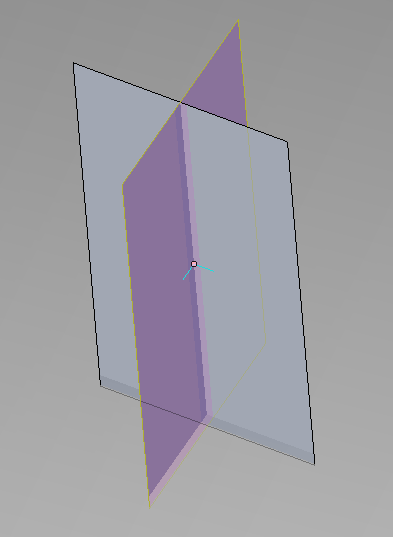
While still in edit mode, go to the top view, select all (press [A]), and duplicate and rotate the plane that is already there. (To do that, press [D], and immediately ater that press [R] and type in 90, followed by [Enter])
Now, as you will notice, the two planes intersect each other right in the middle.
This is useful to create the illusion of a three-dimensional plant.
Uv Mapping
Now, continue to UV-texture the plant. Switch the mode to 'UV Face Select', and add the GreenSprit.png texture to the UVMap window.
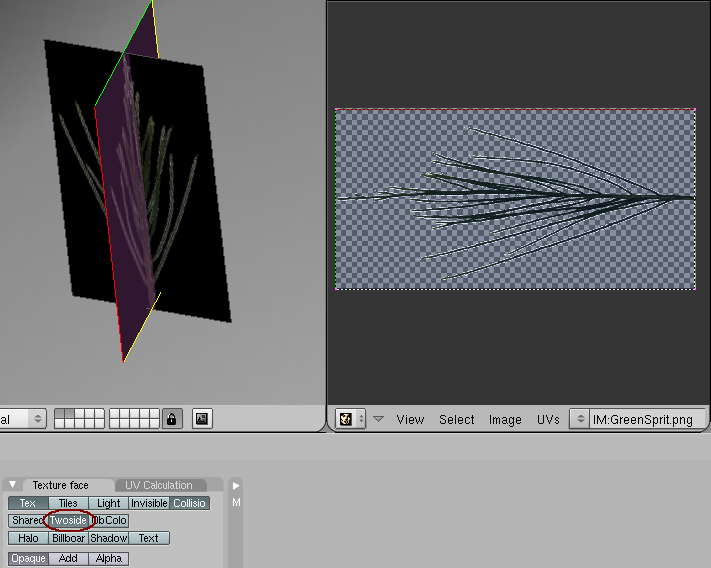
Select at least one face (though it's better to select both), and press the Twoside button as in the image above. This button is located in the Edit menu (![]() )
)
Now, if you see the plant texture rotated somehow (in the UV Face Select view), do correct the UV Mappings for the wrong plane(s).
Texturing
As a next and final step, add a new material to the object, and add an image texture referring to this texture.
Don't forget to set UseAlpha on it.
As a final step, we must give it a Z-Offset, since both this object and the plane of grass beneath it have transparency.
We will need to set the plant's Z-Offset higher than that of the Grass plane, so let's set it to 3.
On the same screen, click the ZTransp button, so that the planes will not overlap each other.
- Note:
- If you set the plant's Z-Offset lower than 2, the grass plane will override it's drawing, makign it invisible
- On the other hand, if you set it to the same Z-Offset (2), the transparencies of the grass and the plant will mix.
- Setting it higher makes the drawing order just right.
Now, it is also important that the plant does not receive any shadows, as that ruins the realism.
We will make the plant Shadeless by pressing the appropriate button in the Material button panel:

Placement and Copying
Don't forget to place the mesh so that it just touched the grass.
To add a bit more population of this plant, just make a few copies, and resize them a bit.
Vary in height and width (by scaling on the Z-axis and XY-plane separately) to get some natural diversity.
A more complex bush
As nice as these simple plants are, it's also nice to add a bit of a bush.
We're going to make a bush in the same way Cyan does in Relto and in The Cleft.
As our age is a bit rocky, is will probably have a poor soil. So why not let a few heather bushes grow there....
As always, here is the texture we'll use:
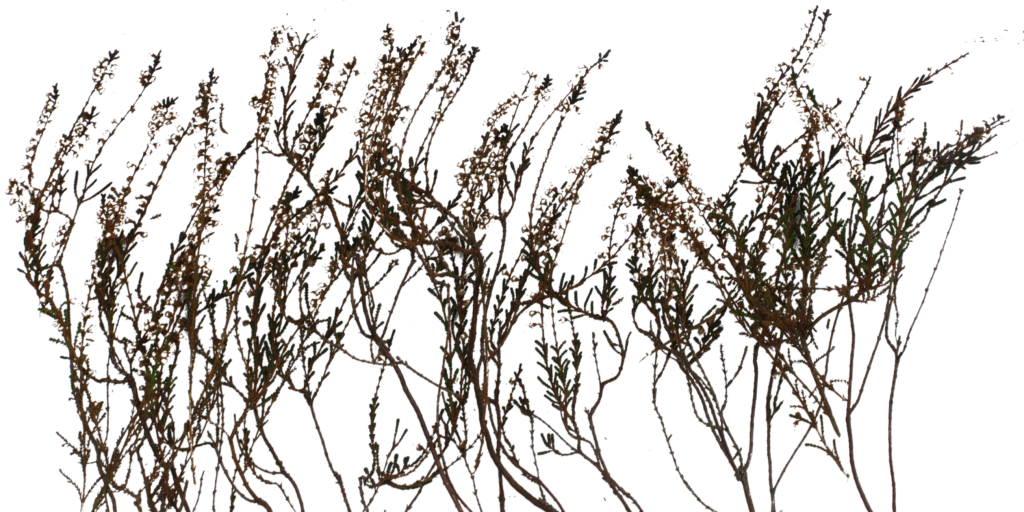
As heather only blooms in the late summer or early autumn, this texture is of course of a non-blossoming heather bush.
Modeling
Making a bush realistic requires a model that is a bit more advanced than the simple billboard we used earlier. This model will have a couple of layers of billboards.
We will start the bush with a tube, consisting of 6 segments.
Set the 3D Cursor to a good starting location, and go to top view.
Press [Space], and choose Add->Mesh->Cylinder.
In the next dialog, DeSelect Cap Ends, and set it to 6 Vertices, and around 0.5 Radius and 2.0 Height.
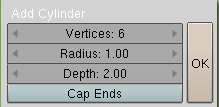
You will now have a simple tube.
Early UV Mapping
To make things easier later on, we will now UV map the image first, before changing the model. Exit Edit mode, and go to UV Edit Mode.
Now, make all faces twosided (one by one), select them and apply the heather bush texture.
Now, we will map the texture around the cylinder:
Go to Top view, press [U] and select Cylinder from View
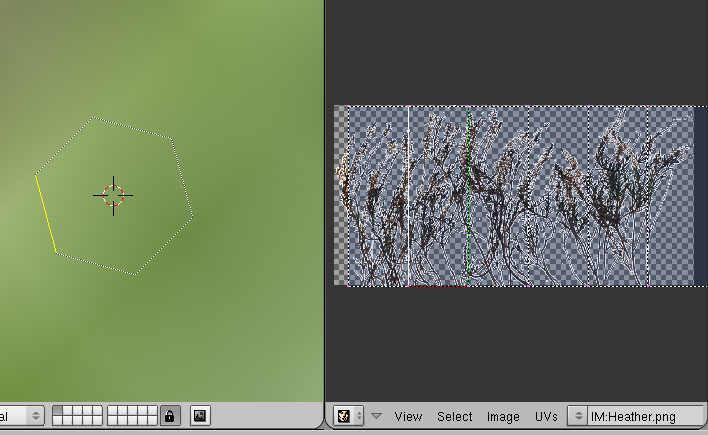
You will notice that the UV Map may not be compleately in the bounds of your texture. This is not a big problem, as textures are repeated by default, but you can go to the UV/Image editor, select all vertices and move them to fit inside the bounds of the image.
Continue modeling
Now that we have mapped the model, we can go back to edit mode.
We are now going to make two copies of the mesh, each a little larger than the last one, and a little rotated. Also, each larger tube, must be a little shorter than the smaller ones.
We will start in Top view First, select all vertices. Now press Shift-[D] to duplicate, and follow it byt [S] to scale. Make it a little larger. Now, press [R] to rotate it, and rotate it a bit.
Now, go to Side view (NumPad-[3]) and go into scaling mode ([S]). Use [Z] to make the scale affect the Z-Axis only, and make it a bit smaller. Finally, grab ([G]) the scaled cylinder, and move it down, so that it's bottom matches the bottom of the first cylinder.
Now, Go back to Top view, and repeat those steps, to make a third (larger) cylinder.
If you're done, it should look a bit like this:
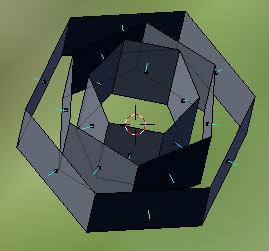
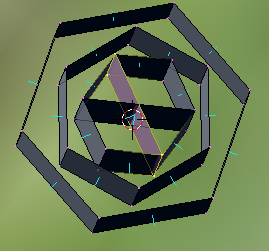
Next, we will add a cross-plane in the center-cylinder.
Go to Top view and make sure that A) you have the Limit selection to visible button [i]OFF[/i] and B) you are in vertex select mode
Select two (technically four, but two of them are hidden below the others) opposing points on the inner cylinder, and press [F] to make a face of them.
Select two other opposing points in the same inner cylinder, and make a face of those as well.
The result (after adjusting the view) should look like this:
UV Mapping again
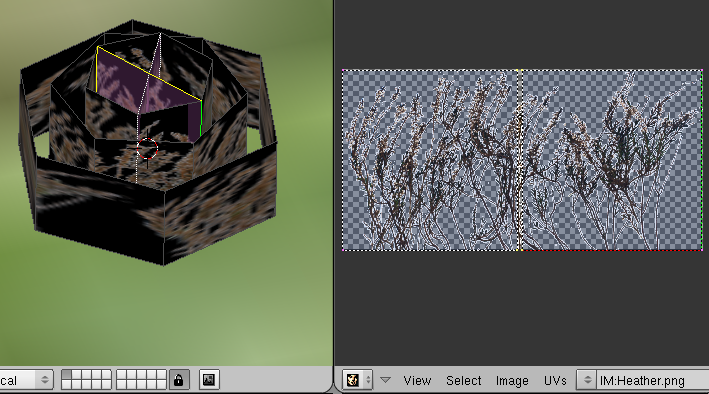
UV map the new planes you just created, so that each plane uses about one half of the heather bush texture.
Also make those faces Two Sided
It should look a little like this:
Finalizing the model
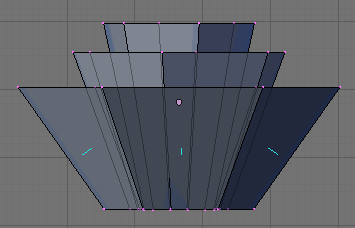
As a final step, we are going to pinch in the bottom of the model, and make the top of it a little wider.
Go into Edit mode and go into Side view.
Now, select all the bottom vertices, and scale them down a little, until you're satsified.
Next, select all the other (top) vertices, and scale them up a little.
Move and scale the top and bottom vertices until you're satisfied with them.
When you're done, it should look like this:
Texturing
As the UV-Mapping is already done, we will only have to add a new material, and set it right.
By now, you have done this a couple of times, so you should be comfortable with it.
Add a new material, and add a new texture layer to it. The texture should be an image texture containing the Heather.png image. Set it to UseAlpha, InterPol and MipMap.
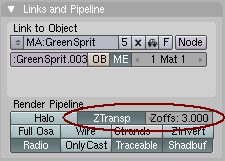
Now, we will need the same Z-Offset and Z-Transparency settings as with the simple plants we did earlier.
The correct settings are below:
Now, here it is important as well to make sure that the bush does not receive any shadows.
We will make the bush shadeless too. Go to the Material button panel and press the correct button:

Copying and Positioning
As a final step, copy a couple of these objects (in Object mode ofcourse), and place them where you see fit.
Perhaps a few on more arid ground..
Don't forget to change their scale a little to add more realism. You can scale them in height, or width (or even X and Y) separately for more diversity.
Adding a Moss Crust Decal
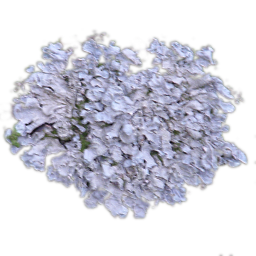
As a final addition to the age's flora, we will add a Moss Crust to the mountain.
The texture we will use:
Decals
Decals in 3D software are quite similar to decals in real life. They're partly transparent surfaces that get put onto another object, in order to change its appearance.
Of course, in 3d environments, they are meant to add realism, while in real life they often do not.
We will however need another surface to put the texture on, that has the same shape as the part of the object it must fit onto.
Modeling
We will put a decal of the Moss Crust onto the mountain, so we'll need to copy a part of the mountain's mesh in order to get it right.
Start by selecting the Island object, and go into edit mode.
Now, select a triangle (one should be enough as they're pretty large at places) where you would want to add the Moss Crust.
- Note:
- You can also select multiple triangles if you want it on multiple locations. You should repeat the steps below for each of those triangles
With the triangle selected, duplicate and separate it (Shift-[D] followed by [Esc] and [P] does the trick) Exit the edit mode, select the new object, and move it by a fraction of a foot (0.05 feet should be sufficient) in order to ensure that it remains visible.
UV Mapping
Next, remove the material from the new object, and remove the Stencil UV map
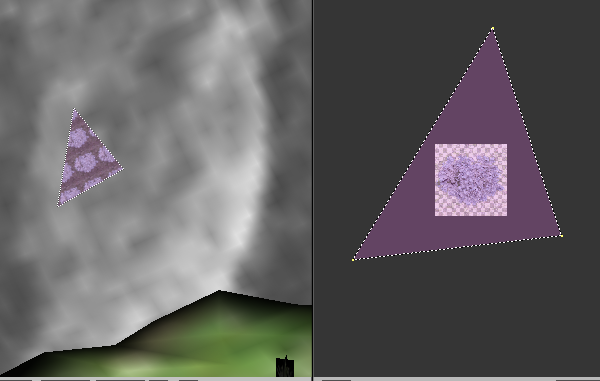
Go into UV Mapping mode and scale the face up, so that it encompasses the texture nicely. (Don't forget to add the Moss Crust texture to the face in the UV/Image Editor)
This picture shows how it should look:
Texturing
Make sure that the existing materials are removed from the object, and add a new one.
As you are accustomed to by now, add a new texture, and make it an image texture containing the MossCrust texture. The settings UseAlpha InterPol (actually used for enabling compression) and MipMap will work.
But, for this decal texture, we will set another setting.
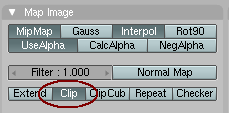
Notice how there is a selection of buttons, among which there are Clip and Repeat
By default it is set to Repeat, making the texture repeat.
But for these decals we will set it to Clip, this way the decal will be used only once, (within the UV image editor's image bounds)
Finishing up
Well, there's nothing more to do...
I guess you could repeat the process for more patches of moss crust, and change the scale on those patches a little each time, but that's entirely up to you.
Continue
Now that we have all the flora there, let's get this place down from space onto a nice planetside, and start Adding Atmosphere...

