Difference between revisions of "Korman:Installation"
m (→Installing Blender) |
(→After Installation) |
||
| (25 intermediate revisions by 5 users not shown) | |||
| Line 4: | Line 4: | ||
| − | This tutorial will show you how to properly set up '''Korman'''. | + | This tutorial will show you how to properly set up '''Blender for Korman'''. |
==Introduction== | ==Introduction== | ||
| Line 14: | Line 14: | ||
==Required Software== | ==Required Software== | ||
| − | + | Luckily, unlike 3DS Max, Blender for Korman is free and open source, so getting your own copy is easy. | |
| − | + | <blockquote>IMPORTANT NOTE: As of 0.13, you no longer need to install Blender separately. Blender for Korman will now install both for you.</blockquote> | |
| − | + | ===Windows=== | |
| − | + | For '''Windows Vista''' and above, you will only need Blender for Korman (32 or 64 bit depending on your system). | |
| − | + | ||
| + | * '''[[Korman:0.16_Release_Notes|Blender for Korman v0.16]]''' | ||
| − | + | You can choose either the installer or the ZIP archive, whichever you prefer. | |
===Mac=== | ===Mac=== | ||
| Line 35: | Line 35: | ||
''Coming soon!'' | ''Coming soon!'' | ||
| − | ==Installing Blender== | + | ==Installing Blender for Korman== |
| − | + | ===Installer=== | |
| − | + | If using the installer, run the EXE and follow the directions. If Windows Protector brings up a green error screen, just click on '''More Info''' and then '''Run Anyway'''. | |
| − | + | [[file:KorIntro02.jpg]] | |
| − | + | It will ask where to want to install. You want to select a folder that's '''not''' in any of the Program Files folders. | |
| − | + | You'll then have the option of where to place a Start Menu shortcut. Choose one, create one (default is Korman #.##), or just choose '''Do not create shortcuts''' if you'd prefer to do it yourself. | |
| − | + | Next comes the '''Choose components''' window. You can leave this and click '''Install'''. This process may take a few minutes. | |
| − | + | Once installation is complete, click '''Finish''' to close the installer. | |
| − | + | ===ZIP Archive=== | |
| − | + | If you're using the ZIP file, simply create a new directory for Blender for Korman and drop the ZIP's contents into that folder. You can then create a shortcut to '''blender.exe'''. | |
| − | + | ==Activating Korman in Blender== | |
| − | + | In order to use Blender for Korman for the first time, you must activate it. | |
| − | + | ||
| − | + | ||
| − | + | ||
| − | + | ||
| − | In order to use Korman, you must | + | |
In Blender, press '''Ctrl+Alt+U'''. This will bring up the '''User Preferences''' menu. | In Blender, press '''Ctrl+Alt+U'''. This will bring up the '''User Preferences''' menu. | ||
| Line 70: | Line 65: | ||
[[file:KorIntro03.jpg|300px]] | [[file:KorIntro03.jpg|300px]] | ||
| − | If Korman is installed correctly, you should see it on the corresponding list that appears (you may have to scroll back up and/or hit the '''Refresh''' button at the bottom of the window). | + | If Korman is installed correctly, you should see it on the corresponding list that appears (you may have to scroll back up and/or hit the '''Refresh''' button at the bottom of the window). |
Click the check box to the right to activate Korman. | Click the check box to the right to activate Korman. | ||
| − | + | Go ahead and save your settings and close the '''User Preferences''' window. | |
| − | + | Next, at the top of the Blender window, switch from '''Blender Render''' (or whatever renderer it's using currently) to '''Korman'''. | |
| − | [[file: | + | [[file:KorIntro04.jpg]] |
| − | Once you | + | ==Choosing Game and Python Installations== |
| + | |||
| + | [[file:KorIntro07.jpg]] | ||
| + | |||
| + | Once you've installed and activated Blender for Korman as shown above, go to the '''Properties''' window, then to the '''World''' panel. | ||
| + | |||
| + | Scroll down until you see the '''Plasma Games''' panel and click on the '''wrench''' to the right (see above image). | ||
| + | |||
| + | [[file:KorIntro06.jpg|500px]] | ||
Here, you'll be able to choose your various game installations to export to (simply navigate to the main directory of each install, whether an online or offline version), as well as which avatar to use upon Linking into the game using '''Test Age''' or '''Launch Age''' options from the '''World''' window. | Here, you'll be able to choose your various game installations to export to (simply navigate to the main directory of each install, whether an online or offline version), as well as which avatar to use upon Linking into the game using '''Test Age''' or '''Launch Age''' options from the '''World''' window. | ||
| + | |||
| + | Simply click on the '''+''' to add an URU installation. | ||
* For an online URU install, use your preferred avatar's KI number. For the server, '''server.ini''' is usually sufficient, but check your install. | * For an online URU install, use your preferred avatar's KI number. For the server, '''server.ini''' is usually sufficient, but check your install. | ||
| + | |||
* For offline URU, choose the name of your preferred testing avatar. | * For offline URU, choose the name of your preferred testing avatar. | ||
You can also set your Python installations here as well, but it's not required. | You can also set your Python installations here as well, but it's not required. | ||
| − | |||
Click '''Save User Settings''' and close the User Preferences window. | Click '''Save User Settings''' and close the User Preferences window. | ||
| − | |||
| − | |||
| − | |||
| − | |||
| − | |||
You are now ready to use Korman! | You are now ready to use Korman! | ||
| + | ==A note about Blender== | ||
| − | + | Korman's tutorials assume you already have a knowledge of Blender and its basic workings and functions. There are many off-site tutorials that can be searched for online. | |
| + | ==After Installation== | ||
| − | If you're updating an existing Age from PyPRP, see [[Korman:Updating From PyPRP]]. | + | * To set up a basic Age from scratch, continue on to the [[Korman:Getting Started|getting started tutorial]]. |
| + | * If you're updating an existing Age from PyPRP, see [[Korman:Updating From PyPRP]]. | ||
[[Category:Korman]] | [[Category:Korman]] | ||
Latest revision as of 19:10, 13 November 2024
| This is a tutorial page.Versions available: PyPRP; 3ds Max; Korman. |
This tutorial will show you how to properly set up Blender for Korman.
Contents
[hide]Introduction
Korman is the spiritual successor to PyPRP, created by the Guild of Writers' H'uru team specifically to streamline the Age-building process for multiple versions of URU, both online and offline.
This includes the removal of AlcScript in favor of a simpler building and programming interface, more in line with Cyan's 3DS Max plugin.
Required Software
Luckily, unlike 3DS Max, Blender for Korman is free and open source, so getting your own copy is easy.
IMPORTANT NOTE: As of 0.13, you no longer need to install Blender separately. Blender for Korman will now install both for you.
Windows
For Windows Vista and above, you will only need Blender for Korman (32 or 64 bit depending on your system).
You can choose either the installer or the ZIP archive, whichever you prefer.
Mac
Coming soon!
Linux
Coming soon!
Installing Blender for Korman
Installer
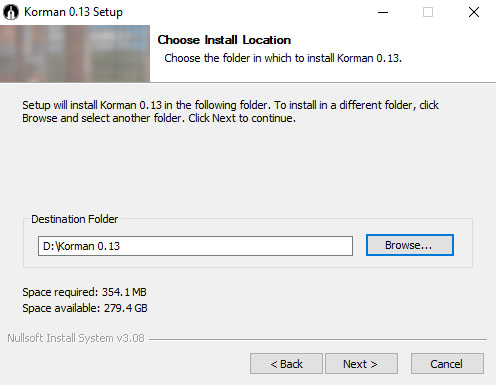
If using the installer, run the EXE and follow the directions. If Windows Protector brings up a green error screen, just click on More Info and then Run Anyway.
It will ask where to want to install. You want to select a folder that's not in any of the Program Files folders.
You'll then have the option of where to place a Start Menu shortcut. Choose one, create one (default is Korman #.##), or just choose Do not create shortcuts if you'd prefer to do it yourself.
Next comes the Choose components window. You can leave this and click Install. This process may take a few minutes.
Once installation is complete, click Finish to close the installer.
ZIP Archive
If you're using the ZIP file, simply create a new directory for Blender for Korman and drop the ZIP's contents into that folder. You can then create a shortcut to blender.exe.
Activating Korman in Blender
In order to use Blender for Korman for the first time, you must activate it.
In Blender, press Ctrl+Alt+U. This will bring up the User Preferences menu.
Click the Add-ons tab at the top of the window, then on the left, select System.
If Korman is installed correctly, you should see it on the corresponding list that appears (you may have to scroll back up and/or hit the Refresh button at the bottom of the window).
Click the check box to the right to activate Korman.
Go ahead and save your settings and close the User Preferences window.
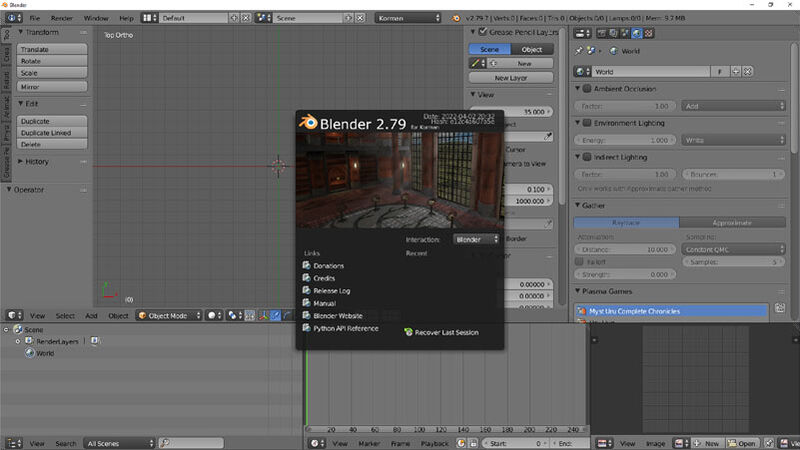
Next, at the top of the Blender window, switch from Blender Render (or whatever renderer it's using currently) to Korman.
Choosing Game and Python Installations
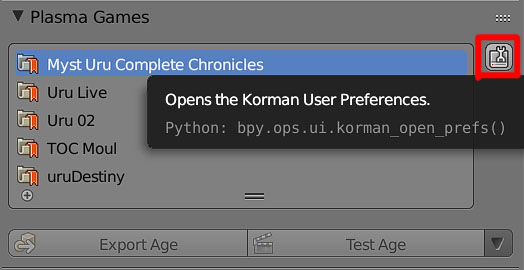
Once you've installed and activated Blender for Korman as shown above, go to the Properties window, then to the World panel.
Scroll down until you see the Plasma Games panel and click on the wrench to the right (see above image).
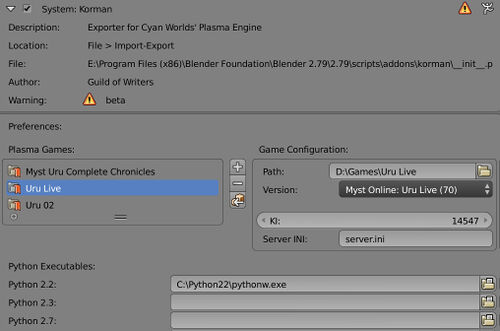
Here, you'll be able to choose your various game installations to export to (simply navigate to the main directory of each install, whether an online or offline version), as well as which avatar to use upon Linking into the game using Test Age or Launch Age options from the World window.
Simply click on the + to add an URU installation.
- For an online URU install, use your preferred avatar's KI number. For the server, server.ini is usually sufficient, but check your install.
- For offline URU, choose the name of your preferred testing avatar.
You can also set your Python installations here as well, but it's not required.
Click Save User Settings and close the User Preferences window.
You are now ready to use Korman!
A note about Blender
Korman's tutorials assume you already have a knowledge of Blender and its basic workings and functions. There are many off-site tutorials that can be searched for online.
After Installation
- To set up a basic Age from scratch, continue on to the getting started tutorial.
- If you're updating an existing Age from PyPRP, see Korman:Updating From PyPRP.

