Difference between revisions of "Korman:Dynamic Decals"
m (→Setting up the Decals) |
m (→Reapply Scale) |
||
| (2 intermediate revisions by 2 users not shown) | |||
| Line 6: | Line 6: | ||
In a few instances in URU, you have seen decals in use, mostly for ripples in water such as the small pool in the cleft or the shallow water in Kadish Tolesa or even when the avatar slams against the force field in Jalak. It's a subtle yet noticeable function that adds a bit more realism or detail to the Ages. As of version 0.10, Korman has added a way to use decals in fan Ages. | In a few instances in URU, you have seen decals in use, mostly for ripples in water such as the small pool in the cleft or the shallow water in Kadish Tolesa or even when the avatar slams against the force field in Jalak. It's a subtle yet noticeable function that adds a bit more realism or detail to the Ages. As of version 0.10, Korman has added a way to use decals in fan Ages. | ||
| + | |||
| + | As a companion to this article, a [https://guildofwriters.org/korman/samples/KormanDecals.blend sample Age blend file] has been made available with examples of the different ways dynamic decals can be used. | ||
=Setting up the Decals= | =Setting up the Decals= | ||
| Line 35: | Line 37: | ||
[[file:KorDecal04.jpg|right|300px]] | [[file:KorDecal04.jpg|right|300px]] | ||
Now that we have a decal or two set up, it's time to tell Korman which objects need them. | Now that we have a decal or two set up, it's time to tell Korman which objects need them. | ||
| + | |||
| + | ==Reapply Scale== | ||
| + | |||
| + | One of the most common reasons decals don't show up is because the scale of the mesh printing or receiving the decal doesn't have 1 to 1 to 1 scale. | ||
| + | |||
| + | To reapply (reset) the scale, press '''Ctrl+A''', then click '''Scale'''. | ||
==Print Decal Mod== | ==Print Decal Mod== | ||
| Line 45: | Line 53: | ||
[[file:KorDecal05.jpg|right|300px]] | [[file:KorDecal05.jpg|right|300px]] | ||
After adding this mod, press the '''+''' to add a new decal for the object to receive and choose the appropriate decal for water or land (see example to the right) | After adding this mod, press the '''+''' to add a new decal for the object to receive and choose the appropriate decal for water or land (see example to the right) | ||
| − | |||
| − | |||
| − | |||
| − | |||
Latest revision as of 20:10, 10 August 2021
| This is a tutorial page.Versions available: PyPRP; 3ds Max; Korman. |
This tutorial will show you how to set up and utilize dynamic decals using Korman.
Contents
Introduction
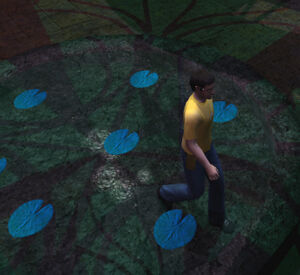
In a few instances in URU, you have seen decals in use, mostly for ripples in water such as the small pool in the cleft or the shallow water in Kadish Tolesa or even when the avatar slams against the force field in Jalak. It's a subtle yet noticeable function that adds a bit more realism or detail to the Ages. As of version 0.10, Korman has added a way to use decals in fan Ages.
As a companion to this article, a sample Age blend file has been made available with examples of the different ways dynamic decals can be used.
Setting up the Decals
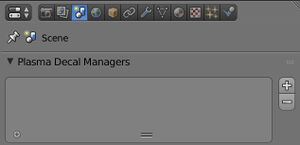
The first order of business is to set up the decals themselves for use throughout the Age. To do this, first click on the Scene button in the Properties window (see image to the right).
Looking pretty empty, isn't it? Before you get started, it's best to determine what kind of decals you will need for your Age. Will there be water to run and/or swim through? Is it a sandy Age that will leave footprint as you walk? You'll basically need to add a decal for every type of interaction the avatar has with a surface and how the result appears and slowly fades away.
Let's start with our first decal. Click on the + to the right of the panel.
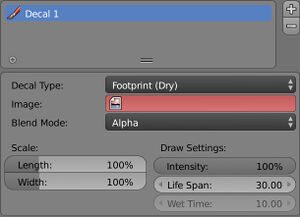
The default Decal 01 appears with a few options (you can rename Decal 01 by double clicking on it in the list):
- Decal Type: selects the type of decal we'd like to to use.
- Water Ripple (Deep): used when swimming in deep water.
- Water Ripple (Shallow): for when an avatar runs through shallow water.
- Footprint (Wet): a dark footprint when an avatar steps out of water onto dry land.
- Footprint (Dry): for when a dry footprint is left on land, usually sand or dusty floors.
- Image: the image file that will be used for the decal.
- Blend Mode: method the image file will be blended onto the surface. You can choose from Multiply, Brighten, Alpha, and Add. Choose the one that works best with your texture.
- Scale: sets the scale of the image texture. Adjust this if the decal is looking too big or small.
- Intensity: the amount of opacity the stencil will have when it first appears.
- Life Span (Footprint Only): The length of time in seconds the decal will last before disappearing.
- Wet Time (Water Ripple Only): Amount of time in seconds the ripple stays visible.
- Wet Footprints (Water Ripple Only - Optional): here, add any existing wet footprint decals that will result from interacting with this water ripple decal.
You can set up decals for all four kinds if you'd like. Once that's done, we need to set up the objects that will utilize these decals.
Using the Decals
Now that we have a decal or two set up, it's time to tell Korman which objects need them.
Reapply Scale
One of the most common reasons decals don't show up is because the scale of the mesh printing or receiving the decal doesn't have 1 to 1 to 1 scale.
To reapply (reset) the scale, press Ctrl+A, then click Scale.
Print Decal Mod
To Be Added
Receive Decal Mod
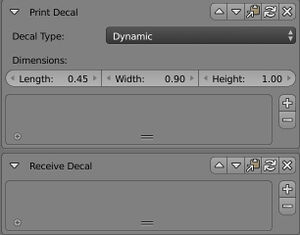
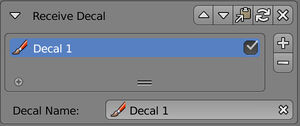
For most ripple and footprint surfaces, the Receive Decal mod is what is needed.
After adding this mod, press the + to add a new decal for the object to receive and choose the appropriate decal for water or land (see example to the right)

