Difference between revisions of "Taking A Beach Ball With You"
m (→Mass and movability) |
m (Fix metadata.) |
||
| (4 intermediate revisions by 2 users not shown) | |||
| Line 1: | Line 1: | ||
| + | {{Tutorial}} | ||
| + | |||
== Adding a beach ball == | == Adding a beach ball == | ||
Before we go, how about taking something along to play with? | Before we go, how about taking something along to play with? | ||
| Line 20: | Line 22: | ||
[[Image:BeachBallColor2.jpg]] | [[Image:BeachBallColor2.jpg]] | ||
| − | + | Add a new material to the ball, then add a texture to the material, loading this texture above. | |
| − | + | ||
| − | + | To UV map it, switch to '''Edit mode''', then turn one of your panes into the UV/Image Editor. On the image name chooser, select your new texture (BeachBallColor2.jpg). Now it should be visible in the UV/Image Editor pane. In the main view, select all faces, and press '''[U]''' for the automatic mapping.<br/> | |
| − | + | If you are in '''Front view''', then choosing '''Sphere From view''' should do the mapping trick this time. [Note: you may need to widen the X-scale of the texture coordinates to get it to span the entire image.] | |
| − | + | ||
=== Making the ball kickable === | === Making the ball kickable === | ||
| Line 34: | Line 34: | ||
In that panel, press '''Bounds''' to give the object bounds, and select '''Sphere''' as the type of bounds. | In that panel, press '''Bounds''' to give the object bounds, and select '''Sphere''' as the type of bounds. | ||
| − | ==== Mass and | + | ==== Mass and mobility ==== |
| − | To add mass (and with that | + | To add mass (and with that mobility) to the object, click the '''Actor''' button, and after that, click the '''Dynamic''' button. |
In the screen that now appears you can set the mass. Since a beachball is pretty light, how about a value of about '''0.5''' kilo's? | In the screen that now appears you can set the mass. Since a beachball is pretty light, how about a value of about '''0.5''' kilo's? | ||
| − | * '''''Note:''''' | + | * '''''Note:''''' The only usable property for us in that screen is '''Mass''' |
| − | + | ||
==== Adding friction and elasticity ==== | ==== Adding friction and elasticity ==== | ||
| Line 53: | Line 52: | ||
For Elasticity, it's good to consider what kind of object the ball is. This one is a beachball, and thus pretty elastic.<br/> | For Elasticity, it's good to consider what kind of object the ball is. This one is a beachball, and thus pretty elastic.<br/> | ||
| − | Setting '''el''' to ''' | + | Setting '''el''' to '''0.8''' should be a good setting to start with |
If you set all the settings, they look like this now:<br/> | If you set all the settings, they look like this now:<br/> | ||
| Line 62: | Line 61: | ||
When moving it, always make sure that it's bottom is slightly above the ground on which it should rest, otherwise it may just fall through the floor. | When moving it, always make sure that it's bottom is slightly above the ground on which it should rest, otherwise it may just fall through the floor. | ||
| + | |||
| + | ==== Remembering the ball's location ==== | ||
| + | |||
| + | URU has the ability to save the last location and orientation of your kickable objects when you leave the age. To trigger this ability, add a property of type '''string''' named "'''physlogic'''", and set its value to "'''storepos'''". See the image below for the correct settings. | ||
| + | |||
| + | [[Image:Tutorial_KickableStore.png]] | ||
| + | |||
| + | |||
| + | If you don't want URU to remember the position, then set the value to "'''resetpos'''". | ||
| + | |||
| + | Note: Setting either of these values will also allow your kickable to collide with other kickables. | ||
| + | However, if you do not add a '''physlogic''' property, the kickable will pass through other kickables. | ||
== Adding colliders == | == Adding colliders == | ||
| Line 114: | Line 125: | ||
Now that we've come this far, I think that we are ready for [[Your Second Visit]] | Now that we've come this far, I think that we are ready for [[Your Second Visit]] | ||
| + | |||
| + | [[Category:PyPRP]] | ||
Latest revision as of 08:35, 4 March 2020
| This is a tutorial page. |
Adding a beach ball
Before we go, how about taking something along to play with?
From the description of the age we made so far, it looks like it's going to be a tropical island of some sort, so how about a beach ball?
Modeling the ball
Modeling a ball is easy, the only real trick is not to use more vertices than neccesary.
Set your 3D cursor to the place where you want to add the ball, and go to Top view
Now, add a UVSphere, like we did when creating the Sky Dome.
A radius of about 1.0 feet should do nicely, and since we don't need too many vertices,
8 segments and 8 rings should be sufficient.
Exit edit mode, and move the ball so that it's just above the ground.
UV mapping and Texturing the ball
Use the following simple beachball texture:
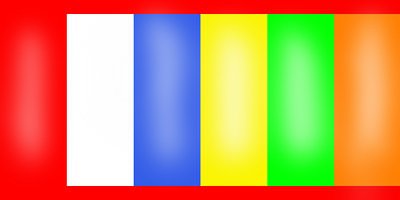
Add a new material to the ball, then add a texture to the material, loading this texture above.
To UV map it, switch to Edit mode, then turn one of your panes into the UV/Image Editor. On the image name chooser, select your new texture (BeachBallColor2.jpg). Now it should be visible in the UV/Image Editor pane. In the main view, select all faces, and press [U] for the automatic mapping.
If you are in Front view, then choosing Sphere From view should do the mapping trick this time. [Note: you may need to widen the X-scale of the texture coordinates to get it to span the entire image.]
Making the ball kickable
Now, it's nice if we can get the ball actually kickable. To do that, we will need to go to the tab that is under the Logic button.
Bounds
In that panel, press Bounds to give the object bounds, and select Sphere as the type of bounds.
Mass and mobility
To add mass (and with that mobility) to the object, click the Actor button, and after that, click the Dynamic button.
In the screen that now appears you can set the mass. Since a beachball is pretty light, how about a value of about 0.5 kilo's?
- Note: The only usable property for us in that screen is Mass
Adding friction and elasticity
To add friction and elasticity, we will need to add two logic properties.
Name one "rc" (Refriction Coefficient), and make it a float.
Name the other "el" (ELasticity), and also make it a float.
Now you can set its properties.
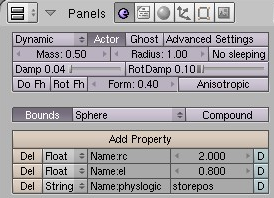
Friction isn't too important, except for loss of motion, and rcof about 2.0 should be ok.
For Elasticity, it's good to consider what kind of object the ball is. This one is a beachball, and thus pretty elastic.
Setting el to 0.8 should be a good setting to start with
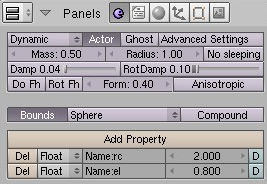
If you set all the settings, they look like this now:
Positioning the ball
Don't forget to place the ball somewhere convenient.
When moving it, always make sure that it's bottom is slightly above the ground on which it should rest, otherwise it may just fall through the floor.
Remembering the ball's location
URU has the ability to save the last location and orientation of your kickable objects when you leave the age. To trigger this ability, add a property of type string named "physlogic", and set its value to "storepos". See the image below for the correct settings.
If you don't want URU to remember the position, then set the value to "resetpos".
Note: Setting either of these values will also allow your kickable to collide with other kickables.
However, if you do not add a physlogic property, the kickable will pass through other kickables.
Adding colliders
On playing with a beachball, it's highly likely that the thing will bounce off the island, thus making it impossible to retrieve.
To prevent this, we will add a collider to the island, to make the ball stay on the island.
(Incidentally, this will also keep you from falling off the island, which is a "Good Thing™")
A collider is a special mesh that won't be visible, but will be impossible to walk through.
Cyan uses them a lot to prevent you from falling down on places where it will be way too annoying, or to prevent you from going where you're not supposed to go.
Because colliders shouldn't be seen, it is a convention to force blender to represent them as wireframe images, even in full texture mode.
We will show you how to do that in a moment.
Adding the collider
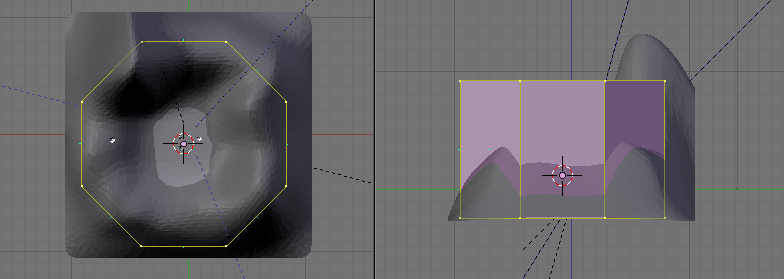
As we have a bit of a circular mountain range in this age, it'll be a good idea to use a tube for it.
A cylinder of about 8 sides should be sufficient here.
Go to Top view mode, and set your 3D cursor to the center of the island.
Now add the cylinder. 8 vertices should be ok, and be sure to have the Cap Ends button unclicked
When it's done, scale the tube so that it encompasses the walkable area of the island...
Also scale it in the Z-Direction so that it is high enough, but not too big.
Setting it to Wireframe
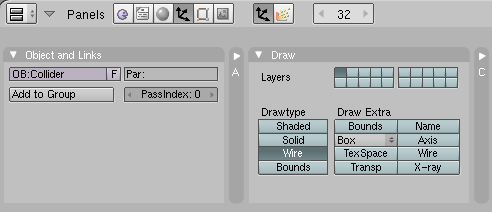
Now, to set it to wireframe view, exit edit mode, and go to the Object button panel.
There, you should press the button labeled Wire:
Setting the collider settings
Finally, we will set the collider info.
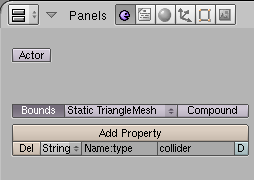
Go to the Logic button panel, and click the Bounds button.
Now set the bounds type to Static Triangle Mesh, since we want an exact set of bounds.
Now to make the object a collider only, add a logic property, name it type, and make it a string property.
(Click on the part that says Float and select String fro mthe drop-down menu)
Now, enter collider' as value for this type property.
Continue
Now that we've come this far, I think that we are ready for Your Second Visit

