Difference between revisions of "Using stencils"
(→Let's check how Plasma is doing) |
m (Fix metadata.) |
||
| (58 intermediate revisions by 4 users not shown) | |||
| Line 1: | Line 1: | ||
| − | '''''NOTE:'' The features in this tutorial need gow-pyprp version 1.1.0 or higher.''' | + | '''''NOTE:'' The features in this tutorial need [[PyPRP|gow-pyprp]] version 1.1.0 or higher.''' |
| + | |||
| + | |||
| + | Welcome to the first installment of a series of Blender stencil tutorials. In this first tutorial we’ll do some basic, straightforward blending using a simple model and a gradient alpha map. At the end I will enhance the things we did to show you another use of stencils. In the second part I intend to show how Cyan uses stenciling to blend terrain. But let me explain the principles of stencils first. | ||
| − | |||
Actually it’s pretty simple. What a blender stencil does is use a black-and-white or alpha image to decide which part of a texture to show and which to hide. By combining two textures seperated by a stencil you can have parts of both appear at will. Have a look at the stack of textures below for instance and the effect of the stencil image on the end result: | Actually it’s pretty simple. What a blender stencil does is use a black-and-white or alpha image to decide which part of a texture to show and which to hide. By combining two textures seperated by a stencil you can have parts of both appear at will. Have a look at the stack of textures below for instance and the effect of the stencil image on the end result: | ||
| Line 7: | Line 9: | ||
[[Image:Stencil_example.jpg]] | [[Image:Stencil_example.jpg]] | ||
| − | I bet you don’t need much imagination to see the implications of this being available to us in the plugin. Cyan uses stencils a lot to do simple blends between terrain textures. If you’ve ever studied Relto and the way blends are done there, then you know what I’m talking about. I must admit that I haven't found many other uses of stencils in Cyan's ages. Most of their textures are stunning in their own right. | + | |
| + | I bet you don’t need much imagination to see the implications of this being available to us in the plugin. Especially considering the fact that besides black and white greys can be used too. | ||
| + | |||
| + | |||
| + | Cyan uses stencils a lot to do simple blends between terrain textures. If you’ve ever studied Relto and the way blends are done there, then you know what I’m talking about. I must admit that I haven't found many other uses of stencils in Cyan's ages. Most of their textures are stunning in their own right. | ||
| Line 16: | Line 22: | ||
[[Image:Stencil_model.jpg]] | [[Image:Stencil_model.jpg]] | ||
| − | What I want to do is have a patch of grass on one side and stone on the other. I assume you know how to do UV mapping, so I will skip that part. Later on however I will show you how to use more UV maps on one model. For our little exercise I use one UV map for all layers we'll be using. The default UV map is called UVTex. Since our little patch of terrain is flat I simply choose Project from view to unwrap. | + | What I want to do is have a patch of grass on one side and stone on the other. I assume you know how to do UV mapping, so I will skip that part. Later on however I will show you how to use more UV maps on one model or for that matter in one material. For our little exercise I use one UV map for all layers we'll be using. The default UV map is called UVTex. Since our little patch of terrain is flat I simply choose Project from view to unwrap. |
| + | |||
| + | |||
| + | I will be using these textures: | ||
[[Image:Stencil_tex_01.jpg]] | [[Image:Stencil_tex_01.jpg]] | ||
| − | Notice that I use a very small alpha blend image. Since there isn't much detail in it, there is no point in making it | + | Notice that I use a very small alpha blend image. Since there isn't much detail in it, there is no point in making it bigger. Actually this is the actual size, while I downsized the other textures for this tutorial (they are 512x512 pixels). After adding it to the material it looks like this: |
[[Image:Stencil_setting_stencil_mat.jpg]] | [[Image:Stencil_setting_stencil_mat.jpg]] | ||
| + | |||
| + | While you are still in the Texture buttons window press the CalcAlpha button for the alpha blend image. PyPRP 1.3.0 and upwards will only use alpha blending if CalcAlpha is enabled. | ||
| + | |||
| + | [[Image:Stencil_CalcAlpha.jpg]] | ||
| + | |||
Now have a look at the settings for each texture layer. There is nothing new to the settings of the actual textures (grass and stone). You can use the settings you are used to here. The real magic is performed by the middle layer, the AlphaBlend layer. | Now have a look at the settings for each texture layer. There is nothing new to the settings of the actual textures (grass and stone). You can use the settings you are used to here. The real magic is performed by the middle layer, the AlphaBlend layer. | ||
| − | So here are the settings in Blender. First the grass texture. I won't show the stone texture here, since the settings are the same | + | |
| + | So here are the settings in Blender. First the grass texture. I won't show the stone texture here, since the settings are the same. Please notice that I use the same UV map for all three layers "UVTex". Later on you will see that it is possible to use different maps. I'm using the same one here for lazy convenience. | ||
[[Image:Stencil_setting_tex.jpg]] | [[Image:Stencil_setting_tex.jpg]] | ||
| Line 34: | Line 49: | ||
[[Image:Stencil_setting_stencil.jpg]] | [[Image:Stencil_setting_stencil.jpg]] | ||
| − | Three important things here: | + | |
| + | '''Three important things here:''' | ||
1. Deselect the "col" button | 1. Deselect the "col" button | ||
| − | 2. Select the "Stencil" button (you must have seen this coming ;) ) | + | 2. Select the "Stencil" button (you must have seen this one coming ;) ) |
3. Select the "No RGB" button | 3. Select the "No RGB" button | ||
| − | If you are using one of Blenders | + | |
| + | If you are using one of Blenders texture blend types as a stencil then the No RGB button can be left alone. More on this method later. In my case, where I'm using an image instead, this setting is crucial. | ||
| + | |||
Hopefully we are lucky and the material preview window confirms all settings are correct. And yes! I'm a happy camper today :D | Hopefully we are lucky and the material preview window confirms all settings are correct. And yes! I'm a happy camper today :D | ||
| Line 48: | Line 66: | ||
[[Image:Stencil_tex_prev.jpg]] | [[Image:Stencil_tex_prev.jpg]] | ||
| + | == Using Blenders texture blend types == | ||
| + | As I mentioned above I used a small gradient image. Blender is actually capable of creating this image for you and several others too. For all textures mentioned I used the "image" option to load them into my materials. You have probably scanned the other options in the Texture Type dropdown. I know I would have :). One of them is called "Blend". And not for nothing ;) Selecting this option brings you several blend types to choose from. The images below show some of them, including a simple lineair blend, similar to what I used. | ||
| − | |||
| − | + | The PRP plugin can handle all of these blend types and will create the necessary 64x64 mipmaps to be used in Plasma. So, while I was stubborn enough to make my own alpha mask, I could have used this one instead. | |
| + | |||
| + | |||
| + | '''Linear blend''' (the Quad and Ease types are lineair too, but resp. emphasizing black or white) | ||
| + | |||
| + | [[Image:Stencil_alpha_blendline.jpg]] | ||
| + | |||
| + | '''Circular blend''' (the Halo type is also a circular blend but smaller) | ||
| + | |||
| + | [[Image:Stencil_alpha_blendcirc.jpg]] | ||
| + | |||
| + | '''Diagonal blend''' | ||
| + | |||
| + | [[Image:Stencil_alpha_blenddiag.jpg]] | ||
| + | |||
| + | |||
| + | Okay, let's not forget what we were doing before this intermezzo and head back to see if our stencil actually works in UrU. | ||
== Let's check how Plasma is doing == | == Let's check how Plasma is doing == | ||
| Line 68: | Line 103: | ||
[[Image:Stencil_tex_01b.jpg]] | [[Image:Stencil_tex_01b.jpg]] | ||
| − | There are many tutorials online showing how to use these kinda stencils to do some cool blending of large terrains. | + | There are many tutorials online showing how to use these kinda stencils to do some cool blending of large terrains. Maybe you are using black and white height maps to create terrains in Blender using displacement. In that case you could use the same maps to assign textures based on height giving it a natural look. You won't see this type of texture blending in Cyans ages though. |
== Another use of stencils == | == Another use of stencils == | ||
| Line 74: | Line 109: | ||
To make our age a little more DRC proof I've decided to put a wall at one end (let's not talk about the dangers on the other three sides). Just for cosmetics I changed the tiling of the grass a bit giving it it's own UV map. What I want to show you is a way to make the tiling of textures less obvious. | To make our age a little more DRC proof I've decided to put a wall at one end (let's not talk about the dangers on the other three sides). Just for cosmetics I changed the tiling of the grass a bit giving it it's own UV map. What I want to show you is a way to make the tiling of textures less obvious. | ||
| − | |||
| − | I will show this principle | + | We all know that we have to stay away from patterns that are obviously repetitive. But then again... details make textures so much more interesting. A way to add detail is to combine textures and give them another "rythm". Layering textures that are both 512 pixels wide using the same UV map will make the details appear at the same place each time, resulting in repetitiveness. But if one of the layered textures is stretched to for instance 140%, then the repetition will occure less. |
| + | |||
| + | |||
| + | I will show this principle using our newly erected wall. Again I use three layers. This time the stencil is a drippy kinda map, intended to mask a rust texture. The effect I'm after is to have some rusty patches at the top of the wall. Have a look at the textures I'm will use here. | ||
[[Image:Stencil_tex_02.jpg]] | [[Image:Stencil_tex_02.jpg]] | ||
| − | As I said in the beginning (but you probably already know this), it's possible now in Blender to use several UV maps within one material. This comes in handy especially when using stencils and even more if you want to combat repetitiveness. Just to make sure you know what I'm talking about I included | + | As I said in the beginning (but you probably already know this), it's possible now in Blender to use several UV maps within one material. This comes in handy especially when using stencils and even more if you want to combat repetitiveness. Just to make sure you know what I'm talking about I included the image below. If you have a look at the bottom right corner, you will notice three UV maps: Wall, Rust and AlphaRust. A new UV map within the same material will be created by clicking "New" to the right of "UV Texture". Use the buttons to the left of for instance "Wall" to respectively use (or change) the map itself and to show the texture in 3D view. |
[[Image:Stencil_setting_stencil2_uv.jpg]] | [[Image:Stencil_setting_stencil2_uv.jpg]] | ||
| Line 88: | Line 125: | ||
[[Image:Stencil_setting_stencil2_uv2.jpg]] | [[Image:Stencil_setting_stencil2_uv2.jpg]] | ||
| − | What I did is give the rust mask stencil layer a different UV map and stretch it a bit. By doing so I | + | What I did is give the rust mask stencil layer a different UV map and stretch it a bit. By doing so I created a different rythm for this particular pattern. |
| − | And here is the | + | |
| + | And here is the end result. Ok, I know, it can be done much better, but to show how this technique can be used effectively this should do. I did add a little vertex painting for "dramatic" effect ;) | ||
[[Image:Stencil_Plasma_03.jpg]] | [[Image:Stencil_Plasma_03.jpg]] | ||
| Line 96: | Line 134: | ||
[[Image:Stencil_Plasma_04.jpg]] | [[Image:Stencil_Plasma_04.jpg]] | ||
| − | I have not seen | + | |
| + | Now think about the possibilities if you manage to create a set of good stencils. Imagine taking the drippy mask I created and using it on the bottom of the wall. I could make it a bit more flat and stretch it even more horizontally. Instead of using my rust texture I could add a mossy one. All in the same material! Get the picture? What I'm trying to say is try to create your stencil masks in such a way that they can easily be reused for other effects!! | ||
| + | |||
| + | == To wrap up == | ||
| + | I have not seen traces of stencil use in Cyans ages. As far as I know they only use this technique to do straight forward lineair blends. I don't know why they don't make use of it more. Maybe they consider them to be to CPU intensive. In most cases I think they manage to design textures that are so incredible that in the end they get away with them without us being distracted by their repetiveness. Which maybe is a good lesson here too: stencils give a whole new range of posibilities, but always think about other, maybe more (CPU) efficient, options too. | ||
| + | |||
| + | |||
| + | Ok, that's it! I hope you are ready to use stencils in your own ages and manage to find some cool applications for them. Please let me know what you came up with. Maybe we can dedicate another tutorial on your ideas. | ||
| + | |||
| + | |||
| + | In the next installment I will show some simple uses of stencils in Cyans ages, which will give you an alternative to the use of vertex painting. | ||
| + | |||
| + | [[Category:PyPRP]] | ||
Latest revision as of 09:23, 4 March 2020
NOTE: The features in this tutorial need gow-pyprp version 1.1.0 or higher.
Welcome to the first installment of a series of Blender stencil tutorials. In this first tutorial we’ll do some basic, straightforward blending using a simple model and a gradient alpha map. At the end I will enhance the things we did to show you another use of stencils. In the second part I intend to show how Cyan uses stenciling to blend terrain. But let me explain the principles of stencils first.
Actually it’s pretty simple. What a blender stencil does is use a black-and-white or alpha image to decide which part of a texture to show and which to hide. By combining two textures seperated by a stencil you can have parts of both appear at will. Have a look at the stack of textures below for instance and the effect of the stencil image on the end result:
I bet you don’t need much imagination to see the implications of this being available to us in the plugin. Especially considering the fact that besides black and white greys can be used too.
Cyan uses stencils a lot to do simple blends between terrain textures. If you’ve ever studied Relto and the way blends are done there, then you know what I’m talking about. I must admit that I haven't found many other uses of stencils in Cyan's ages. Most of their textures are stunning in their own right.
Contents
[hide]Starting with a simple model
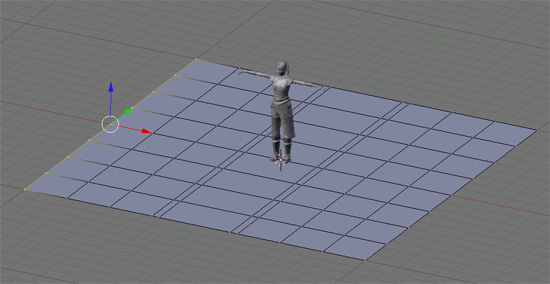
Okay, here is our model (I have a copy of Yeesha as an import file to check dimensions). The model already has its bounds set, and I already have a link in point in place. I also set the default background color in the .fni file to blue. I said it was a simple model didn’t I ;) ?
What I want to do is have a patch of grass on one side and stone on the other. I assume you know how to do UV mapping, so I will skip that part. Later on however I will show you how to use more UV maps on one model or for that matter in one material. For our little exercise I use one UV map for all layers we'll be using. The default UV map is called UVTex. Since our little patch of terrain is flat I simply choose Project from view to unwrap.
I will be using these textures:
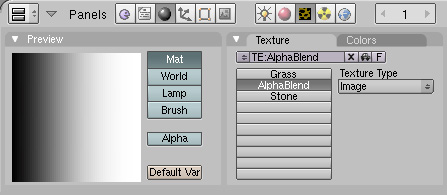
Notice that I use a very small alpha blend image. Since there isn't much detail in it, there is no point in making it bigger. Actually this is the actual size, while I downsized the other textures for this tutorial (they are 512x512 pixels). After adding it to the material it looks like this:
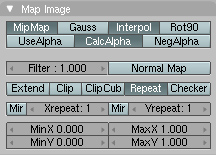
While you are still in the Texture buttons window press the CalcAlpha button for the alpha blend image. PyPRP 1.3.0 and upwards will only use alpha blending if CalcAlpha is enabled.
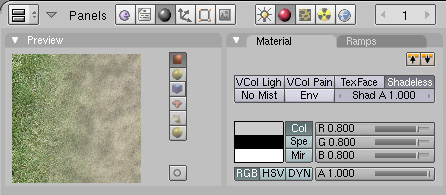
Now have a look at the settings for each texture layer. There is nothing new to the settings of the actual textures (grass and stone). You can use the settings you are used to here. The real magic is performed by the middle layer, the AlphaBlend layer.
So here are the settings in Blender. First the grass texture. I won't show the stone texture here, since the settings are the same. Please notice that I use the same UV map for all three layers "UVTex". Later on you will see that it is possible to use different maps. I'm using the same one here for lazy convenience.
Settings for the stencil layer:
Three important things here:
1. Deselect the "col" button
2. Select the "Stencil" button (you must have seen this one coming ;) )
3. Select the "No RGB" button
If you are using one of Blenders texture blend types as a stencil then the No RGB button can be left alone. More on this method later. In my case, where I'm using an image instead, this setting is crucial.
Hopefully we are lucky and the material preview window confirms all settings are correct. And yes! I'm a happy camper today :D
Using Blenders texture blend types
As I mentioned above I used a small gradient image. Blender is actually capable of creating this image for you and several others too. For all textures mentioned I used the "image" option to load them into my materials. You have probably scanned the other options in the Texture Type dropdown. I know I would have :). One of them is called "Blend". And not for nothing ;) Selecting this option brings you several blend types to choose from. The images below show some of them, including a simple lineair blend, similar to what I used.
The PRP plugin can handle all of these blend types and will create the necessary 64x64 mipmaps to be used in Plasma. So, while I was stubborn enough to make my own alpha mask, I could have used this one instead.
Linear blend (the Quad and Ease types are lineair too, but resp. emphasizing black or white)
Circular blend (the Halo type is also a circular blend but smaller)
Diagonal blend
Okay, let's not forget what we were doing before this intermezzo and head back to see if our stencil actually works in UrU.
Let's check how Plasma is doing
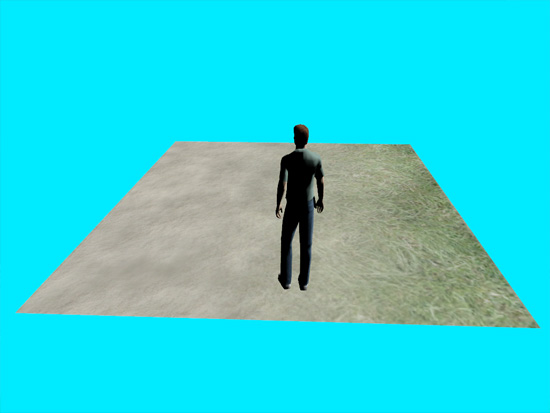
Export your age and pay it a little visit! Have a look at the picture below and you will see that we did all right. Since I didn't tile the alpha image or use it only on a smaller part of the model, the result looks a bit crude. But you get the picture.
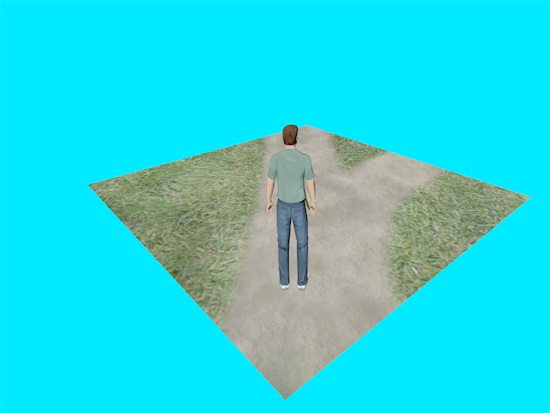
To show you one of the many uses of stenciling, look what happens if I change the basic linear blend stencil to something (only a little) more exciting:
The map I used looks like this:
There are many tutorials online showing how to use these kinda stencils to do some cool blending of large terrains. Maybe you are using black and white height maps to create terrains in Blender using displacement. In that case you could use the same maps to assign textures based on height giving it a natural look. You won't see this type of texture blending in Cyans ages though.
Another use of stencils
To make our age a little more DRC proof I've decided to put a wall at one end (let's not talk about the dangers on the other three sides). Just for cosmetics I changed the tiling of the grass a bit giving it it's own UV map. What I want to show you is a way to make the tiling of textures less obvious.
We all know that we have to stay away from patterns that are obviously repetitive. But then again... details make textures so much more interesting. A way to add detail is to combine textures and give them another "rythm". Layering textures that are both 512 pixels wide using the same UV map will make the details appear at the same place each time, resulting in repetitiveness. But if one of the layered textures is stretched to for instance 140%, then the repetition will occure less.
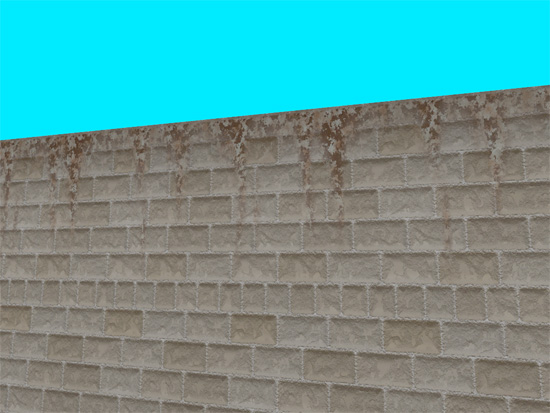
I will show this principle using our newly erected wall. Again I use three layers. This time the stencil is a drippy kinda map, intended to mask a rust texture. The effect I'm after is to have some rusty patches at the top of the wall. Have a look at the textures I'm will use here.
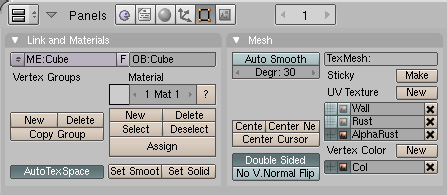
As I said in the beginning (but you probably already know this), it's possible now in Blender to use several UV maps within one material. This comes in handy especially when using stencils and even more if you want to combat repetitiveness. Just to make sure you know what I'm talking about I included the image below. If you have a look at the bottom right corner, you will notice three UV maps: Wall, Rust and AlphaRust. A new UV map within the same material will be created by clicking "New" to the right of "UV Texture". Use the buttons to the left of for instance "Wall" to respectively use (or change) the map itself and to show the texture in 3D view.
To actually use the maps you created, be sure to assign them to the different textures that make up this particular material:
What I did is give the rust mask stencil layer a different UV map and stretch it a bit. By doing so I created a different rythm for this particular pattern.
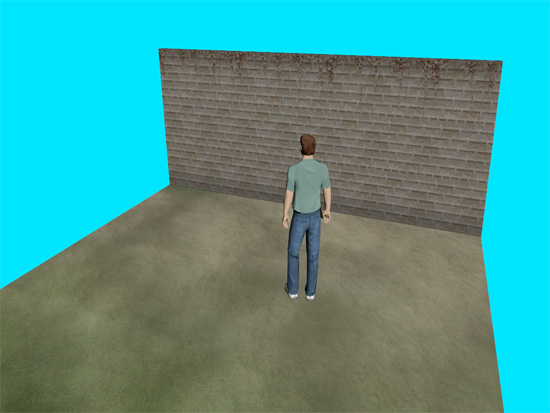
And here is the end result. Ok, I know, it can be done much better, but to show how this technique can be used effectively this should do. I did add a little vertex painting for "dramatic" effect ;)
Now think about the possibilities if you manage to create a set of good stencils. Imagine taking the drippy mask I created and using it on the bottom of the wall. I could make it a bit more flat and stretch it even more horizontally. Instead of using my rust texture I could add a mossy one. All in the same material! Get the picture? What I'm trying to say is try to create your stencil masks in such a way that they can easily be reused for other effects!!
To wrap up
I have not seen traces of stencil use in Cyans ages. As far as I know they only use this technique to do straight forward lineair blends. I don't know why they don't make use of it more. Maybe they consider them to be to CPU intensive. In most cases I think they manage to design textures that are so incredible that in the end they get away with them without us being distracted by their repetiveness. Which maybe is a good lesson here too: stencils give a whole new range of posibilities, but always think about other, maybe more (CPU) efficient, options too.
Ok, that's it! I hope you are ready to use stencils in your own ages and manage to find some cool applications for them. Please let me know what you came up with. Maybe we can dedicate another tutorial on your ideas.
In the next installment I will show some simple uses of stencils in Cyans ages, which will give you an alternative to the use of vertex painting.


