Difference between revisions of "Setting Your Age Up"
m |
(Repair broken links.) |
||
| (5 intermediate revisions by 3 users not shown) | |||
| Line 29: | Line 29: | ||
* '''age.sequenceprefix''' | * '''age.sequenceprefix''' | ||
*:Each Age for Uru has its own unique id number - the sequence prefix. There can't be two ages on an Uru installation sharing the same sequence prefix, otherwise Uru will just crash. | *:Each Age for Uru has its own unique id number - the sequence prefix. There can't be two ages on an Uru installation sharing the same sequence prefix, otherwise Uru will just crash. | ||
| − | *:For now, the default sequence prefix of 100 is ok for | + | *:For now, the default sequence prefix of 100 is ok for editing your Age in Blender. However, many people experience a crash in Uru if it is left at 100, upon exporting your Age, even for local testing. You MUST change this number before you export your Age for testing. To obtain your own unique personal Sequence Prefix numbers follow the instructions: '''[[TPOTS Sequence Prefixes]]'''. |
* '''age.pages''' | * '''age.pages''' | ||
*:The '''age.pages''' property is a list (indicated by the dash sign) of page descriptions. Each page description has at least two properties - '''index''' - the index number of the page, and '''name''' - the name of the page | *:The '''age.pages''' property is a list (indicated by the dash sign) of page descriptions. Each page description has at least two properties - '''index''' - the index number of the page, and '''name''' - the name of the page | ||
| Line 41: | Line 41: | ||
Since you get annoying fog settings by default, we should add a text file that has settings that don't give fog. | Since you get annoying fog settings by default, we should add a text file that has settings that don't give fog. | ||
| − | + | The "init" file was created when you added a new book. You can check on it by selecting "init" from the text editor dropdown. | |
| − | + | ||
The contents of that file will look like this: <br/> | The contents of that file will look like this: <br/> | ||
| Line 51: | Line 50: | ||
Before continuing, it is a good idea to add a third text file to your Blender file, that one will be empty, but will be the place where you can set advanced settings for your objects later on. | Before continuing, it is a good idea to add a third text file to your Blender file, that one will be empty, but will be the place where you can set advanced settings for your objects later on. | ||
| − | + | The "AlcScript" file was created when you added a new book. You can check on it by selecting "AlcScript" from the text editor dropdown. | |
| − | + | ||
== Continue == | == Continue == | ||
| − | We are done with setting up the Blender file, let's continue with [[Adding a | + | We are done with setting up the Blender file, let's continue with [[Adding a Bit of Surface]] |
Latest revision as of 12:18, 3 May 2012
For starters, we will begin with a new blank Blender session.
Contents
[hide]Preparing the Blender screen
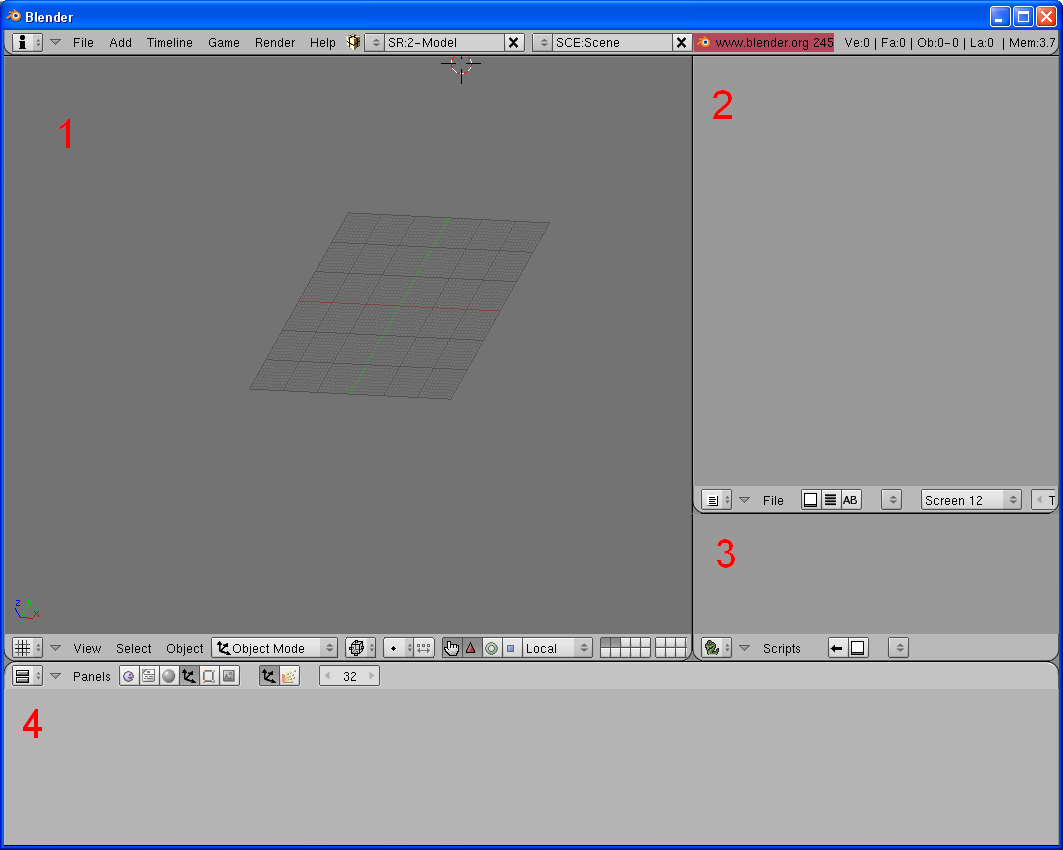
Prepare your Blender screen so it looks something like this:

Window 1 is a 3D View; Window 2 is a Text Editor; Window 3 is a Scripts Window; Window 4 is a Buttons Window.
Having these windows like this is not necessary, but it will make following this tutorial a bit easier.
Adding a book
Each Age needs certain information to describe the basics of how it operates. In PyPRP and Blender, this information is stored in a text file (a text file that is stored internally in Blender, to be precise).
To add a default version of such a text file, go to the Scripts Window, and press Scripts->Add->PyPRP. Now select "Add Book" from the popup menu. Congratulations, you just added a text file to Blender!
Now in the text window, press the button with the two arrows, and select "Book" from the popup menu that shows.

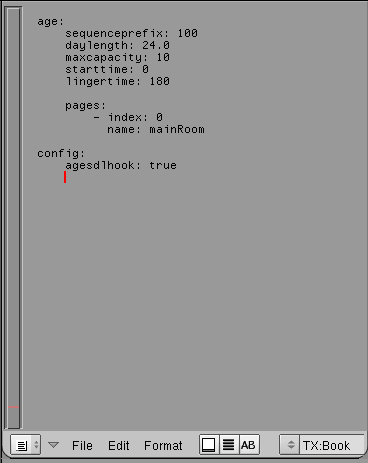
Your text window should now show this:

You can see that there are various properties to be set. Most of these properties are not interesting at this time, but two of them are important to know about:
- age.sequenceprefix
- Each Age for Uru has its own unique id number - the sequence prefix. There can't be two ages on an Uru installation sharing the same sequence prefix, otherwise Uru will just crash.
- For now, the default sequence prefix of 100 is ok for editing your Age in Blender. However, many people experience a crash in Uru if it is left at 100, upon exporting your Age, even for local testing. You MUST change this number before you export your Age for testing. To obtain your own unique personal Sequence Prefix numbers follow the instructions: TPOTS Sequence Prefixes.
- age.pages
- The age.pages property is a list (indicated by the dash sign) of page descriptions. Each page description has at least two properties - index - the index number of the page, and name - the name of the page
- Contents of Uru Ages are often separated into separate pages, with separate names.
- For now, one page called "mainRoom" will be sufficient.
Note: the Book file used the same structure as AlcScript
Adding default fog settings
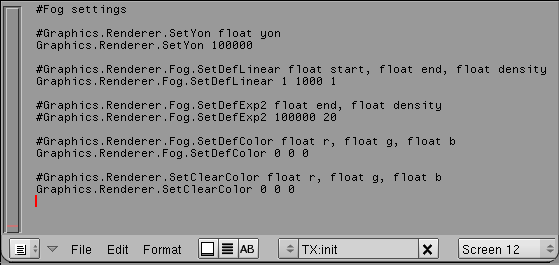
The fog settings for Uru are also set in a text file in Blender - this file corresponds directly to the files with extention ".fni" in Uru. Since you get annoying fog settings by default, we should add a text file that has settings that don't give fog.
The "init" file was created when you added a new book. You can check on it by selecting "init" from the text editor dropdown.
The contents of that file will look like this:

Adding a default AlcScript file
Before continuing, it is a good idea to add a third text file to your Blender file, that one will be empty, but will be the place where you can set advanced settings for your objects later on.
The "AlcScript" file was created when you added a new book. You can check on it by selecting "AlcScript" from the text editor dropdown.
Continue
We are done with setting up the Blender file, let's continue with Adding a Bit of Surface
